How to mock your entire backend server?

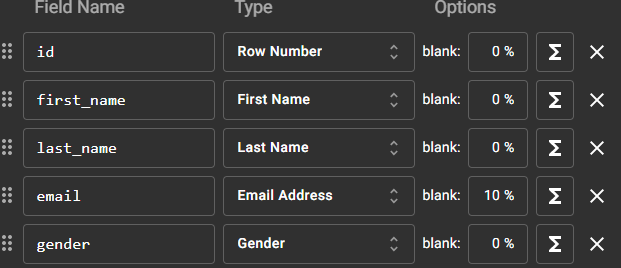
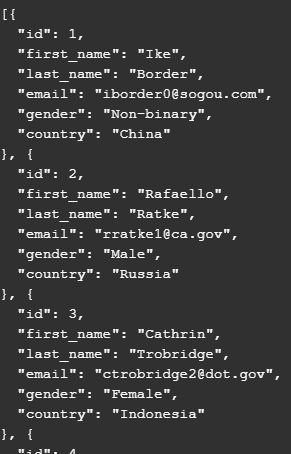
This is the last post in our series on mocking data for testing purposes. So far, we have seen how to generate mock data using Mockaroo and then how to incorporate such fake data in our Angular application.

Today, let’s push this one step further and use that same JSON data to mock our entire backend server, including CRUD (CReate Update Delete) operations, so you can also test data updates.

Enter JSON Server

JSON server is a small npm library that reads a JSON file and turns it automatically into a RESTful web server. Yes, you read that right: All we need as input is our JSON data in a file!

The format of that JSON is one single object where each property will be turned into a backend endpoint. So, for instance, say you need to support two types of data: users and teams.

Then your JSON database will look like this:

{
   "users": [ 
      // Array of all users data
   ],
   "teams": [ 
      // Array of all teams data
   ]
}Code language: JSON / JSON with Comments (json)

You would substitute those arrays with the mock data generated with Mockaroo, and then running JSON server would give you the following RESTful API:
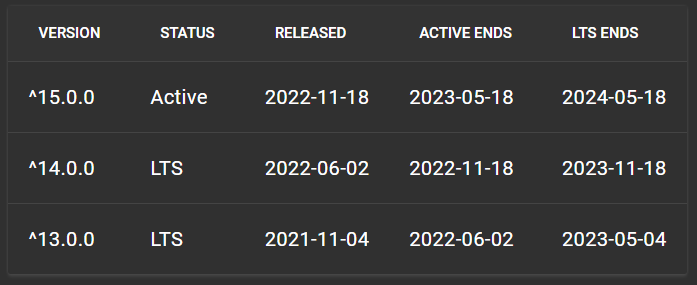
  • HTTP GET /users => Returns the list of all users
  • HTTP GET /users/21 => Returns the user with id = 21
  • HTTP POST /user => Creates a new user
  • HTTP DELETE /user/21 => Deletes the user with id = 21
  • HTTP PUT /user/21 => Updates the user with id = 21

JSON server also supports pagination, full-text search, and custom routes if you want to add more endpoints to your test backend. Any changes you make to your data persist in your JSON file, too. This means you have a single file database for testing purposes, which is excellent!

If you want to try it, here is a complete tutorial on how to use JSON server with Angular apps. The getting started section of the npm package is also very well documented.

How to use mock data in your Angular application?

Our last newsletter covered how to generate mock data for our Angular applications with Mockaroo.

Today, we’ll cover how to use that data in our apps so it can:

  • Act as a temporary backend implementation so you can build your Angular components before the backend API is ready.
  • Use that data as mocks for your unit tests.

Using hard-coded data in our Angular apps

Let’s say we need to display a list of users in a component, but the backend doesn’t have that data ready yet, or we want to try it with fake data. We head to Mockaroo, generate a JSON file with 100 users, and then copy-paste that JSON string and assign it to a constant in our code (example here – all links in the rest of this post go to the source code of the mentioned file as well):

Then we want to access that data using a service. We already have a UserService that’s using our backend, but we want to replace that call with our fake data:

So we generate a new FakeUserService that has the same shape as UserService, but is returning a custom Observable of our mock data instead of making an HTTP request:

Finally, we change the dependency injection configuration in our AppModule so that the application uses FakeUserService instead of UserService:

And now, our AppComponent believes it’s using a real UserService, but is actually getting a FakeUserService from the Angular injector:

What’s nice and clean about that approach is that you don’t have to change any of your components. The only line of code to change to enable/disable your mock data is the providers config in AppModule. That’s it! You can access the entire code for this example on Stackblitz.

Using that same hard-coded data in our unit tests

Once you follow the above approach, using that data in your unit tests will be very similar. We can reuse that same FakeUserService by configuring the Angular TestBed in our unit tests as follows:

How to generate mock data for my application?

Testing Angular applications can be difficult because our front-end code depends almost entirely on back-end data, and setting up different database scenarios takes a lot of time and effort. Sometimes, we don’t even have enough data to test in the first place.

This is why I want to introduce Mockaroo. Mockaroo is a website where you can generate as much data as you want for testing purposes. So, for example, if you need 1,000 fake users with random email addresses, countries, and phone numbers, Mockaroo can generate all that. And you can even decide which percentage of data is left blank for each attribute.

In the example below, I decided that 10% of the email addresses would be blank:

Here is a quick JSON example I generated in a few seconds:

Mockaroo is powerful because it supports lots of different data types, such as:

  • Phone numbers, age, credit card numbers, payment card types, bitcoin addresses…
  • Street names, city names, countries, latitudes, longitudes, airport codes…
  • Names, colors, job titles, genders, SSNs, EINs, university names…

And if you need a data type that Mockaroo doesn’t have, you can provide a regular expression that Mockaroo will use to create data that matches that regexp for you. Yes, it’s that good!

You can generate data in several formats (JSON, CSV, SQL, Firebase, and more) and then either use it as mocks in your Angular application (hardcoded object) or store the data in a test database that you would use for integration testing.

Using Mockaroo is free for exports of up to 1,000 rows. Still, there’s no limit on how many exports you run daily, so you could export more random data over and over again if you need more than 1,000 items, or you can use a paid plan to increase or remove all limits.

RxJs withLatestFrom operator

Our weekly RxJs operator is withLatestFrom, a rare example of an operator with a name that says it all.

Here’s the marble diagram for withLatestFrom:

This operator takes two or more Observables and turns them into one single Observable that emits a new value whenever the source Observable emits something new.

The important thing to note here is that only one Observable triggers updates in the output Observable. As a result, withLatestFrom is a great option when you want a user action to trigger an update in the user interface (think about data table filters, inter-connected dropdowns, etc.)

You can see a live code example here (including comments that explain the thought process) with two dropdowns that depend on one another. A selection in the first dropdown impacts the values displayed in the second one (selecting a continent filters out the countries shown in the second dropdown:

If you want a deeper dive, I have this complete tutorial on using withLatestFrom alongside other operators to implement dynamic filtering in a component.

And for even more RxJs content, my 2-hour RxJS workshop from ng-conf 2022 is now available on Youtube for free!

How to update my version of Angular?

Yesterday, we mentioned why it’s essential to keep your version of Angular as up-to-date as possible.

Today, we’re going to see how to do that. A concise answer would be to use the instructions at https://update.angular.io because that’s where all the information is. You can select your current version, the one you want to upgrade to, click a button, and you get a detailed TODO list as a result:

A typical upgrade consists in:

  1. Upgrading your current version of the Angular CLI: npm install -g @angular/cli@latest
  2. Upgrading your project code to the latest version: ng update @angular/core@latest @angular/cli@latest

The ng update command will update Angular and its dependencies and even change your code if the new version of the framework has some breaking changes (meaning that some functions or classes have been renamed or replaced with something else). Yes, it’s all automatic!

There are some scenarios where the upgrade can be more difficult:

  1. For example, if you have dependencies that are not maintained anymore or that get upgraded weeks/months later – something I’ll address in a later edition of this newsletter.
  2. If a Node.js upgrade is needed by Angular, which means upgrading your dev environment and continuous integration servers.

Again, the key is to stay as up-to-date as possible to make your upgrades a 5 to 10-minute task every six months rather than a 2-week deep dive every few years.

Angular Release Schedule

Angular is constantly evolving. A quick look at the release notes of the framework shows that new releases are happening every week. For example, yesterday, we mentioned the latest updates of Angular 15.1.

Let’s talk about how often Angular is released. The main release cadence is the following:

  • Major version every six months (Angular 16 is released six months after Angular 15)
  • Minor versions every month if needed, usually 1 to 3 between each major version (Angular 15.2 is released a month after 15.1)
  • Patch versions every week if needed (Angular 15.1.1 is released the week after 15.1.0)

This is important because you can plan your upgrades based on that cadence. For instance, some of my consulting clients plan the major releases of their applications twice a year, one month after they get a new version of Angular.

It’s also important to know that major versions are supported for 18 months. This is for critical fixes and security patches only. New features and improvements are added to a major version during its six months lifespan.

As of today, here are the actively supported versions:

If you’re using any version older than 13, you’re out of the support window and potentially exposed to bugs, vulnerabilities, and other issues. As a result, it’s always recommended to use the latest major version as much as possible or as a plan B to stay one or two major versions behind, but not more.

You can read the entire rationale behind that approach as well as more information about Angular’s release schedule here: https://angular.io/guide/releases

How to learn more about RxJs operators?

In the past weeks, we covered a few different RxJs operators in this newsletter. RxJs is the most difficult thing to learn about Angular, and that’s because the technology is a mix of concepts that are not always obvious on their own: asynchronous data and callbacks, functional programming, streams, etc.

My favorite resource to learn more about RxJs is to use a website called rxmarbles.com. Why? Because that website features interactive diagrams of RxJs operators.

Let’s take an example with mergeMap. Here’s the official definition of mergeMap:

Projects each source value to an Observable which is merged in the output Observable.

Rxjs.dev documentation

And here’s an interactive diagram from RxJs marbles for mergeMap – I just recorded my screen while interacting with the diagram by dragging data around:

They say a picture is worth a thousand words. An interactive picture is even better, and that’s exactly what rxmarbles.com is. No text, just interactive diagrams.

Note: Not all operators are documented on that website, just some of the most useful ones. At times, the operator’s signature or name is slightly different depending on the version of RxJs you’re using. Still, overall, RxJS Marbles remains one of the very best tools for understanding operators.

RxJs tap operator

The tap operator is one of the simplest RxJs operators because it doesn’t change anything to the data coming into your observable:

Why would we need a function that doesn’t do anything? We saw a first very important example that enabled us to use the async pipe earlier.

At least three important use cases are:

  • Debugging complex RxJs scenarios using console.log (as illustrated in the above marble diagram)
  • Registering side effects as the data changes (that’s what we did in our async pipe scenario)
  • Watching for completion of inner observables (when you’re combining several observables into one subscription)

In short, tap is a way to spy on what is happening inside an observable stream. Any time you want to extract some data/debug/take a look at what’s going through an Observable, tap is the easiest answer.

You can find examples for these three scenarios in my tutorial: 3 reasons to use the tap operator.

ngrxLet: A better version of the async pipe

Yesterday, we mentioned how the async pipe can be used with *ngIf or *ngFor in our templates to declare a local variable that allows us to have multiple expressions using the same data:

<div *ngIf="user$ | async as user">
   <p>First name: {{ user.firstName }}</p>
   <p>Last name: {{ user.lastName }}</p>
</div>Code language: HTML, XML (xml)

While the above code works perfectly well, it’s not always convenient to add an additional *ngIf or *ngFor in our templates. Another shortcoming of the async pipe is that it doesn’t let us know if the observable has an error or completes successfully.

This is where the ngrxLet directive can save the day, as it solves all of the above shortcomings with a straightforward syntax. Our previous example becomes:

<div *ngrxLet="user$ as user">
   <p>First name: {{ user.firstName }}</p>
   <p>Last name: {{ user.lastName }}</p>
</div>Code language: HTML, XML (xml)

And if we want to get any errors or the completion status of the observable, we can do so with more local variables exposed by ngrxLet:

<div *ngrxLet="user$ as user; error as e; complete as c">Code language: HTML, XML (xml)

You can find a complete working example here. ngrxLet can be installed as a dependency using npm (npm install @ngrx/component), and it’s important to note that it is not the entire ngrx state management library, just a tiny subset of it, so using that directive does not require using anything else from ngrx.

Here is a link to a slightly expanded version of that tutorial with more information if you want to dig deeper into it: ngrxLet – A better version of the async pipe.

Async pipe syntax tricks

Yesterday, we wrote about how to use the async pipe to automatically subscribe and unsubscribe from our observables.

When I teach that topic, people usually have at least one of these two objections:

What if I also need the data from that subscription in my Typescript code?

At first, using the async pipe seems only to give you access to the data in your HTML templates. That isn’t the case, though, because you can still use the tap operator to “spy” on your observable and get the data from there. For instance (complete example here):

this.name$ = nameService.getName().pipe(
    tap(name => this.name = name)
);Code language: TypeScript (typescript)

And then in the HTML template:

<p>Name from async pipe: {{ name$ | async }}</p>Code language: HTML, XML (xml)

What if I need to read multiple properties from the object in that subscription?

Another way to put it is that you don’t want to end up doing something like this:

<p>First name: {{ (user$ | async)?.firstName }}</p>
<p>Last name: {{ (user$ | async)?.lastName }}</p>Code language: HTML, XML (xml)

The above code is pretty hard to read and requires one subscription for each property. This alone can be a disaster, as each subscription might trigger an HTTP request for the same data from the server!

Instead, you can do something like this, which uses only one subscription, stores the result in a local variable, then renders the data when it’s available. This technique works with any structural directive, such as *ngIf or *ngFor:

<div *ngIf="user$ | async as user">
   <p>First name: {{ user.firstName }}</p>
   <p>Last name: {{ user.lastName }}</p>
</div>Code language: HTML, XML (xml)

If changing the DOM structure by adding an element to accommodate that subscription bothers you, then you can use ng-template instead, though the syntax here can be a little bit unsettling, too:

<ng-template [ngIf]="user$ | async" let-user>
   <p>First name: {{ user.firstName }}</p>
   <p>Last name: {{ user.lastName }}</p>
</ng-template>Code language: HTML, XML (xml)

Ok, that’s probably plenty enough for today. Tomorrow, we’ll see how we can do even better than this.