Async pipe, Signals, and Change Detection

Yesterday, we covered what markForCheck() can do in terms of change detection and why it could be needed at times.

Regarding best practices, I often mention using the async pipe or Signals to improve change detection and performance in our apps. Why is that? That’s because both the async pipe and Signals have some extra code to help Angular detect changes.

Here’s what we can find in the source code of the async pipe:

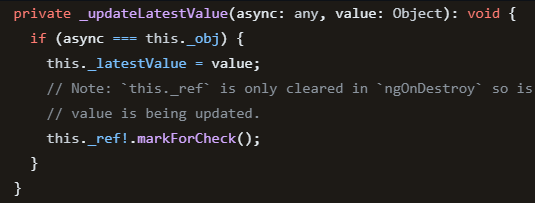
The last line of code indicates that whenever an async pipe receives a new value, it marks the corresponding view for check, triggering the need for change detection. That’s the reason why the async pipe works well even when used in an OnPush component: Its internals override the behavior of whatever change detection strategy we use.

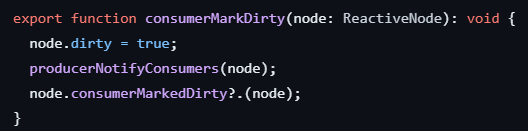
Signals do something similar by marking their consumers (or “subscribers,” in a sense) as dirty when the Signal value changes:

As a result, and back to the point I was making yesterday, Instead of trying to use markForCheck() directly in our code, we should rely on the tools designed to do it automatically and in an optimized fashion for us.

Conclusion: Always use the async pipe with RxJs (you can always do so) or use Signals for an even better experience.

ChangeDetectorRef.markForCheck()

The following method call is either something you’re either very familiar with or something you’ve never heard about: ChangeDetectorRef.markForCheck()

If you’ve never heard about it, congratulations! It means you’ve been using Angular in a way that doesn’t require you to mess with change detection, and that’s an excellent thing.

On the other end of the spectrum, if you see that method in many places in your code, your architecture might have a problem. Why is that? As we covered before, there are two types of change detection: Default and onPush.

When we use onPush, we’re telling Angular: “This is a component that relies on @Input values to display its data, so don’t bother re-rendering that component when @Input do not change”.

The thing is, sometimes people start using onPush full of good intentions. Then, they start injecting services into their component, and when the data in those services change, the component does not re-render… So, instead of disabling ChangeDetection.OnPush (or figuring out a better way to keep their component as a presentation component), they go to StackOverflow, where people say: Just use ChangeDetectorRef.markForCheck(), and problem solved! Here’s a typical screenshot of such a response:

That’s because ChangeDetectorRef.markForCheck() does exactly that: It’s a way to tell Angular that something changed in our component, so Angular must check and re-render that component as soon as possible. As you can guess, this is meant to be an exception and not the rule.

The main reason why we would use ChangeDetectorRef.markForCheck() is if we integrate a non-Angular friendly 3rd party library that interacts with the DOM and changes values that Angular cannot see because Angular doesn’t manage that DOM. In other scenarios, we should avoid using it and think about a better architecture.

Perf and template syntax – Example 3

Yesterday, we looked at the pros and cons of our second code example.

Today, let’s cover the pros and cons of our third and final example:

Example #3 – Signal

<div *ngFor="let data of dataSignal()">{{data.name}}</div>

This last example is very interesting for a few reasons. First, if you follow Angular best practices, you might be screaming that we’re calling a method in a template, and you would discard that code immediately.

But the thing is, this is a Signal, and Signals are different. It’s perfectly fine to call a Signal in a template, and as a matter of fact, this is the way to do it so Angular knows where Signals are read and can then optimize DOM updates based on that information.

Even better, when we use a signal with ngFor, the subscriber to that signal is actually a view (an instance of ng-template) and not the entire component. When Signal-based components become part of the framework, Angular will be able to re-render just that view instead of the entire HTML template of that component.

What are the cons, then?

The only downside of Signals is that they require Angular v16+, so you’ll need to upgrade your apps to use them. The other downside is that the full benefits of improved change detection are not there yet and won’t land in v17 either, but the Angular team is making steady progress, and some early parts of Signal-based components were released in version 16.2.

Other than that, Signals are the way to go. if you’re just getting started with Angular and building a new app, I believe you should use Signals as much as possible.

Perf and template syntax – Example 2

Yesterday, we looked at the pros and cons of our first code example.

Today, let’s cover the pros and cons of our second example:

Example #2 – Observable

<div *ngFor="let data of getData() | async">{{data.name}}</div>

This code is calling a method in a template, too, and that’s a lot worse than in example #1. Here’s why: If the getData() method returns an Observable by calling httpClient.get() (or a service that makes that same call) then the async pipe subscribes to it and receives the data, which triggers change detection, so Angular calls getData() again, gets a new Observable, the async pipe subscribes to it, and there you have an infinite loop of HTTP requests that will bring down your browser for sure, and possibly your server.

How to fix it?

<div *ngFor="let data of data$ | async">

Store the Observable in a variable instead of calling a method, and the problem is solved. You can assign that Observable in the constructor of your component as follows:

constructor(service: DataService) {  
   this.data$ = servie.getData();
}Code language: JavaScript (javascript)

At this point the code is pretty much optimal because:

The only con is the async pipe syntax and working with Observables, which is often considered the most complex part of the Angular learning curve.

Perf and template syntax – Example 1

Yesterday, I sent you 3 different examples of Angular binding syntaxes and asked you to take a look at them and identify the pros and cons of each one.

Today, let’s cover the pros and cons of our first example:

Example #1 – Array of data

<div *ngFor="let data of getData()">

The only pro of this example is the simplicity of the syntax. Other than that, the syntax uses one of the anti-patterns covered earlier in this newsletter: Calling a method in a template. The problem is that this method will be called a lot more than you’d think, and if that code happened to create a new array every single time, it could be really bad in terms of performance, as Angular would have to re-render the entire list pretty much every time the user does anything in the application.

What can we do to improve it?

  1. Use a variable instead of a method – this fixes the performance issue right away:

    <div *ngFor="let data of dataList">
  2. Use a trackBy function to avoid useless re-renders. By telling Angular what’s the unique ID of each list item, Angular would be less confused, but it’s a sub-par solution:

    <div *ngFor="let data of getData(); trackBy: trackById">

Conclusion

If you want to iterate over data that’s in your component (not an observable or a Signal), then use a variable instead of calling a method. Easy enough.

Performance and template syntax

Today, I’d like to challenge you with a small exercise. Take a minute to examine the three following code examples and decide which option performs best. Note how similar those three options are from a syntax standpoint, yet they yield very different results performance-wise:

Example #1 – Array of data

<div *ngFor="let data of getData()">{{data.name}}</div>

Example #2 – Observable

<div *ngFor="let data of getData() | async">{{data.name}}</div>

Example #3 – Signal

<div *ngFor="let data of dataSignal()">{{data.name}}</div>

Feel free to list the pros and cons of each approach. You can even respond to that email with your answers if you want. Tomorrow, I’ll give you my insights.

Everything you need to know about Arrow Functions

Arrow functions have become the standard syntax in modern JavaScript. They offer a concise way to write functions, making your code lighter and more readable. Let’s explore arrow functions and their various syntax options with code examples.

Basic syntax

Two things to note:

  • Parentheses are required when using multiple function parameters.
  • In a one-liner arrow function, the result of the expression is automatically returned.

Zero or One Parameter

If your function has only one parameter, parentheses become optional. If there’s no parameter, then you do need the parentheses:

Multiple instructions

If your function has multiple lines of code, then you need curly braces and a return statement:

Why use arrow functions?

Aside from the syntax improvements described above, arrow functions are helpful in classes because they preserve the context of this. By default, in JavaScript, this means “the current function,” not “the current class instance.” Arrow functions fix that scope for us:

Angular Change Detection Illustrated

I see a lot of confusion around Angular change detection. I compared the OnPush and Default strategies in a past post, but let’s illustrate them with visuals.

Default Change Detection

An event happening anywhere in the DOM tree will have Angular check the entire tree for changes:

OnPush Change Detection

If a hierarchy of components is using OnPush, then only that branch on OnPush components will be checked for changes:

Signal Change Detection

This is the future of Angular. When using Signals, only the views of components that use that Signal will get updated, making it the best and most accurate option:

Creating a library with Angular

You’re probably used to creating Angular applications, but what about Angular libraries?

First, it’s essential to define what an Angular library is. A library is a collection of components/pipes/directives or services bundled together that can be shared and used in multiple code repositories. As a result, Angular libraries are designed to be published on npm (publicly or privately) so they can be shared with other people externally or internally.

If you want to start a new library from scratch, these Angular CLI commands will get it done:

The above commands create a projects/my-lib folder in the workspace, with a sample component and service in it. The main difference between a library and an application is that a library exposes public features that can be imported into other libraries or applications.

Such features are listed and exported in public-api.ts in the library folder. That’s where you decide what’s public/private in your library code. In this example, the library is just one service:

Then, to test or build your library, you can use regular Angular CLI commands such as:

Once built, a library can be published to the public npm repository with one single command. This command has to be run from the dist folder where the compiled library can be found after running your production build:

Note that this command requires an npm account and npm authentication before you can publish. Upon publishing, the version number used in your package.json will be used as the public version number on npm:

And on npm’s website:

At that point, anyone can run npm install [your-library-name] and use your code in their projects. Nice and easy!

Note that the library I used in that example is a work in progress and should not be used as-is in your apps.

Angular 17 is coming soon…

Angular 17 tentative release date is set for November 8, 2023. Be ready for a few good surprises along the way, but for now, I can share that the new control flow features will be available with that version.

There was a control flow RFC a few months back. The Angular team received valuable feedback from it and decided to go with the following syntax:

The above syntax can be used instead of ngIf and its awkward else syntax. Also visible in the above example is @defer, a way to lazy-load a component based on different criteria.

Of course, we’ll cover all this in the newsletter in November once all these features are officially released. In the meantime, mark your calendar: November 8 is the date.