When working with strings in Javascript, we have three options: Backticks, double quotes, and single quotes. Today, let’s look at when to use each of these and the pros and cons of each approach.
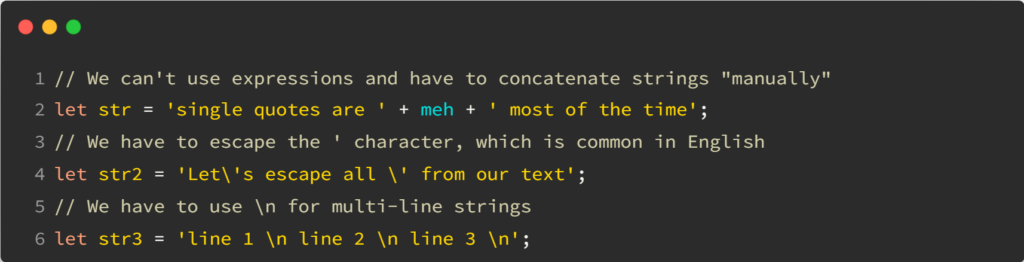
Single-quotes
Single quotes are the least exciting option because they have primarily cons:
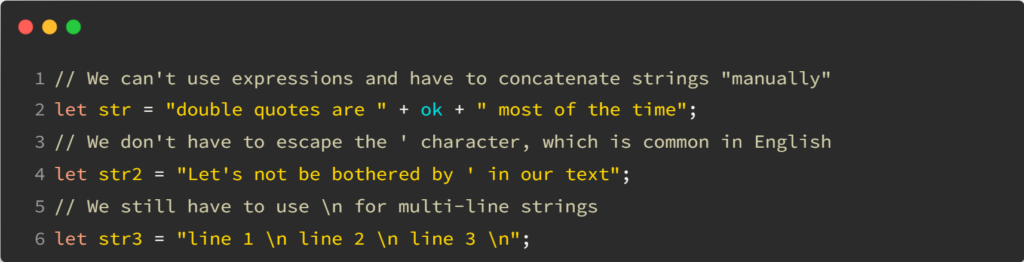
Double-quotes
Double quotes get the job done most of the time but don’t shine when building template strings with multiple lines:
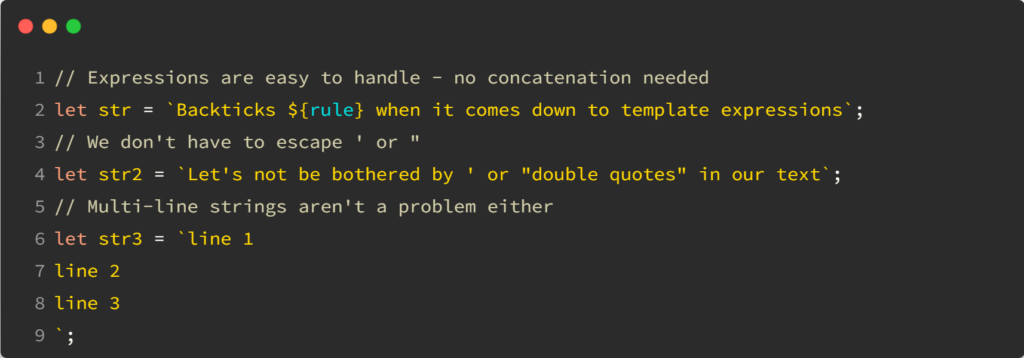
Backticks
Backticks are superior most of the time because they were designed to make template strings easy:
It’s been proven that there are no differences in performance when using backticks in modern Javascript. It’s also important to remember that with Angular, our TypeScript compiler will compile those backticks into double quotes if our compiler is set to any version of Javascript before ES6, so you don’t have to worry about browser compatibility either. All modern browsers support template literals with backticks.
Last week, we introduced eslint and how it can help improve our code by identifying places where we have dead code or don’t follow best practices. Sometimes, we “break” some of these rules on purpose or decide to adopt a different convention, which is perfectly fine.
In that case, instead of giving up on eslint entirely, a better idea is to change its configuration to tweak the severity of a rule or even disable it. An es lint rule has three different severity settings:
“off” or 0 – turns the rule off
“warn” or 1 – turns the rule on as a warning (doesn’t make the lint command fail)
“error” or 2 – turns the rule into an error (makes the lint command fail with exit code 1 – a good option to fail a continuous integration build)
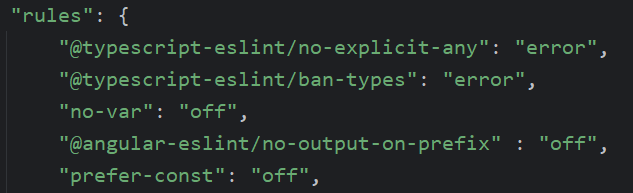
Such severity tweaks can be made in the .eslintrc.json file created in your project by the Angular schematics:
In the above example, I made the first two rules throw an error instead of a warning (I’m very much against disabling type-checking in TypeScript), but I’m OK with seeing some var keywords instead of let, so I turned off that third rule.
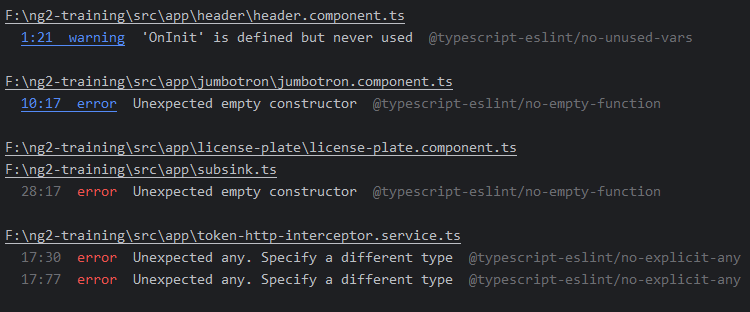
Getting the rule’s name is easy: When the linter fails, that name will be displayed in the console. Here @typescript-eslint/no-empty-function :
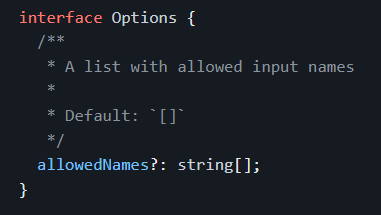
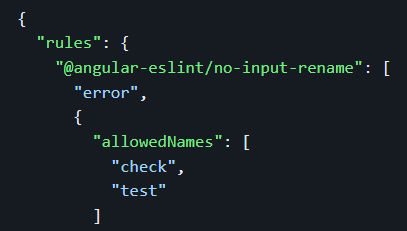
Some rules accept more configuration options to create an allowlist of accepted values. For instance, @angular-eslint/no-input-rename prevents you from renaming @Input values, but you can specify a config option that allows a few input names:
The config for that rule becomes an object that looks like this:
The above config allows renaming inputs only if the new name is check or test. This gives you more flexibility than turning off a rule entirely if it’s too restrictive for you.
eslint is a popular linter that parses your code and outputs a list of warnings and errors to help you improve. The library is designed to lint JavaScript code, and there are extra plugins for TypeScript and Angular so we can get even more specific feedback for our components and services. Here is an example of linting output:
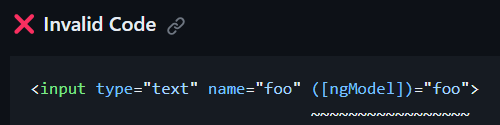
A linter is a perfect complement to a compiler. For instance, angular-eslint, the eslint plugin for Angular, will also look at your HTML templates and flag code that doesn’t follow the Angular style guide. It’s also looking for possible mistakes, such as getting the ngModel 2-way data-binding syntax wrong:
To give you a better idea, here is the list of all the template rules and all the Angular TypeScript rules. If you want to give eslint a try, the first step is to install it with the help of some schematics:
This will download the proper dependencies and plugins and set up everything necessary to lint your code. If you’re using an older version of Angular or building a library instead of an app, there are step-by-step instructions to follow here. Once the set-up is done, all you have to do is run:
This command will parse all your files and output feedback in the console. Note that several IDEs can detect your eslint config and suggest automatic fixes to linting errors, which is even better!
Note the different type narrowing options, such as: if (“property” in object), which can come in handy instead of creating extra types. Type guards are exciting as well, though rarely used in Angular applications:
In the past few weeks, we’ve covered different examples of directives, such as the CDK Listbox directive and the CDK Drag and Drop directive. I have mentioned that directives are underused in Angular applications these days, and one way to use more directives is to adopt the directive composition API.
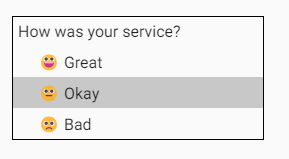
Let’s consider our previous example of a list of items:
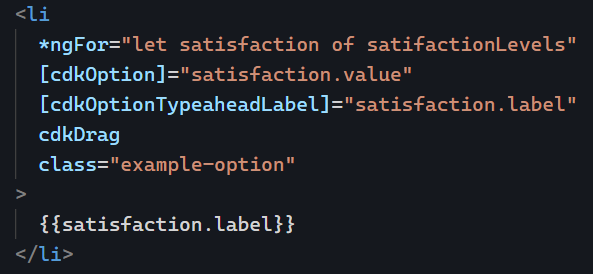
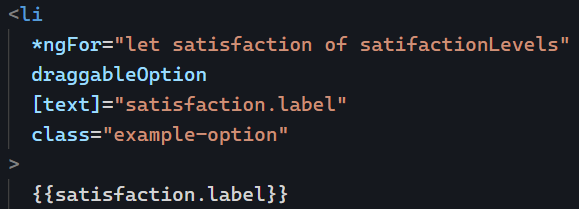
Let’s assume we want to make our list flexible enough to support re-ordering items using drag and drop. To do so, we could start using multiple different directives on the same element, such as cdkOption and cdkDrag (code example here on Stackblitz):
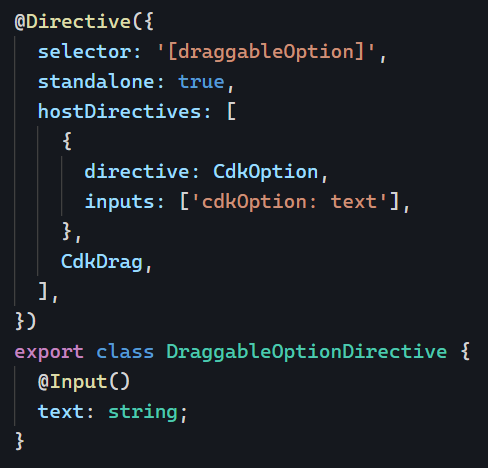
While the above code works, it’s designed for a one-time use case. If we know that our application will use several droplists that support drag-and-drop, we should start thinking about creating our own custom directive that refactors these different features in one place. Enter the directive composition API:
This new directive draggableOption is composed of both cdkOption and cdkDrag to achieve the desired result. We have one input text that is forwarded to the cdkOption input thanks to this syntax:
Note that both inputs and outputs can be forwarded that way (code examples here). The beauty of this approach is that our new directive has very little code while packing reusable features in a concise syntax. This is how we would use our new directive:
You can find that example live on Stackblitz here. There are a few caveats with the directive composition API, mainly that it only works with standalone directives and that the options to “forward” inputs and outputs are limited for now. However, the composition API is an excellent option to make our code more reusable and immune to copying and pasting collections of directives from one component to another.
This is the final post in our JavaScript series on destructuring. Let’s focus on the rest operator, which materializes with three little dots ... as follows:
One way to put it is that the rest operator means “everything else goes into a new array.”
This syntax also works with objects, with the “rest of the properties going into a new object”:
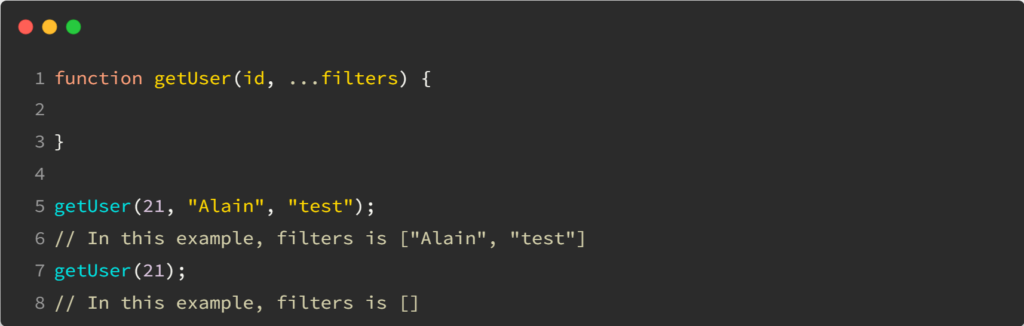
The rest operator can also be used in a function to catch several parameters in an array:
While the above code works, it is very lengthy and repetitive. It also increases your code base’s size, negatively impacting performance. Instead, we can use a modern JavaScript syntax introduced with ES6/ES2015 called object destructuring:
The above line of code does the same as the three previous lines. What if we want the local variable to have a different name than the original property? Say we want to name our new variable homeAddress instead of address. We can do it like this:
What if we want those variables to have a default value in case they are not defined in this.user? We can do that too:
Now you know everything you need about object destructuring.
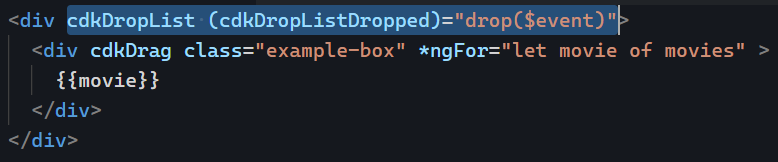
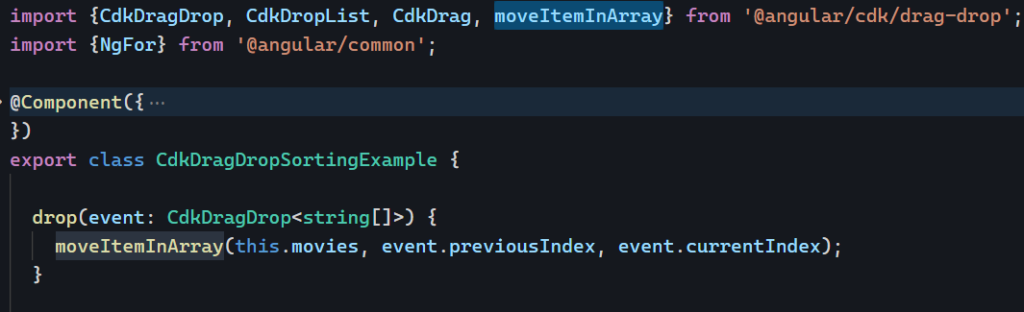
Drag and drop features can dramatically improve the UX of a web application. Implementing drag and drop with Javascript seems intimidating, which is why we have the Angular CDK (Component Development Kit).
Let’s say we have a list of items we want to be able to reorder using drag and drop:
Let’s get back to our series on state management with this post. So far, we covered that state management libraries give us a global State that gets updated using Actions and Reducers. I haven’t told you yet that typical Redux Reducer functions are meant to be synchronous. In other words, you’re not supposed to make an HTTP request or anything asynchronous in a reducer.
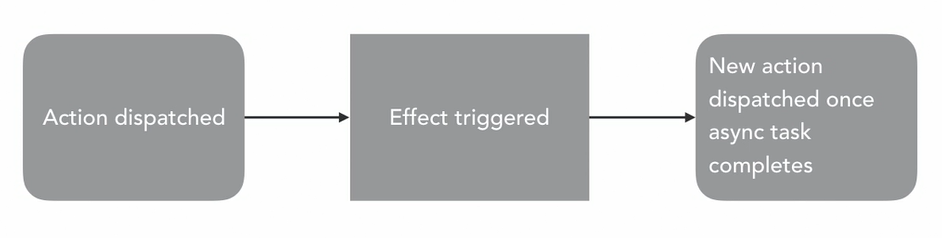
So, how do we implement asynchronous tasks? This is known as a side-effect (because it involves a third party such as a server) or just Effect.
When we use Effects, the idea is to have an Action that triggers the Effect, and once the Effect completes, another Action is triggered:
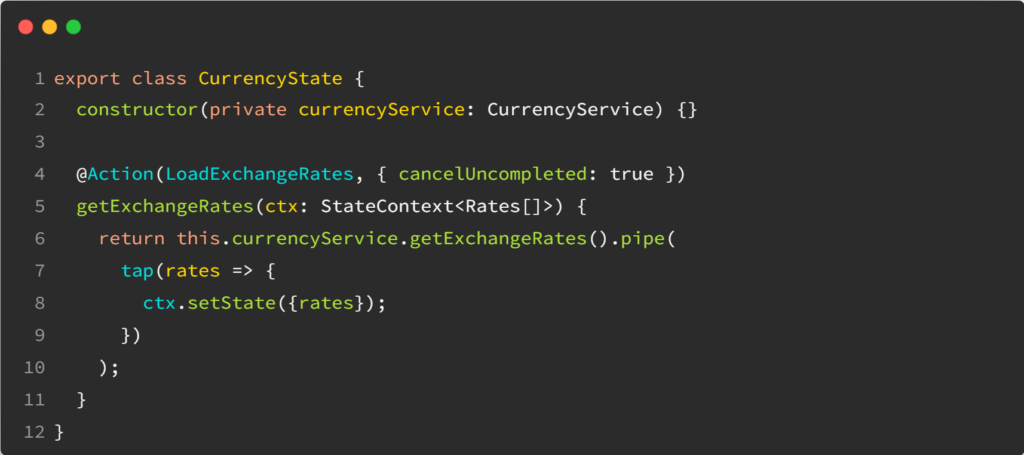
For instance, in our current switcher example, we could have an Action called LOAD_EXCHANGE_RATES. This Action would trigger an Effect to make an HTTP request and fetch exchange rates from an API. For instance, the original Action would also update the State to make it a “loading” state.
Then, once the HTTP request completes, the Effect would dispatch another action, EXCHANGE_RATES_LOADED and pass the data as its payload so it gets stored in the State.
Effects are implemented differently based on the state management library
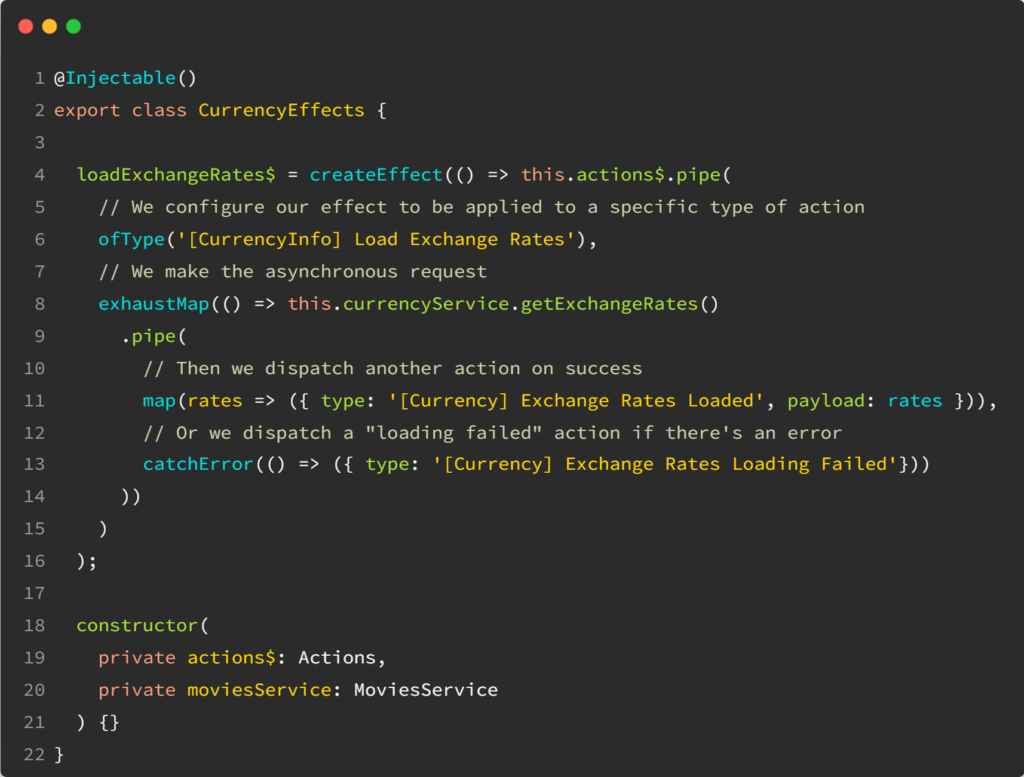
NgRx
NgRx effects rely heavily on RxJs and look like this:
As you can see, the Effect code is verbose, but every single step makes sense: We turn an action into an asynchronous request that dispatches other Actions upon success or failure.
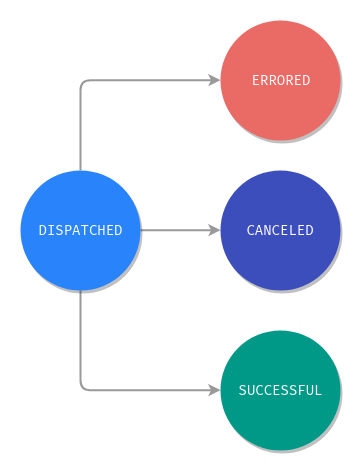
As a result, action handlers (reducers) can use asynchronous requests without needing any effects:
As you can see, even if the Redux concepts remain the same, every state management library has a different approach. I like NgXs because of its simplicity. The code is more to the point and less reliant on RxJs operators.