I decided to do something different for this newsletter: a video tutorial (about 12 minutes long) instead of a blog post. If you like that format, please let me know. I might use this once or twice per month from now on if you like it.
The goal of the video is to re-enable form CSS classes such as ng-valid, ng-touched, ng-pristine, etc., in Signal Forms since that feature is absent from the API at the moment.
It’s a great example of creating a custom directive, which isn’t something developers do every day, making it an even more interesting tutorial:
Angular 19 is now available with many different updates. A video recap (23 minutes long) of all these features is available on YouTube.
There is a lot to unpack, so this week, my focus is on all signal-related updates.
First, signal-based input, output, and view query functions are all stable APIs as of v19, which means you can use all of them safely. Here is the complete list of such stable features:
Second, to help you migrate your old @Input() and @ViewChild()to their signal-based equivalents, new Angular CLI migration commands are available:
ng generate @angular/core:signal-input-migration
ng generate @angular/core:signal-queries-migration
ng generate @angular/core:output-migration
Initial feedback from these automated migrations is very positive.
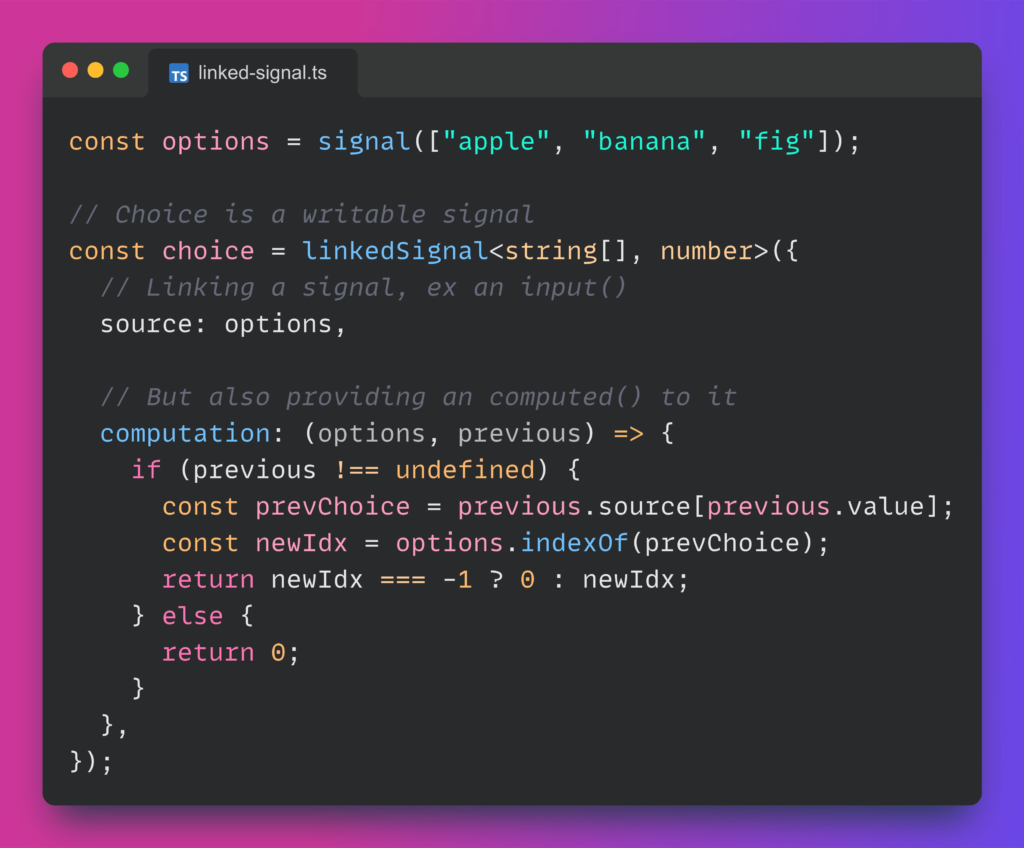
The third update, a new type of Signal (in developer preview) called linkedSignal. This new function also creates a computed signal that can be written manually. In other words, a computed signal is read-only, whereas a linkedSignal is writable while preserving automatic update and computation features of a computed signal.
The final and most significant update is the addition of a resource API to Angular. This is a big one for several reasons: It enables total signal-based reactivity while using Promises or RxJs to fetch updates.
The above code will send a request to /users with the proper sort parameter every time the sortOrder() signal value changes. The result is an object with lots of information about the resource:
The approach is similar to ngx-signalify or TanStack Query, and it looks promising. Now, resource is in an experimental state, which means “do not use it in production yet” (the API will likely change), but you can learn more about it here. Because there’s so much more to it, I’ll write a dedicated post and/or do a long-form video workshop on that topic.
And that’s it for the four main updates regarding Signals in v19. I could add a fifth one with the effect() function still in developer preview but now allows writing other signals by default (no more need to add the option to perform such writes).
For the second consecutive week, I want to experiment with a slightly different newsletter format inspired by James Clear’s 3-2-1 weekly newsletter. I aim to give you three short articles about Angular, two quick Angular ecosystem updates, and one question to make you think differently about the code you work with every day.
The Angular team is hosting a special event on YouTube today at 11 a.m. US/Pacific. If you miss the live event, a recording will be available shortly after.
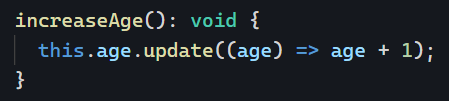
A new feature called linkedSignal is in the works. So far, it seems similar to a computed signal that is also writable and only depends on one source signal.
Let me know what you think about this different newsletter format. As always, it remains short and to the point. Also, if you have announcements you’d like to share in the newsletter, let me know.
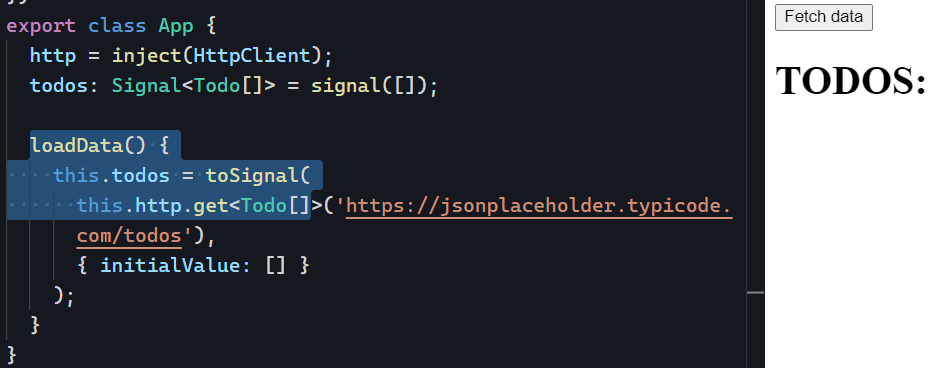
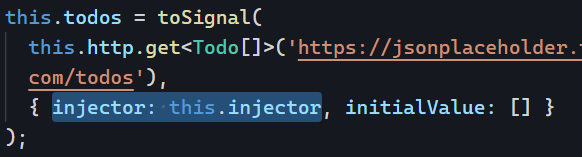
If you’ve ever tried to convert an Observable into a Signal using the toSignal() function, you might have encountered the following error NG0203: toSignal() can only be used within an injection context:
This happens when you create an Observable outside of an injection context, which can happen if you want to download data when the user clicks on a button, for instance:
Can we make this work? Absolutely! The key is to access our injector and store it in a variable so we can pass it as a parameter to toSignal(). How to do that?
Interestingly enough, we can access our injector by… injecting it into our component:
Then, we pass it as an option to the toSignal() function:
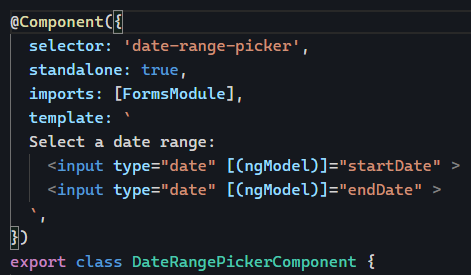
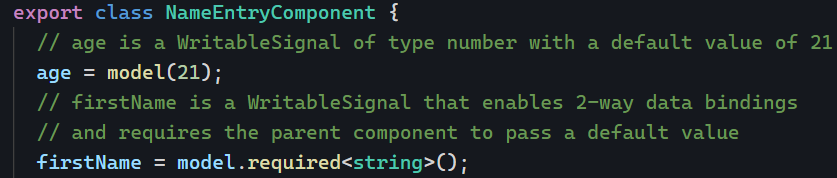
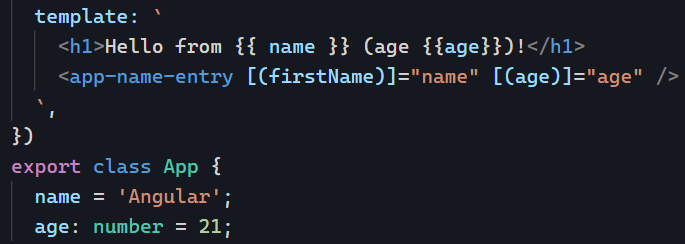
In today’s post, I want to showcase several Angular framework features in one example. More specifically, we’ll use standalone components, signals with model() and input(), as well as forms.
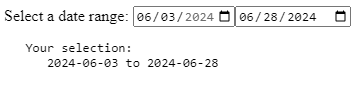
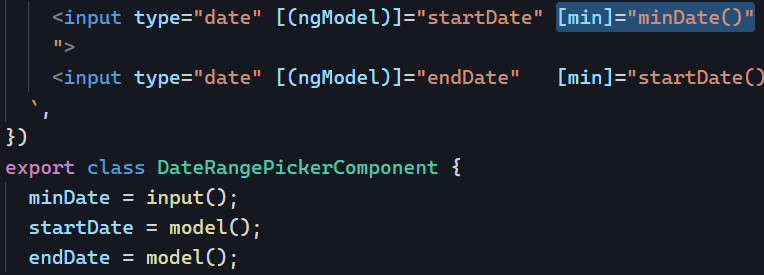
Our goal is to build a reusable date-range picker component to select two dates:
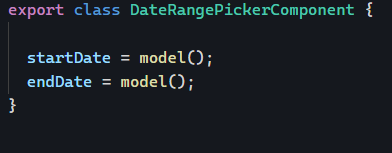
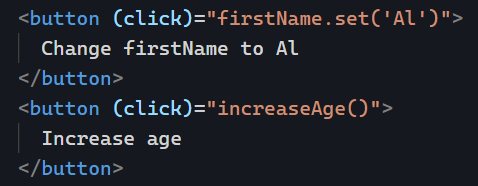
We use ngModel (which is from FormsModule) to capture the current value selected by the user and set a default value for those dates if needed. To do so, let’s use two signals created by the model() function from @angular/core:
Two important things to note:
These two variables are signals and work seamlessly with ngModel
These variables enable two-way data bindings with the parent component as follows:
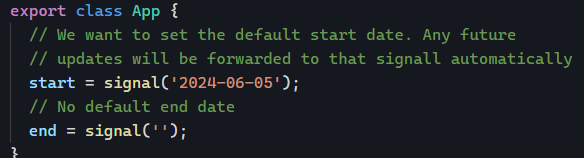
start and end are signals as well. We can use those signals to pass a default value to the child component or keep that value empty if we don’t want any:
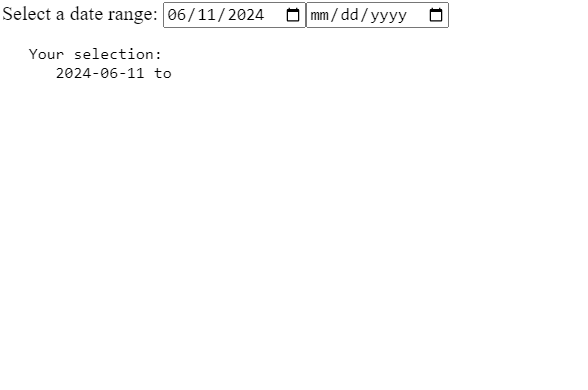
And that code is 100% functional as-is. No need for template-driven forms or reactive forms! Now, let’s add some features to our date-range picker component. Let’s say we want to enforce the rule that the start date cannot be after the end date and vice versa. The following bindings do the trick using the min and max HTML attributes:
Because this is all based on signals, it’s all reactive by default. Changing the start date or the end date automatically updates the range of what’s selectable in the other date input:
Adding more features is now as easy as adding more signals and bindings. For instance, I want to enforce a minimum start date. I added a new signal input called minDate and I bind it to the min attribute of our startDate:
And then, in the parent component, we can pass a minimum start date:
Please email me if you’d like me to add more features to that example in a future post. I’m always happy to cover what really matters to most people reading these posts.
I’m giving several talks at free conferences and events this week, so I thought I would share those with you in case you’re interested. As always, all of these are free for you to enjoy.
Two of those events already have a recording available on YouTube:
Then I’m speaking about Signals at Frontend Nation on Wednesday (25-minute intro to Signals at 11 am US/Pacific) and Friday (2-hour workshop on Architecting Angular apps with Signals). You can register here.
You’re probably familiar with ngOnDestroy for Angular components/pipes/directives, which cleans things up when an Angular object is destroyed. A typical use case is to unsubscribe from RxJs subscriptions (though there are better-suited tools for this now) or cancel a timer.
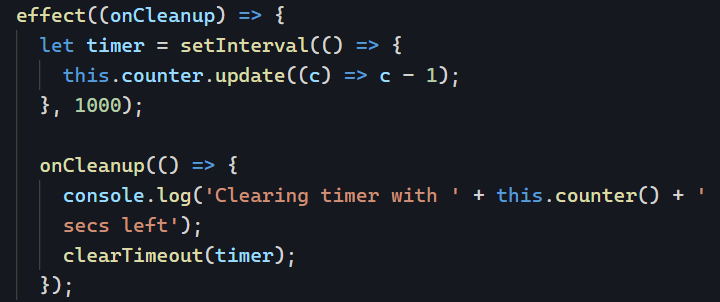
Angular Signals introduced the effect() function to run side-effects, including RxJs Observables or timers. As a result, we might want to cancel a timer or an RxJS-based task when the effect runs again in the future, and luckily for us, Angular supports a cleanup function for our effects.
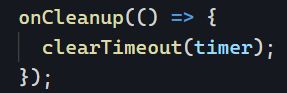
To enable the cleanup function, we pass it as a parameter to the callback registered in our effect:
Then we call it and pass our cleanup code as a param to it using an arrow function:
Angular Signals are growing almost every day with new features and new ways of building Angular applications. If you’re still unsure about signals and want to catch up, you can watch this Angular Signals workshop recording on Youtube or sign up for my continuously updated Angular Signals course.
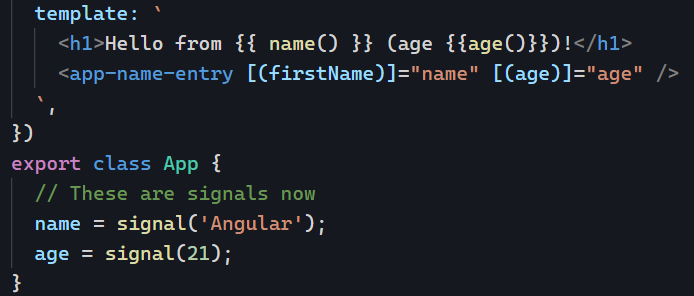
Today, let’s explore how Angular determines if the value of a signal has changed. If we create the following signal with a default value of “Hello”:
Then calling name.set("Hello") does not trigger any updates for any of the consumers of our name signal. That’s because Angular compares the “new” value with the previous one using a === comparison, and "Hello" === "Hello" is true, so Angular doesn’t trigger any change.
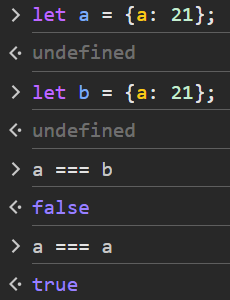
What about objects? When comparing objects with ===, we’re comparing references, meaning “Are the two variables pointing at the same object?” We can verify that easily with a few lines of Javascript running in a browser console:
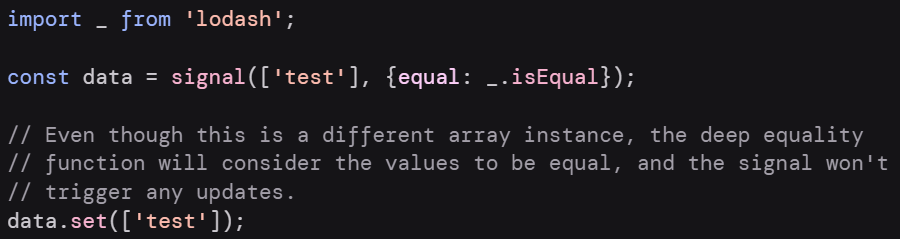
This leads us to the custom signal equality function. If we want to do a deep comparison instead of just comparing references, we can instruct Angular to do so by providing our own comparison function. Here is the example used by the Angular team:
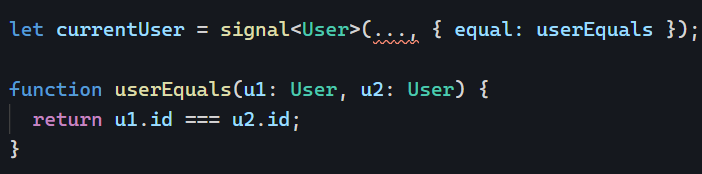
Of course, we don’t need lodash to implement custom equality functions. For example, we want to create a signal that only emits updates when the current user ID changes. We don’t care if the user’s name or email changes, just the ID (which would indicate that a new user logged in, most likely):
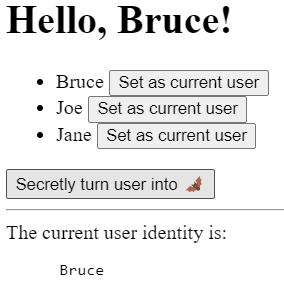
With this approach, the signal doesn’t trigger any updates if we change values that aren’t the ID. For instance, we can secretly turn our user into Batman (and note that I do create a new object by making a copy of the current one, which would make === return false):
Performance could be one thing: if we have a signal that stores an object and know that the only change we make to that object is one or two specific properties, then creating a custom equality function on these properties would make perfect sense. Even more so if the properties are in nested objects, though I wouldn’t recommend using deeply nested objects as signal values, keeping our values as flat as possible instead.
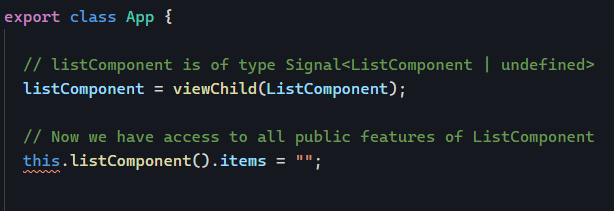
In case you’re not familiar with Angular queries, they existed before Angular 17.2 as the @ViewChild and @ContentChild decorators.
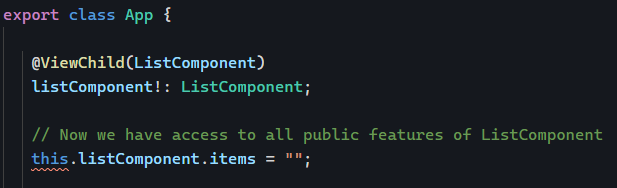
ViewChild is a way to get a reference on an HTML within the current component’s template. For instance, if we need our Typescript to access the instance of a given child component, I can use @ViewChild like so:
The new syntax gives us the same feature as a Signal:
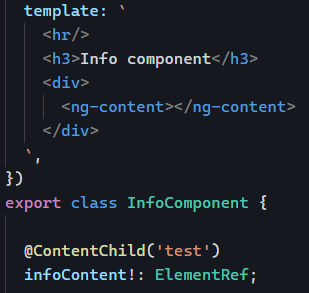
The same goes with ContentChild. The difference between ViewChild and ContentChild is that ViewChild looks for an element inside the component’s template, whereas ContentChild looks for an element projected by the parent component into the ng-content element of the current component using content projection. You can learn more about content projection with this tutorial:
The above code will look for an element with a template reference variable called test in the projected ng-content.
We can achieve the same feature with the new contentChild() function, which returns a Signal:
Differences between these new functions and the old decorators
These new functions bring a few extra interesting features. For instance, we can get rid of possibly undefined values by making a query required:
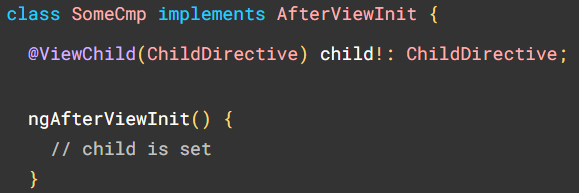
Decorator-based queries were satisfied once the component was fully initialized, which means that running side effects required the use of specific lifecycle methods:
With signal-based queries, we receive a signal so we can rely on computed() or effect() to run such side-effects:
This approach is less intrusive and requires knowing just one thing: Signals! No more lifecycle methods are needed. You can find these different examples in action on Stackblitz here.
Angular 17.2 brought more features to the signal-based components approach, where almost everything in our components will become signals. We’ve already covered that inputs can be signals since Angular 17.1.