Angular Component Testing with Cypress

Great news! Thanks to all your contributions, I’m happy to organize another coffee-fueled 2-hour workshop in January, which will be about testing Angular components with Cypress!

The date is January 18th, 2024, at 9 am US/Pacific (time zone converter here).

Like last time, the workshop will be on Zoom, and we’ll have a few hands-on exercises. A recording will be shared with all attendees after the workshop. You can register here and contribute here to keep me caffeinated.

If you have ideas for future workshops, please let me know. I do have a few, but I’m always open to suggestions.

Fine-tuning your eslint configuration

Last week, we introduced eslint and how it can help improve our code by identifying places where we have dead code or don’t follow best practices. Sometimes, we “break” some of these rules on purpose or decide to adopt a different convention, which is perfectly fine.

In that case, instead of giving up on eslint entirely, a better idea is to change its configuration to tweak the severity of a rule or even disable it. An es lint rule has three different severity settings:

  • “off” or 0 – turns the rule off
  • “warn” or 1 – turns the rule on as a warning (doesn’t make the lint command fail)
  • “error” or 2 – turns the rule into an error (makes the lint command fail with exit code 1 – a good option to fail a continuous integration build)

Such severity tweaks can be made in the .eslintrc.json file created in your project by the Angular schematics:

In the above example, I made the first two rules throw an error instead of a warning (I’m very much against disabling type-checking in TypeScript), but I’m OK with seeing some var keywords instead of let, so I turned off that third rule.

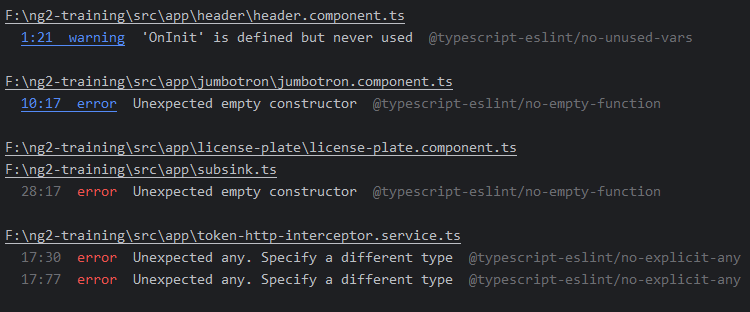
Getting the rule’s name is easy: When the linter fails, that name will be displayed in the console. Here @typescript-eslint/no-empty-function :

Some rules accept more configuration options to create an allowlist of accepted values. For instance, @angular-eslint/no-input-rename prevents you from renaming @Input values, but you can specify a config option that allows a few input names:

The config for that rule becomes an object that looks like this:

The above config allows renaming inputs only if the new name is check or test. This gives you more flexibility than turning off a rule entirely if it’s too restrictive for you.

Improve your code with eslint

eslint is a popular linter that parses your code and outputs a list of warnings and errors to help you improve. The library is designed to lint JavaScript code, and there are extra plugins for TypeScript and Angular so we can get even more specific feedback for our components and services. Here is an example of linting output:

A linter is a perfect complement to a compiler. For instance, angular-eslint, the eslint plugin for Angular, will also look at your HTML templates and flag code that doesn’t follow the Angular style guide. It’s also looking for possible mistakes, such as getting the ngModel 2-way data-binding syntax wrong:

To give you a better idea, here is the list of all the template rules and all the Angular TypeScript rules. If you want to give eslint a try, the first step is to install it with the help of some schematics:

This will download the proper dependencies and plugins and set up everything necessary to lint your code. If you’re using an older version of Angular or building a library instead of an app, there are step-by-step instructions to follow here. Once the set-up is done, all you have to do is run:

This command will parse all your files and output feedback in the console. Note that several IDEs can detect your eslint config and suggest automatic fixes to linting errors, which is even better!

Running unit tests on continuous integration servers

We talked about unit testing a couple of times last week. One of the main benefits of unit tests is that they run quickly and provide immediate feedback. As a result, we get the best return on investment when running those unit tests on a continuous integration (CI) server after each commit.

Two challenges come with running unit tests on a CI server:

  1. The default test runner for Angular projects (Karma) opens a Chrome browser to run the tests, which is challenging on most CI servers (typically Unix based with no UI support).
  2. The ng test command doesn’t stop on its own. It keeps watching the source code for updates and then reruns the tests.

Fortunately for us, there is a single command that addresses both problems:

Running the command will result in a single test run (thanks to --watch false) and will run in a UI-less way (thanks to --browsers ChromeHeadless). That’s all your CI server needs to do.

If you’re using an older version of Angular, this old tutorial of mine might help you configure Karma accordingly.

How to unit test an Angular service?

Yesterday, we covered how to unit test an Angular pipe. Services are a bit more complex to test because they usually have dependencies that need to be injected. Let’s consider this example:

All the service does is rely on the HttpClient to make requests to a server. In a unit test, we don’t want to have a server up and running for the test to work. Instead, we want to focus on CartService only and replace all its dependencies with fake implementations called mocks.

Replacing a dependency with a mock requires some dependency injection config, which is why the setup of a service test is different. Here is what Angular CLI generates for us automatically:

We can see that the test relies on a TestBed object to create a testing module and then inject CartService in our test. TestBed is an Angular utility that enables custom dependency injection in unit tests. We are going to use TestBed to replace our real HttpClient with a fake one.

The simplest fake implementation we can create to satisfy our unit test is the following:

The above mock object has hardcoded methods that return the same Observables for each HTTP request. The next step is to configure our TestBed so our test uses that mock instead of the real HttpClient:

At this point, our test setup is ready. We can start writing actual test cases. We want to test getCartContents and make sure that it returns an empty array. The challenge at that point is that our method returns an Observable, which means we have to subscribe to it and then test the result:

The above test works! We got the Observable from our mock and checked the empty array. The test passes. That said, when working with Observables, it is recommended to use the async function as follows to make sure that the test waits long enough before completing:

Note that async has to be passed as a parameter to the test function (first line of code) and then called as the last line in our subscribe callback function.

There are other approaches to testing services that rely on the HttpClient. This one is the most straightforward, but if you’re interested, I have another tutorial that uses the official Angular mock API for the HttpClient.

Updates from ng-conf 2023

I’m writing this message up in the air over the desertic landscapes of Nevada as I’m flying back to California from ng-conf 2023. It has been two days filled with lots of information, and I will unpack some of the major announcements in more detail in the following newsletters.

For now, I’ll focus on some rapid-fire news grouped by topic:

RxJs

  • RxJs 8 is coming out soon, and it will be 30% smaller than RxJs 7 and 60% smaller than RxJs 6!
  • Will have support for async / await syntax for Observables.
  • We will have some new syntactic sugar for chaining operators using a rx() function. Code such as obs$.pipe(map(...), filter(...)) will be writable as rx(obs$, map(...), filter(...)). Optional, yet good to know.

NgRx

  • Support for a Signal Store is coming soon

Endbridge

Other cool news

  • Bard, Google’s response to ChatGPT, is built with Angular!
  • Analog.js is a meta-framework for Angular apps. It supports server-side rendering, static pages, back-end APIs, and regular Angular front-end code all in one project, all in Javascript. Similar to Next.js for React. Analog is still a work in progress but looks promising.

How to mock your entire backend server?

This is the last post in our series on mocking data for testing purposes. So far, we have seen how to generate mock data using Mockaroo and then how to incorporate such fake data in our Angular application.

Today, let’s push this one step further and use that same JSON data to mock our entire backend server, including CRUD (CReate Update Delete) operations, so you can also test data updates.

Enter JSON Server

JSON server is a small npm library that reads a JSON file and turns it automatically into a RESTful web server. Yes, you read that right: All we need as input is our JSON data in a file!

The format of that JSON is one single object where each property will be turned into a backend endpoint. So, for instance, say you need to support two types of data: users and teams.

Then your JSON database will look like this:

{
   "users": [ 
      // Array of all users data
   ],
   "teams": [ 
      // Array of all teams data
   ]
}Code language: JSON / JSON with Comments (json)

You would substitute those arrays with the mock data generated with Mockaroo, and then running JSON server would give you the following RESTful API:

  • HTTP GET /users => Returns the list of all users
  • HTTP GET /users/21 => Returns the user with id = 21
  • HTTP POST /user => Creates a new user
  • HTTP DELETE /user/21 => Deletes the user with id = 21
  • HTTP PUT /user/21 => Updates the user with id = 21

JSON server also supports pagination, full-text search, and custom routes if you want to add more endpoints to your test backend. Any changes you make to your data persist in your JSON file, too. This means you have a single file database for testing purposes, which is excellent!

If you want to try it, here is a complete tutorial on how to use JSON server with Angular apps. The getting started section of the npm package is also very well documented.

How to use mock data in your Angular application?

Our last newsletter covered how to generate mock data for our Angular applications with Mockaroo.

Today, we’ll cover how to use that data in our apps so it can:

  • Act as a temporary backend implementation so you can build your Angular components before the backend API is ready.
  • Use that data as mocks for your unit tests.

Using hard-coded data in our Angular apps

Let’s say we need to display a list of users in a component, but the backend doesn’t have that data ready yet, or we want to try it with fake data. We head to Mockaroo, generate a JSON file with 100 users, and then copy-paste that JSON string and assign it to a constant in our code (example here – all links in the rest of this post go to the source code of the mentioned file as well):

Then we want to access that data using a service. We already have a UserService that’s using our backend, but we want to replace that call with our fake data:

So we generate a new FakeUserService that has the same shape as UserService, but is returning a custom Observable of our mock data instead of making an HTTP request:

Finally, we change the dependency injection configuration in our AppModule so that the application uses FakeUserService instead of UserService:

And now, our AppComponent believes it’s using a real UserService, but is actually getting a FakeUserService from the Angular injector:

What’s nice and clean about that approach is that you don’t have to change any of your components. The only line of code to change to enable/disable your mock data is the providers config in AppModule. That’s it! You can access the entire code for this example on Stackblitz.

Using that same hard-coded data in our unit tests

Once you follow the above approach, using that data in your unit tests will be very similar. We can reuse that same FakeUserService by configuring the Angular TestBed in our unit tests as follows:

How to generate mock data for my application?

Testing Angular applications can be difficult because our front-end code depends almost entirely on back-end data, and setting up different database scenarios takes a lot of time and effort. Sometimes, we don’t even have enough data to test in the first place.

This is why I want to introduce Mockaroo. Mockaroo is a website where you can generate as much data as you want for testing purposes. So, for example, if you need 1,000 fake users with random email addresses, countries, and phone numbers, Mockaroo can generate all that. And you can even decide which percentage of data is left blank for each attribute.

In the example below, I decided that 10% of the email addresses would be blank:

Here is a quick JSON example I generated in a few seconds:

Mockaroo is powerful because it supports lots of different data types, such as:

  • Phone numbers, age, credit card numbers, payment card types, bitcoin addresses…
  • Street names, city names, countries, latitudes, longitudes, airport codes…
  • Names, colors, job titles, genders, SSNs, EINs, university names…

And if you need a data type that Mockaroo doesn’t have, you can provide a regular expression that Mockaroo will use to create data that matches that regexp for you. Yes, it’s that good!

You can generate data in several formats (JSON, CSV, SQL, Firebase, and more) and then either use it as mocks in your Angular application (hardcoded object) or store the data in a test database that you would use for integration testing.

Using Mockaroo is free for exports of up to 1,000 rows. Still, there’s no limit on how many exports you run daily, so you could export more random data over and over again if you need more than 1,000 items, or you can use a paid plan to increase or remove all limits.