Reactive or template-driven forms?

People are often conflicted when it comes down to forms with Angular. Should we use template-driven forms or reactive forms?

Here’s a simple answer:

  • If your form is dynamic (meaning: if the user selects this option, then add/enable or remove/disable other form elements) or will rely on RxJs for reactivity (meaning: auto-complete features or on-the-fly validation of user input using HTTP requests), then use reactive forms.
  • In all other scenarios, template-driven forms should be perfectly fine.

That’s it. A bonus for you: If you want to have custom validation of your form, use this tutorial to implement custom validation that works with both template-driven and reactive forms, so you’re not tied to a single option and can still change your mind later on.

Running unit tests on continuous integration servers

We talked about unit testing a couple of times last week. One of the main benefits of unit tests is that they run quickly and provide immediate feedback. As a result, we get the best return on investment when running those unit tests on a continuous integration (CI) server after each commit.

Two challenges come with running unit tests on a CI server:

  1. The default test runner for Angular projects (Karma) opens a Chrome browser to run the tests, which is challenging on most CI servers (typically Unix based with no UI support).
  2. The ng test command doesn’t stop on its own. It keeps watching the source code for updates and then reruns the tests.

Fortunately for us, there is a single command that addresses both problems:

Running the command will result in a single test run (thanks to --watch false) and will run in a UI-less way (thanks to --browsers ChromeHeadless). That’s all your CI server needs to do.

If you’re using an older version of Angular, this old tutorial of mine might help you configure Karma accordingly.

Angular Accelerator Program

Since I started this newsletter at the beginning of the year, quite a few people have inquired about one-on-one coaching/training from me.

Several people have also asked for more preparation content for the Angular certification exams.

As a result, I’m about to launch the beta test of an Angular Accelerator program, and you can show your interest by filling out this form.

The program would combine weekly exercises and access to a Slack channel shared with other learners, me, and possibly other Angular experts, as well as live Q&A sessions and code reviews for each exercise.

On top of that, you would have access to all my video courses during that month of training. If you think this could interest you and want to try it as a beta tester, here is the form to fill out. You can also suggest ideas in that form.

Beta testers will be selected in the next couple of weeks based on their availability and time zone constraints, and the first cohort will likely be soon after that in July.

Thank you so much for your attention and participation.

How to pass multiple pieces of content from one component to another?

Yesterday, we saw that we could use content projection to pass an HTML template from one component to another. But what if we want to pass multiple different templates? We can use multi-slot content projection.

Here’s what we want to achieve:

In our reusable dialog component, we will have multiple ng-content elements. Each ng-content will have a specific query selecting a template to render:

These queries use the CSS selector syntax. In the above example, we’re using [], which means we are selecting HTML attribute names. As a result, our parent component will pass two distinct templates, one for the body and one for the footer, using the following syntax:

You can see an example of such code in action on Stackblitz.

Passing custom content to a component with content projection

If you’re creating a component library or working on components meant to be as generic and reusable as possible, then content projection should be a major part of your Angular toolkit.

Let’s take the example of a pop-up window/dialog component:

The main idea of content projection is that the parent component (most likely a container component) knows about the current use case of our reusable presentation component and can pass custom HTML to it. Such content is passed in the content section of the component, which is the body of the HTML element – what we have between the opening and the closing tag:

Angular projects that content into the template of the child component. We can set the destination of that projection by using an ng-content element in the template of the reusable component as follows:

Content projection is like cutting and pasting some content from one component to another. You can see the full code example here on Stackblitz.

RxJs retry() operator

Some weeks ago, I posted about how to handle errors in RxJs. In some cases, it might be a good idea to retry an Observable when it fails, especially for HTTP requests.

The retry operator has the following marble diagram:

In the above marble diagram, we retry the Observable 2 times. Since all attempts fail (the X in the timeline indicates an error), we still end up with an error at the end, but we can see that the first and second errors were invisible to the subscriber thanks to the retry operator.

The nice thing about retry is that we can specify a delay before retrying, as well as how many times to try again. By default, if we don’t use any parameter, retry will keep trying forever:

In the above example, we would retry a maximum of 3 times, wait 5 seconds between each attempt, and reset our retry counter if the Observable ends up succeeding. That way, another request in the future would still get all 3 attempts, for instance.

If you’re interested in a slightly more complex example using several more operators, I wrote that tutorial “How to do polling with RxJs and Angular?” that uses the retry operator.

How to unit test an Angular service?

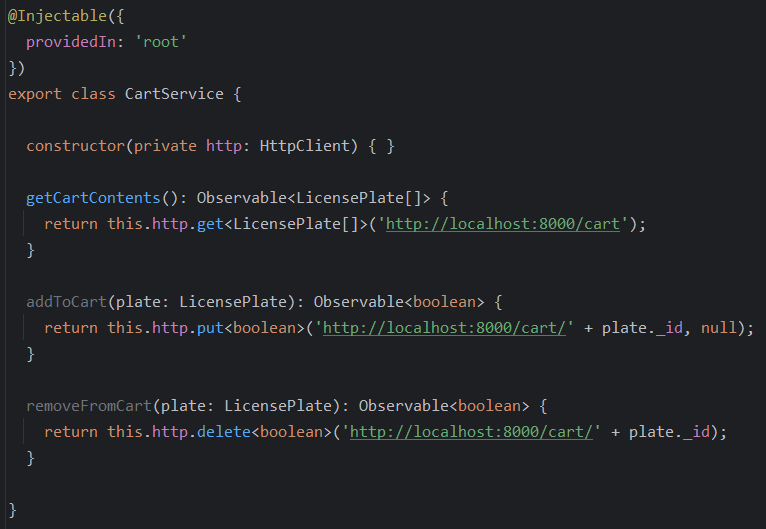
Yesterday, we covered how to unit test an Angular pipe. Services are a bit more complex to test because they usually have dependencies that need to be injected. Let’s consider this example:

All the service does is rely on the HttpClient to make requests to a server. In a unit test, we don’t want to have a server up and running for the test to work. Instead, we want to focus on CartService only and replace all its dependencies with fake implementations called mocks.

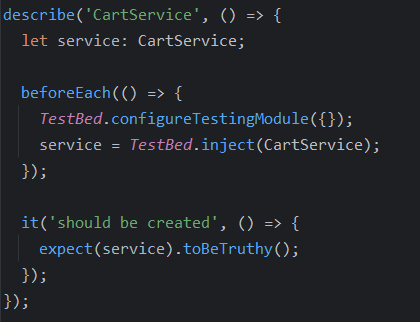
Replacing a dependency with a mock requires some dependency injection config, which is why the setup of a service test is different. Here is what Angular CLI generates for us automatically:

We can see that the test relies on a TestBed object to create a testing module and then inject CartService in our test. TestBed is an Angular utility that enables custom dependency injection in unit tests. We are going to use TestBed to replace our real HttpClient with a fake one.

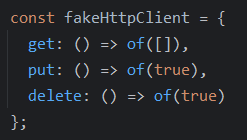
The simplest fake implementation we can create to satisfy our unit test is the following:

The above mock object has hardcoded methods that return the same Observables for each HTTP request. The next step is to configure our TestBed so our test uses that mock instead of the real HttpClient:

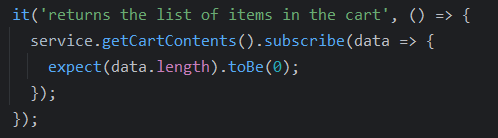
At this point, our test setup is ready. We can start writing actual test cases. We want to test getCartContents and make sure that it returns an empty array. The challenge at that point is that our method returns an Observable, which means we have to subscribe to it and then test the result:

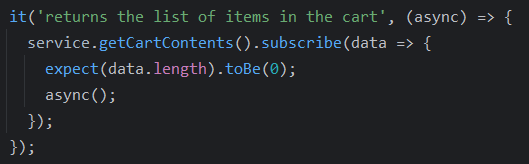
The above test works! We got the Observable from our mock and checked the empty array. The test passes. That said, when working with Observables, it is recommended to use the async function as follows to make sure that the test waits long enough before completing:

Note that async has to be passed as a parameter to the test function (first line of code) and then called as the last line in our subscribe callback function.

There are other approaches to testing services that rely on the HttpClient. This one is the most straightforward, but if you’re interested, I have another tutorial that uses the official Angular mock API for the HttpClient.

Rollbar: Error tracking and reporting

Whenever we deploy a web application to production, one of the challenges is that our code will run on several different machines in different locations. When a user reports an error, we cannot access their browser console or stack trace unless the user is techy enough to share that information with us.

Of course, we can create a generic error handler and try to reproduce an issue in our environment, but this can be challenging as none of these options give us eyes on what is going on in that user’s specific browser.

This is where Rollbar shines. Rollbar is a library that can report Javascript errors to a server and create alerts/statistics/tracking of those errors over time:

In the above screenshot alone, there is a wealth of information that we would never get with console.log. For instance, the first error has happened 412 times on 72 different machines (IPs), and the last occurrence was three days ago.

Such a screen can help you identify if a new release solved an issue for all users or created a new one. Even better, Rollbar supports different environments so you can check production or pre-prod, or staging environments for those errors, as well as filter by level, activity, etc. :

Each error contains the browser info, locale, screen definition, stack trace, and more. Errors can also be assigned to developers for further investigation and marked as fixed or muted if the error is irrelevant.

All in all, once people start using Rollbar, it’s almost impossible to stop using it. You can see an Angular demo on Stackblitz here and read this quick set-up tutorial from the Rollbar documentation.

Lazy-loading with defer (new RFC)

We’ve talked about lazy loading and performance a few times in this newsletter. The Angular team is working on a new feature that will expand the scope and flexibility of lazy-loading in Angular using a new primitive with a syntax similar to the one introduced in the control flow RFC:

The above code would lazy-load the calendar component whenever that block is rendered in a template. And it gets better: We can also add conditions on when to render, how much time to wait before doing so, or even a combination of several predefined conditions/triggers:

The above code means that the calendar component would be loaded if the user interacts with the page or after 5 seconds.

We will be able to provide a placeholder and a loading template, too – those would be displayed before and during lazy-loading, respectively:

This new defer block is in the request for comments (RFC) phase, which means the Angular team is gathering feedback from all of us on this idea. There is no timeline yet as to when the feature will be available. Feel free to add your thoughts and contribute here. The more excitement is shown on Github, the higher the Angular team will prioritize the feature.

Updates from ng-conf 2023

I’m writing this message up in the air over the desertic landscapes of Nevada as I’m flying back to California from ng-conf 2023. It has been two days filled with lots of information, and I will unpack some of the major announcements in more detail in the following newsletters.

For now, I’ll focus on some rapid-fire news grouped by topic:

RxJs

  • RxJs 8 is coming out soon, and it will be 30% smaller than RxJs 7 and 60% smaller than RxJs 6!
  • Will have support for async / await syntax for Observables.
  • We will have some new syntactic sugar for chaining operators using a rx() function. Code such as obs$.pipe(map(...), filter(...)) will be writable as rx(obs$, map(...), filter(...)). Optional, yet good to know.

NgRx

  • Support for a Signal Store is coming soon

Endbridge

Other cool news

  • Bard, Google’s response to ChatGPT, is built with Angular!
  • Analog.js is a meta-framework for Angular apps. It supports server-side rendering, static pages, back-end APIs, and regular Angular front-end code all in one project, all in Javascript. Similar to Next.js for React. Analog is still a work in progress but looks promising.