State Management: Effect

Let’s get back to our series on state management with this post. So far, we covered that state management libraries give us a global State that gets updated using Actions and Reducers. I haven’t told you yet that typical Redux Reducer functions are meant to be synchronous. In other words, you’re not supposed to make an HTTP request or anything asynchronous in a reducer.

So, how do we implement asynchronous tasks? This is known as a side-effect (because it involves a third party such as a server) or just Effect.

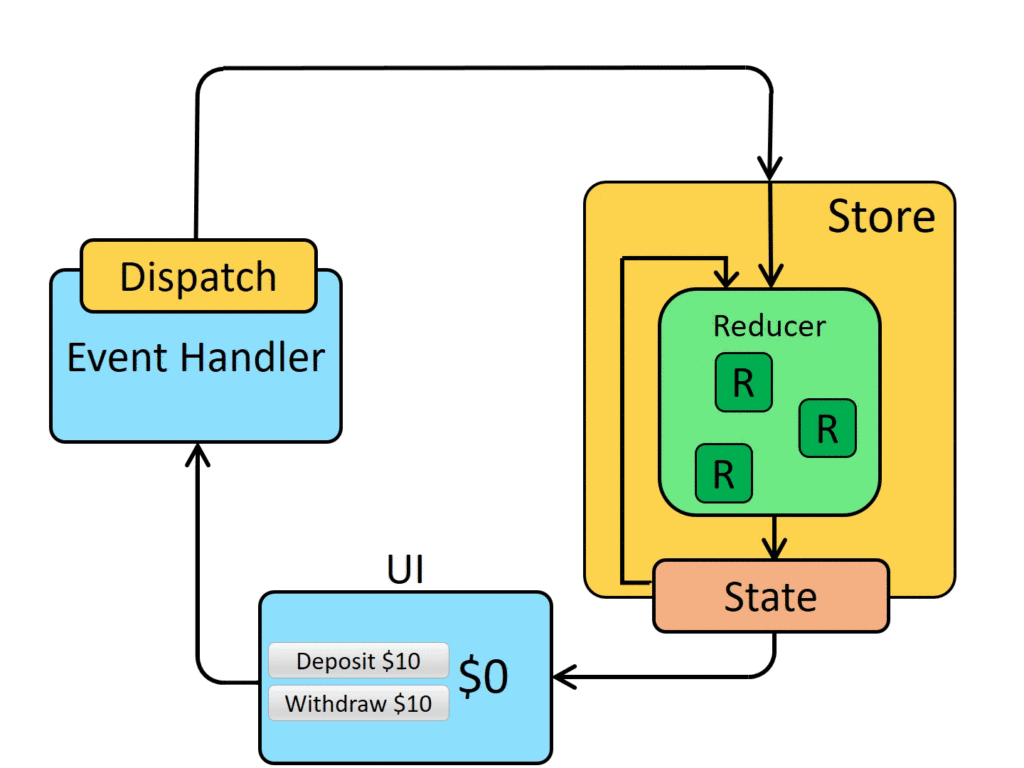
When we use Effects, the idea is to have an Action that triggers the Effect, and once the Effect completes, another Action is triggered:

For instance, in our current switcher example, we could have an Action called LOAD_EXCHANGE_RATES. This Action would trigger an Effect to make an HTTP request and fetch exchange rates from an API. For instance, the original Action would also update the State to make it a “loading” state.

Then, once the HTTP request completes, the Effect would dispatch another action, EXCHANGE_RATES_LOADED and pass the data as its payload so it gets stored in the State.

Effects are implemented differently based on the state management library

  1. NgRx

NgRx effects rely heavily on RxJs and look like this:
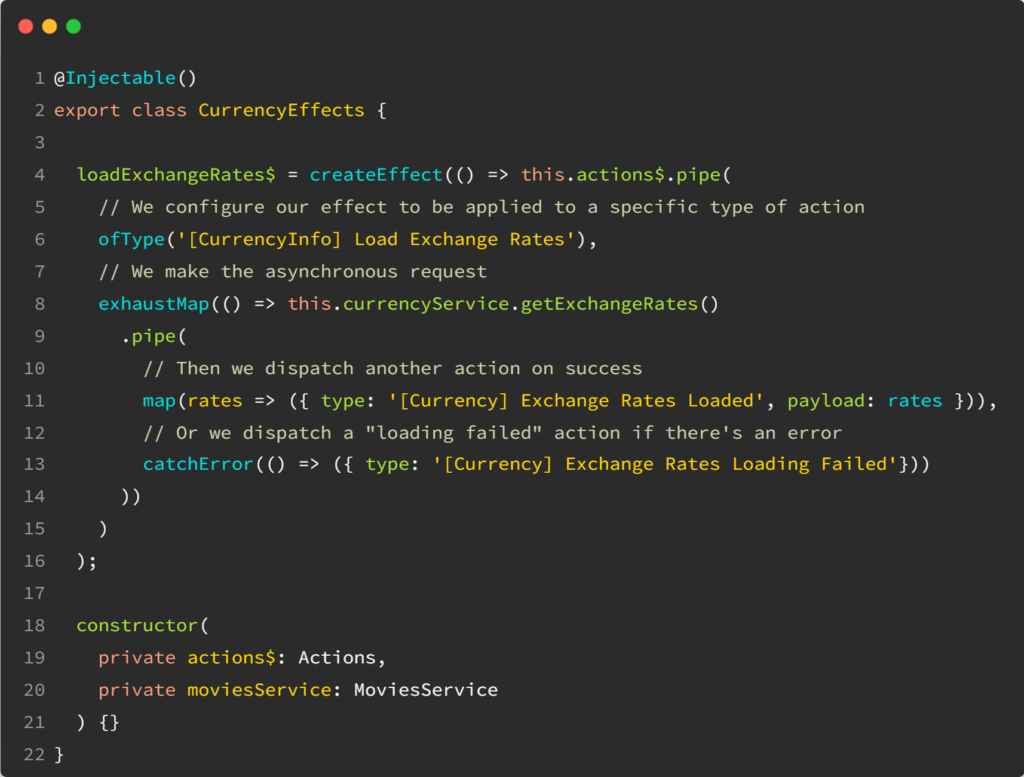
As you can see, the Effect code is verbose, but every single step makes sense: We turn an action into an asynchronous request that dispatches other Actions upon success or failure.

If you want to learn more about NgRx, I have this video course on LinkedIn Learning.

2. NgXs

NgXs has a different approach and doesn’t have effects. Instead, all actions have four states by default:

As a result, action handlers (reducers) can use asynchronous requests without needing any effects:
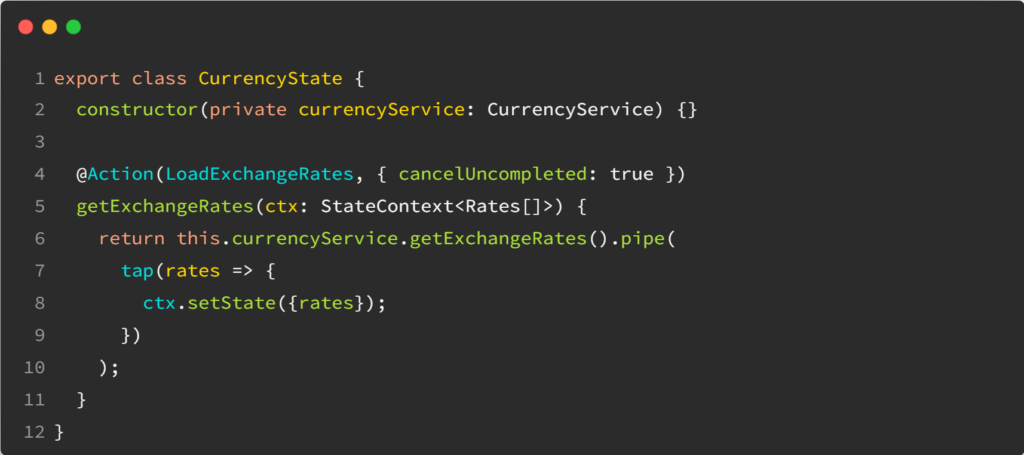
As you can see, even if the Redux concepts remain the same, every state management library has a different approach. I like NgXs because of its simplicity. The code is more to the point and less reliant on RxJs operators.

State Management: Selector

We know how to create a State and dispatch actions to update its value. Now let’s see how to receive updates when the State gets updated.

Most state management libraries provide what is known as Selectors. A Selector query function runs against our State and returns an Observable. For instance, with NgXs, a Selector can be created with the @Select decorator as follows:

The above code creates an Observable that returns any value update in state.currencyInfo. If you don’t like decorators, you can also use the select function from the Store service:

Both options return a similar Observable. If a Selector of a slice of your State is used repeatedly, you can make it a memoized selector by using the @Selector decorator in your State class. This example creates a new selector that returns just the currency property of our State:

Such a Selector can be used with @Select decorator in your components/services as follows:

You can see that code in action on Stackblitz.

State Management: Action and Reducer

Now that we’ve covered what’s the global State and what’s the Store service, let’s take a look at how we can update that State. In our introduction to state management, we introduced Actions.

Actions are simple objects with a name/type describing what we’re trying to do. An optional payload contains the parameters for that Action. In our example of currency switcher, we want to change a currency, so we would create the following Action, where the payload is the new currency:

The above Action does absolutely nothing on its own. We need a reducer to implement the corresponding state transition. With NgXs, a reducer is a method with the decorator @Action in our State class:

In the above code, we define which method runs when the Action of type ChangeCurrency is dispatched to our state management library.

That method takes the current State, creates a copy of it (this is a core principle of Redux), and then changes the currency and exchangeRate in the new state object.

Then, NgXs will automatically notify any component/service/directive subscribed to that State that a new value has been set.

How to dispatch an action?

If we want to use the Action and Reducer created earlier, we use the only object that knows about everything in our state-management machinery: The Store.

Conveniently enough, our Store has a dispatch method that can be used for any Action:

As a reminder, the Store is a service that can be injected anywhere we need it:

We’ve covered most of the pieces of our state management architecture. We know how to create a State, an Action, a Reducer and use the Store to dispatch an action and update our State:

In our next post in this series, we’ll see how to Select and subscribe to specific parts of our State. You can see that example in action on Stackblitz.

State Management: State and Store

After introducing state management concepts last week, let’s dive deeper and get into two essential concepts of state management libraries: Store and State. I’m using NgXs for these examples because the library’s syntax is the most straightforward and consistent with how Angular works, using Typescript decorators to configure the different classes.

The example we will be using is an online store where the user can change the currency and see the different prices get updated as a result:

We want to manage that currency and the exchange rate that goes with it using state management. The first step is to create a piece of State that handles that data – and provide a name and default value for it:

The above State has to be registered with the NgxsModule in our AppModule as follows:

And that’s it! Now, to interact with that State, we can use the Store service and inject it wherever we need it:

Of course, you can create multiple pieces of State for your application using the same approach as above. Every new part of our State gets added as a property to the global state object. For instance, our current currency information can be found at state.currencyInfo. If we add a new State with a name set to cartContents, its data would be accessible under state.cartContents.

In the next post of this series, we’ll see how to use Actions to update the application’s State. You can see that example in action on Stackblitz.

Introduction to State Management

When you work with Angular for quite some time, you realize that you implement similar services repeatedly. Most likely, you end up with services with BehaviorSubjects to store some data, and you have components that subscribe to these subjects exposed as read-only Observables.

If you’re not at that point yet, I suggest you stop reading this article and get into the above architecture pattern first. This is a good reading about what I call “progressive state management,” where you get into state management little by little. Start there.

Once comfortable with the above, you might start thinking about NgRx, NgXs, or other state management libraries.

Why state management?

The main goal of a state management library is to define a single way to handle data in your application. Instead of having your application data in multiple different services, all your data will belong in a single, massive object called state. That state has to follow several rules and cannot be updated directly.

State management is all about rules and conventions created by the ancestor of all state management libraries: Redux. All modern libraries use similar concepts and vocabulary.

Here are the three core principles of Redux:

  • Single source of truth: The app’s state is stored in a single object tree within a single store. In Angular applications, that store is usually a service that can be injected anywhere we want.
  • The state is read-only: The only way to change the state is to emit an action, an object describing what happened and how we want to change our state.
  • State changes are made with pure functions called reducers. These functions take the previous state, an action, and return the next state. They return new state objects instead of mutating the previous state.

Visually, a typical Redux application works like this: A user interaction triggers an action that updates the global state using a reducer, and then components receive state updates to render the new data:

I know what you’re thinking at that point: That’s a lot of definitions and vocabulary. But this is what all state management libraries give us, so there’s no way around it. For instance, here are the links to these concepts in 3 different state management libraries:

  • NgRx: State (notice how that class extends BehaviorSubject) – ActionReducer.
  • NgXs: StateActionReducer (note that NgXs does not mention reducers directly and tries to simplify how they work, which is one of the reasons why it’s my state management library of choice)
  • Redux: StateActionReducer

We’ll dive into these topics in more detail with a series of posts in the next few days/weeks.