Zoneless is the official default change-detection mode in Angular 21+, but there’s a lot of confusion (and misleading AI-generated content) out there, so I thought I’d clarify what that means and what you need to change on your apps to enable Zoneless change detection.
Because here is the thing: Zoneless is not magical. If you use old practices, Angular won’t detect your changes anymore. In Zoneless, change detection is triggered by one of these scenarios:
- A component input binding receives a new value
- An async pipe detects a new value in an Observable that it is subscribed to
- A Signal value changes
- Your code calls
ChangeDetectorRef.markForCheck()directly
And that’s it. If you subscribe to an Observable in a service or component’s TypeScript code and display that data in a template without using one of the above mechanisms, Zoneless won’t work.
You can read here if you’re confused about what Zoneless actually means.
In other words, if you want to use Zoneless, you have to update your architecture according to the above recommendations, which basically means making most of your components OnPush compatible.
Note that if you use AI tools in your IDE, the Angular 21 MCP server can help with that migration and suggest changes for you.
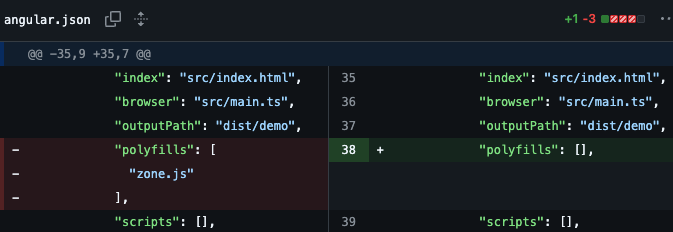
Once your application is Zoneless-ready, a few steps will allow your app to become fully Zoneless:
- In
angular.json, remove the zone.js pofyfill from the polyfills section:
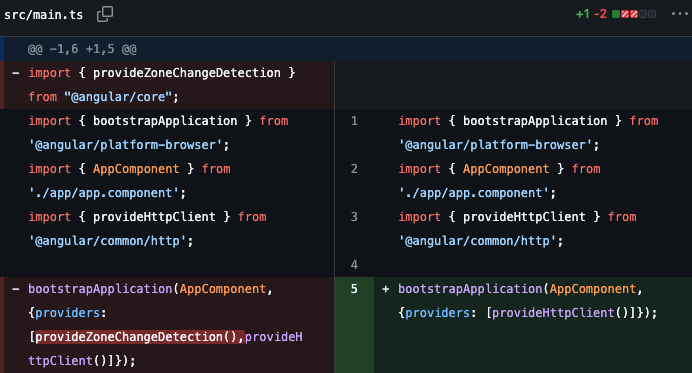
- In main.ts, remove any change detection related providers. They’re not needed in Angular 21 as Zoneless is the default. You can keep that code if using an older version of Angular:
- Uninstall
zone.jsby runningnpm uninstall zone.js
And now you have a truly Zoneless Angular application! Note that the official documentation has similar instructions but is more verbose.
If you have any questions about Zoneless, let me know, and I’ll cover those in another article. And if you need a consultant to help you with Zoneless, you know where to find me.