5 tips for Strictly Typed Reactive Forms

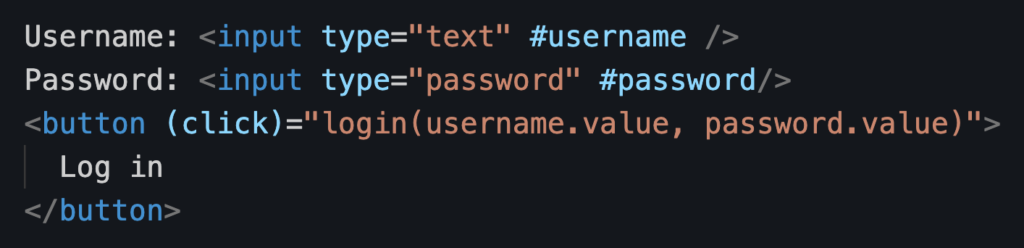
Forms can be a very complex part of any web application, and today, I will cover some useful tips and tricks for using Reactive Forms with strict types.

  1. Use 
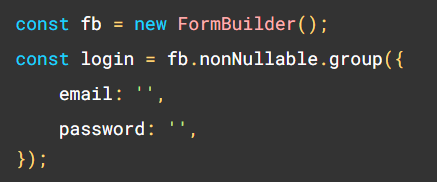
nonNullable: true to restore default values on reset

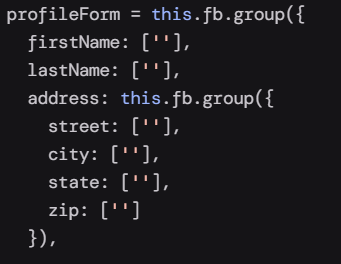
Form controls and groups are nullable by default in Angular, which means that the following example of FormControl value isn’t of type string:

Instead, if you try to read email.value, you’ll see that the type is string or null. Why would that be the case since we have a default value? That’s because the form can be reset with a <button type="reset"> on the form or by calling email.reset(), for instance.

The trick then is to make that control non nullable by adding the following option:

Now, when the form gets reset, email.value is equal to "test2@gmail.com", which is perfect in several different form scenarios, such as an edit form, where we don’t want to “lose” the previous values, but just “reset” to those values.

2. Using non-nullable form controls at scale

If we want to apply that same config to several form controls, we can put them in a FormGroup and pass that same nonNullable: true option to the FormGroup constructor instead of specifying it for every single control. But what if we use the FormBuilder service?

Then we can use the following syntax:

3. How to define the type of a FormControl with no default value?

If we do something like this:

We’re in trouble because Typescript will infer the type of password.value is null. Instead, we use generics and a union type to specify the expected type for that value, here string or null:

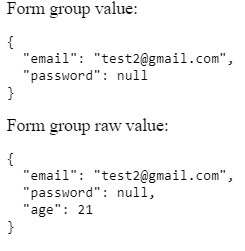
4. How to read the values of disabled form controls?

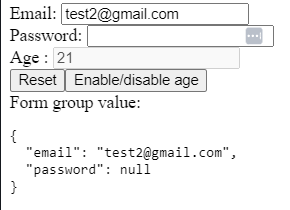
In complex forms, it is very common that some controls are enabled/disabled based on some condition. For instance, if the user selects the country “USA, ” we might enable a state dropdown with the US states in it and disable it for other countries.

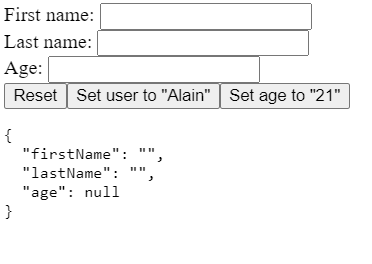
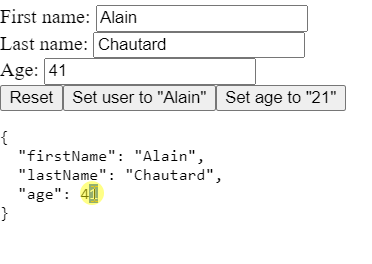
When a control is disabled, its value doesn’t appear as part of the form group value. Here is an example where age is obviously equal to 21, but since that control is disabled, formGroup.value doesn’t return it:

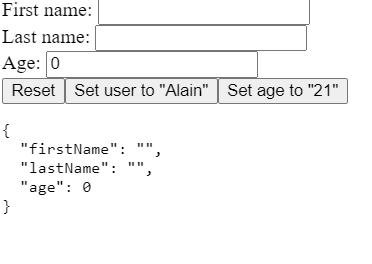
The workaround here is to use formGroup.getRawValue(), which will return everything, including disabled control values:

You can see that example in action on Stackblitz here.

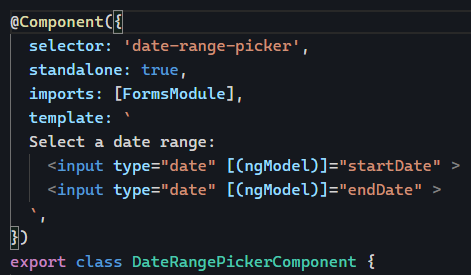
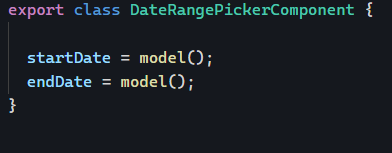
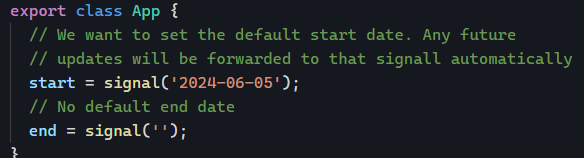
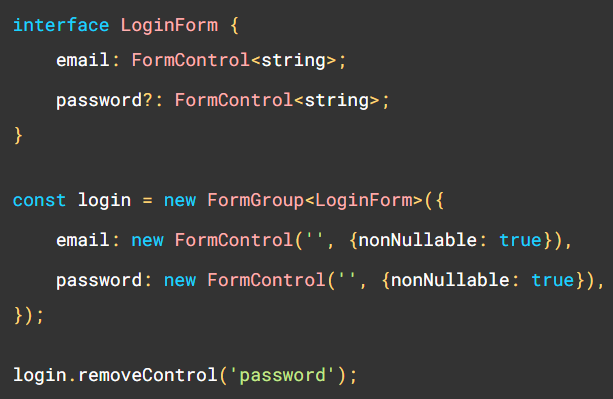
5. How to handle dynamic forms where we don’t know which controls will be present ahead of time?

In some cases, forms can be completely different depending on the type of user, country, etc. As a result, we don’t know whether a control will be present or not at runtime. We can define that uncertainty in Typescript using the optional operator ? when we define the type of our form:

In the above code, password is defined as optional in our interface, meaning that the compiler will not throw an error if we remove that control later.

If your form is 100% dynamic and handling proper types for each scenario would be a nightmare, you can use the more flexible FormRecord instead of FormGroup:

Dynamic forms with FormArray

We’ve covered reactive and template-driven forms in the past. One of the nice features of reactive forms is the FormArray class. You can use FormArray for a form where the number of inputs is dynamic and can increase or decrease:

To achieve the above, we create a FormArray in our component and add a method so we can append new FormControls to that array:

Then, we use a @for block to display all controls of that array in our template, including a button to add new names to the list. Note that we store the index of each control in a local variable i:

We can even add support for the removal of form elements using the removeAt method of FormArray and the index of the element to remove:

And that’s it! We can check that the FormArray value is updated correctly with the following expression:

You can see that code in action on Stackblitz here. You can read this excellent guest post from Jennifer Wadella on my blog for more information on dynamic forms.

Using FormBuilder or FormControl?

When creating reactive forms with Angular, we have two options available. The most documented one is to inject the FormBuilder service and use it to generate your form’s structure:

FormBuilder makes perfect sense for forms that contain lots of elements. This service gives us methods that are factories for the following syntax, which is a lot more verbose:

Now, if you have a simple form with just one or two form controls, you don’t need FormBuilder. Declaring your FormControl “manually” is actually more manageable that way:

You can find an example of a single FormControl with custom validation here on Stackblitz.

ngx-mask for user input masking

HTML forms are evolving but still lacking a little in masking, which really means “suggesting the proper format to the user.

For instance, if I need to capture a US phone number in a specific format, I’d like to use a mask that looks like this:

We could use a placeholder, but the placeholder disappears as soon as we start typing, whereas a mask should remain visible and try to make the user input fit into that format. For instance:

This is where ngx-mask helps. It’s a third-party library that passes my acceptance criteria for dependencies. ngx-mask comes with directives and pipes to implement customizable masks.

To install it: npm install ngx-mask

You can find out how to configure the library here. Here is an example of the mask directive used for a US phone number:

And another one for a French phone number that doesn’t show the mask as we type but still enforces it:

The result looks like this:

Here is a link to my example on Stackblitz.

You can try many different demos on this website. The library supports regular expressions and lots of other options, such as a validation attribute to invalidate the form when the input is invalid:

And it’s possible to have multiple different acceptable formats on a mask, too:

Asynchronous form validation with Angular

We’ve already covered how to write custom form data validators with Angular. We also covered how to display custom validation feedback to the user. Today, let’s take a look at how to perform asynchronous validation of our form data, which is useful when we need to make an HTTP request to a server to validate user input.

The approach for asynchronous validation is very similar to what we do with regular validation. The only difference is that instead of returning ValidationErrors, we return an Observable or a Promise of such ValidationErrors:

A ValidationErrors object is any keys and values you want to return. I like using keys that are the name of the form input throwing the error and the value being the error message I want to display on the screen. For instance, this is one of my typical ValidationErrors objects:

If you want to dig deeper, here is a link to a tutorial showcasing an example of an async validator. It’s also worth noting that asynchronous validators introduce a new validation state besides VALID and INVALID, which is PENDING. You can use that validation state to display a spinner or temporarily disable a form input while the asynchronous validation occurs.

How to create custom form controls with Angular?

When working with lots of forms, you’ll likely use similar controls repeatedly: A country selection dropdown, a state selection dropdown, a date-range picker with specific constraints, etc.

Instead of duplicating our code, which is never a good idea, Angular allows us to create custom form controls that integrate with Angular’s form validation mechanism.

This feature requires our custom control component to implement an interface called ControlValueAccessor that has the following methods:

I have a detailed tutorial and code example if you want to dive deeper into that topic.

It’s also worth noting that you don’t have to start from scratch when implementing a control value accessor. Angular has a DefaultValueAccessor directive (the one used by FormControl, NgModel, etc., in Angular forms) that can be invoked with the selector ngDefaultControl, and there are a few more options available, such as the SelectControlValueAccessor.

Prefer template-driven forms

International readers might not know that today is a public holiday in the United States as the country celebrates its birth and Independence. As a result, I’ll make today’s post very short but still useful.

Over the past couple of newsletters, I explained that template-driven forms are perfectly fine in most cases. A few years ago at ng-conf 2021, Ward Bell said he always uses template-driven forms and explained how he does that in less than 19 minutes.

If you’d rather read a short article, you can head to my “reactive template-driven forms” post where I showcase how template-driven forms are actually… a layer on top of reactive forms, and that you could still access reactive features on a template-driven form if you wanted to. I know, it’s mind-blowing!

Happy 4th of July if you’re in the US!

Reactive forms Observables

Last week, I gave you a simple decision framework to decide when to use reactive or template-driven forms.

As a matter of fact, the only reactive (meaning RxJs-friendly) piece of reactive forms is that FormGroup, FormArray, and FormControl all extend the AbstractControl class and, as a result, expose two different Observables:

Those two can be very powerful when used alongside some RxJs wizardry (see this tutorial on dynamic filtering with RxJs and Angular forms, for example). In their most simple form, we can use those to listen to changes in our form and react accordingly:

In the above example, we enable the city form control if a 5-digit zip code has been entered. Since we are subscribed to valueChanges, any future change of the zipcode value could enable/disable the city input.

The other Observable, statusChanges, focuses on validity changes only and returns one of the four following values:

Here is an example use case for statusChanges, which is more accurate than the previous example as this one would take into account all validation code relevant to the zip code:

Reactive or template-driven forms?

People are often conflicted when it comes down to forms with Angular. Should we use template-driven forms or reactive forms?

Here’s a simple answer:

  • If your form is dynamic (meaning: if the user selects this option, then add/enable or remove/disable other form elements) or will rely on RxJs for reactivity (meaning: auto-complete features or on-the-fly validation of user input using HTTP requests), then use reactive forms.
  • In all other scenarios, template-driven forms should be perfectly fine.

That’s it. A bonus for you: If you want to have custom validation of your form, use this tutorial to implement custom validation that works with both template-driven and reactive forms, so you’re not tied to a single option and can still change your mind later on.

RxJs debounceTime operator

This week’s RxJs operator is very commonly used for form validation: debounceTime.

debounceTime is going to delay emitted values for a given amount of time (in milliseconds) and emit the latest value after that period has passed without another source emission. I know it’s not super easy to describe with words.

A marble diagram for debounceTime looks like this:

In the above example, the values 2 – 3 – 4 – 5 are emitted less than ten milliseconds from one another, so they get dropped. Only five gets emitted 10 ms later.

Why is that useful for form validation? Because we usually want to wait for the user to finish typing something before triggering some asynchronous validation. For instance, if we validate a street name, it makes sense to wait for the user to stop typing for a while instead of sending HTTP requests to an API every time a new keystroke happens, which would flood the server with useless validation requests.

Using our credit card demo from yesterday, here is a different Stackblitz example where I debounce the output for 400 ms. This is the result:

You can see that the debounced value gets displayed once I stop typing for 400 ms. So that’s how I used that operator:

And then display the results side by side in my HTML template as follows:

Usually, 300 to 400 ms is an excellent spot to debounce user input, but you can try different values and see what works best.

If you want to dive deeper into asynchronous form validation, this tutorial should help: How to write async form validators with Angular?