Angular 16 Preview: TakeUntilDestroyed

Angular 16 will be released next week, and this new version will be big. I will cover most of the new features of Angular 16 for the next few days.

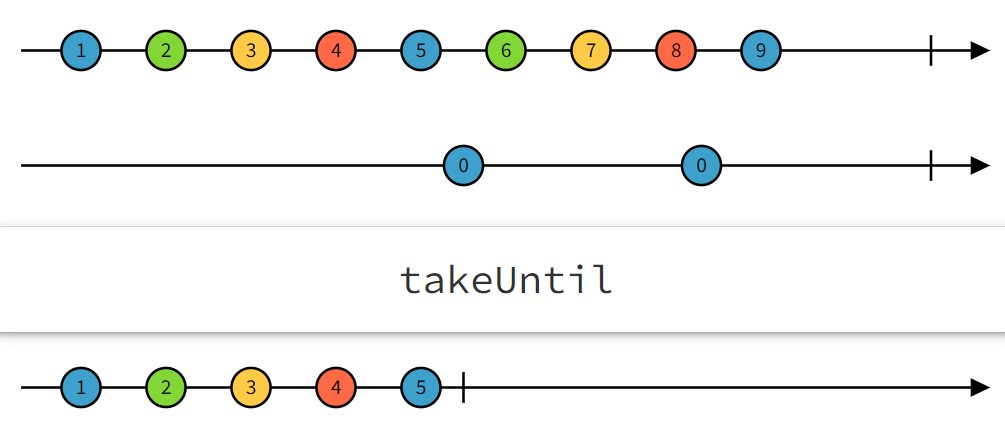
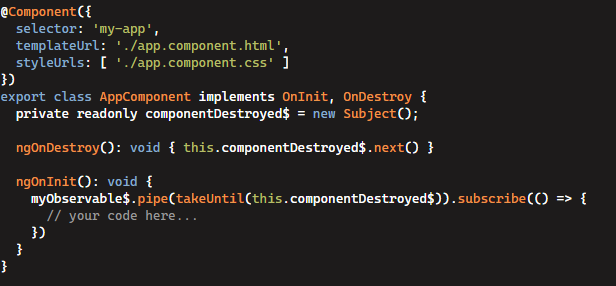
One of the simple but handy features shipped with Angular 16 is a new operator for RxJs Observables: takeUntilDestroyed.

We have covered several techniques to automatically unsubscribe from Observables in this newsletter.

takeUntilDestroyed will make all of it easier than ever:

And that’s it! That one operator will take care of automatically unsubscribing from data$ when the component/pipe/directive using it is destroyed.

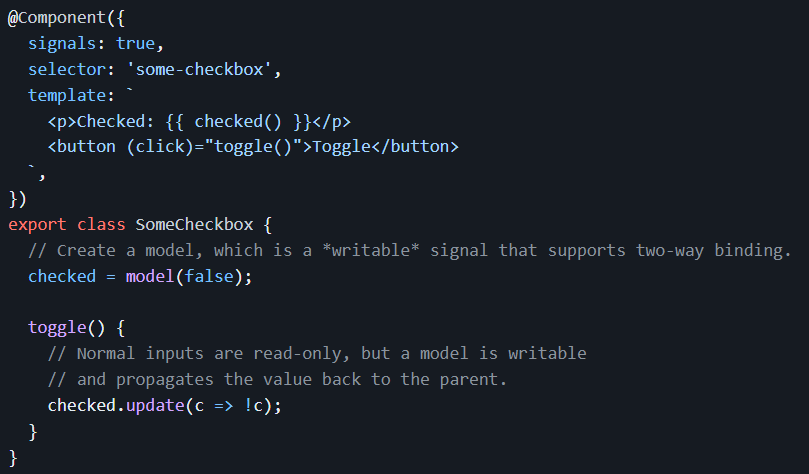
Signals will be the most significant addition to Angular 16 (as a developer preview – for now), and as a result, I’m about to launch a short course on Signals. If you’re interested in beta-testing that course (for free!), please respond to this email to let me know.

How to create your own two-way data binding with Angular?

If you’ve ever used [(ngModel)] with Angular, you know what two-way data binding is. The idea is to have a variable that works simultaneously as an Input and an Output.

In today’s post, we will see how to implement such a two-way data binding on our own so that we can use the [()] syntax on any of our component properties, such as message in the following code:

Before we get into this tutorial, I want to tease that signal-based components will have such two-way data bindings available out of the box with the following syntax – using a model() function instead of the @Input and @Output decorators we’re used to:

Note that the above feature will not be a part of the initial developer preview of Angular Signals coming out in less than two weeks with Angular 16. However, it might be available in developer preview in six months with Angular 17.

In any case, here is the link to my custom two-way data binding tutorial and a code example in action on Stackblitz.

Anti-pattern: Subscription within a subscription

Welcome to this new series on Angular anti-patterns. I intend to cover one anti-pattern per week for a few weeks, starting with one of the most common ones: Subscribing to an Observable within another Observable subscription. Here’s an example where we get a country and then the currency for that country:

Why is this a bad idea? Here are a few reasons:

  • getCurrencyForCountry() is never unsubscribed, which can lead to memory leaks.
  • When the country changes, the Observable that gets the previous country’s currency is not canceled. If that Observable emits again, this.currency will get overwritten.
  • Such nested callbacks are hard to read, and as a result, such code is more challenging to maintain.

Let’s imagine our component template is as follows:

Then in a scenario where getCurrencyForCountry() emits updates values every second, our component would end up displaying the following values, which become wrong very quickly:

You can take a look at that code here.

The solution to avoid such issues is to use the switchMap operator as follows:

The above code works fine because switchMap cancels the previous currency Observable as soon as a new country is emitted from service.getCountries(). No more memory leaks, and our two Observables are always in sync:

Here is a link to that same code example using the switchMap operator.

keyValue pipe

The keyValue pipe turns any object into an array of key-value pairs, which can be helpful for debugging purposes or working with an object with a dynamic shape.

Here’s an example:

In this example, we’re using the keyValue pipe to iterate over the properties of user and display them. The item variable represents each key-value pair in the object, and we’re using the item.key and item.value properties to display the key and value for each item.

As a result, if user is this object:

The component displays:

You can see the above example in action on Stackblitz.

This pipe is part of my collection of 3 Angular pipes everyone should know about, including the async pipe and the json pipe.

RxJs takeUntil and takeWhile operators

Our Rxjs operators of the week are takeUntil and takeWhile. These operators are the opposite of skipWhile covered last week: They let the values from the source Observable pass through until a condition is met.

takeUntil is based on a second Observable and stops emitting values when that second Observable emits for the first time, as illustrated in this marble diagram:

takeWhile is very similar but uses a predicate instead of an Observable to decide when to stop emitting from the source Observable:

The primary use case for takeUntil with Angular is to automate unsubscriptions from Observables, even though I recommend less verbose approaches to automating unsubscriptions, such as using the async pipe :

The above code uses a subject to emit a value when the component gets destroyed, thanks to the ngOnDestroy lifecycle hook. Then, that same subject is used by takeUntil to complete the source Observable.

Here is a different example of takeUntil in action on Stackblitz.

Angular profiler for performance tuning

The Angular dev tools introduced in our previous newsletter include a second tab called Profiler:

The Profiler has a single record button. We can hit it, play with our application, then stop the recording. This turns the UI into a profiler view of what happened during the recording. In the example below, we can see how a click generated a change detection event that impacted several components:

As you can see in the above screenshot, every change detection event is tracked as a bar chart entry. The taller a bar is, the more time it takes to complete that cycle. We can explore which components and directives are impacted for each event and how long it took to re-render that component (in the above example, 0.1 ms).

When facing a performance issue, the Profiler is perfect for identifying the problem’s root cause. For instance, it could highlight that one component is much slower than the others and gets refreshed for no good reason, indicating that a different change detection strategy is needed.

The official documentation showcases all individual features of the Profiler one by one.

Debugging with the ng namespace

Angular 9 introduced the ng namespace variable, which is available in development mode but not exposed when the application is running in production mode.

We can debug an application using that global namespace without any breakpoint or dev tools extension. Here’s how.

First, select a DOM element

Using your browser dev tools, select a DOM element on the page as follows:

When an element is selected using the above process, it becomes assigned to a variable called $0 in the developer tools console. The previous selection is known as $1, the one before that $2, and on and on.

Then, use the ng workspace functions

If the selected DOM element is an Angular component, you can head to the browser console and type ng.getComponent($0). This returns a reference to the component instance – ready to be explored and debugged:

If the element you select is not a component (say a div or an image), use ng.getOwningComponent($0) to get a reference to the parent component of the selected DOM element.

If you want to select the directives applied to that element, use ng.getDirectives($0). It’s also possible to access the context of a template in a ngFor or ngIf directive.

There are a few more useful functions available in that global namespace.

Angular DevTools Extension

Angular DevTools is a browser extension that provides debugging and profiling capabilities for Angular applications (v12 minimum). It’s available for Chrome, Firefox, and Edge.

The extension comes with a tree view of the component hierarchy of our application. You can expand and collapse components to inspect their properties, inputs, and outputs. Hovering a component in the tree view highlights it in the user interface, as shown here:

We can explore inputs and outputs and even change those values to test how the UI would respond to different values:

There’s also a search feature where you can type the name of a component to find it in a complex component hierarchy:

Those features alone can be a huge time saver—no need for debugger breakpoints or JSON pipe to inspect our data. The inspector always displays up-to-date component information.

Angular 16 is coming soon!

It’s official; Angular 16 will be released on May 3rd. The first release candidate version is available, and yes, it includes the base API for Signals!

Signals will be in developer preview only for now, but we can expect the feature to be shipped and fully available with Angular 17, which is exciting news.

Other notable features include required inputs with @Input({required: true}) and the ability to receive router data as component inputs (think resolver data and URL params, for instance).

Of course, I’ll cover all these new features in more detail when the final version is released.

New Workshop Available

In the meantime, if you want to practice your RxJs skills, build custom directives, use content projection, and more, I just launched a workshop made of 7 different exercises with commented video solutions.

As a thank you for subscribing to this newsletter, the coupon code ng-newsletter gives you $20 off this $39 course (more than 50%), making it just $19 for the next 30 days.

A real bargain for Angular level 2 developers who want to prepare for the level 3 certification, for instance.

As always, let me know if you have any questions.

RxJs skipWhile operator

Our RxJS operator of the week is skipWhile. This operator will ignore values emitted by an Observable as long as a given condition is true.

Its marble diagram looks like this:

The above example shows us that as long as the emitted values are less than 5, they get skipped.

What are some everyday use cases for skipWhile? Here is an example where I want to wait for the user to type at least two characters in a form input before we start filtering (an addition to last week’s startWith example):

That way, the filter$ observable starts emitting values only when the source FormControl value has a length of at least two characters, which results in the following behavior:

This can be used to delay querying a server-side API with HTTP to start filtering only once we have enough meaningful data. This is somewhat similar to what can be done with the debounceTime operator.

You can see the complete example here on Stackblitz.