ngOnDestroy lifecycle hook

After covering ngOnChanges and ngOnInit earlier, let’s talk about ngOnDestroy. The ngOnDestroy lifecycle hook is called when an Angular component/directive/pipe is destroyed. I’ll refer to components only in this post, but everything you read also applies to directives and pipes.

This can happen when the component is removed from the DOM, or the application is destroyed.

Most of the time, a component gets destroyed when it’s removed from the DOM as a result of:

  • A ngIf directive condition becomes false, thus hiding the element from the screen.
  • The router navigates to a different screen, thus removing the component from the DOM.

The ngOnDestroy hook is a good place to do cleanup tasks, such as unsubscribing from Observables (though there are better options to automatically unsubscribe your Observables), closing sockets, or canceling setInterval and setTimeout tasks (though you could use RxJs timer for that):

Getting Started with Angular Material

This is a guest post by Duncan Faulkner. He is an Angular developer for a fintech company based in the UK. A software engineer with over twenty years of experience, Duncan has been working with Angular since the early betas, written blog posts for ng-conf and several short books on Angular Material. He’s also the maintainer for the @ngbracket/ngx-layout (formerly @angular/flex-layout) open-source project.

You can follow him on Twitter, LinkedIn, Medium and YouTube by using this bio link.

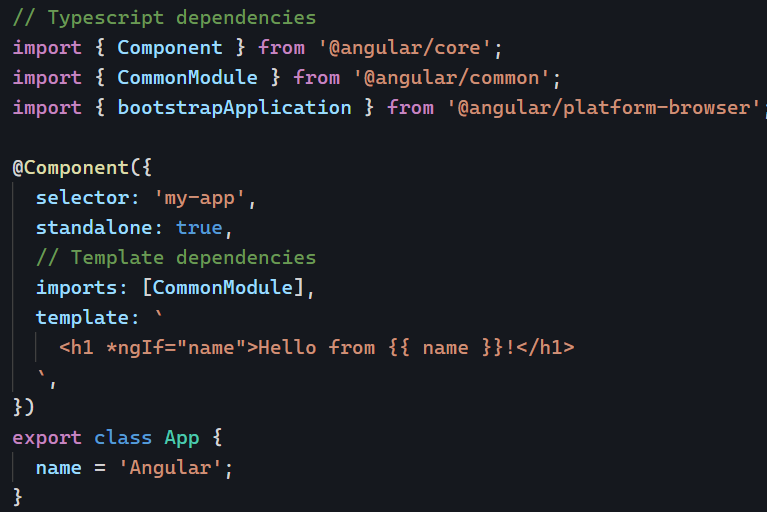
Angular Material is a component library for Angular projects, this library comprises of a number of User Interface components (UI) and a Component Development Kit (CDK). In this series of posts we’ll use Angular Material version 16, there haven’t any major changes to this version of the library.

Some of the components in this library are:

  • buttons
  • inputs
  • cards
  • date picker
  • progress bar
  • grids
  • toolbar
  • and many more:

Adding Angular Material to an existing Angular application is quite straight forward, navigate to your Angular project in a terminal window and type:

ng add @angular/material
Code language: CSS (css)

This will install Angular Material, the CDK and the Angular Animations, during this installation process we are asked to make a few choices.

  • The first one will show the version of Angular Material that will be installed and whether to proceed or not.
  • Next, choose either one of the pre-built themes or create a custom theme.
    • The available pre-built themes are:
      • deeppurple-amber, Palette (Primary, Accent, Warn) – deep-purple, amber, red.
      • indigo-pink, Palette (Primary, Accent, Warn) – indigo, pink, red.
      • pink-bluegrey, Palette (Primary, Accent, Warn) – pink, blue-grey, red.
      • purple-green, Palette (Primary, Accent, Warn) – purple, green, red.
    • Custom – I will discuss this in a future post.
  • Next, include Angular Material typography styles in our project.
    • This will add the mat-typography CSS class to the body tag: <body class="mat-typography"> <app-root></app-root> </body>
  • Finally, include browser animations in our project.
    • Declining this will disable most of the animations of Angular Material.

Now the installation is complete, there have been a few changes made to our project.

  • The following two dependencies were added to the package.json file."dependencies" : { "@angular/cdk": "^16.2.1" "@angular/material" : "^16.2.1" }
  • The Roboto font was added to the index.html file: <link rel="preconnect" href="https://fonts.gstatic.com"> <link href="https://fonts.googleapis.com/css2?family=Roboto:wght@300;400;500&display=swap" rel="stylesheet">
  • The Material Design Icon font was also be added to the index.html file. <link href="https://fonts.googleapis.com/icon?family=Material+Icons" rel="stylesheet">

There are also some changes to global CSS styles:

  • Removed the margins from the body tag
  • Changed the height : 100% on html and body tag.
  • Made the Roboto font as the applications default.

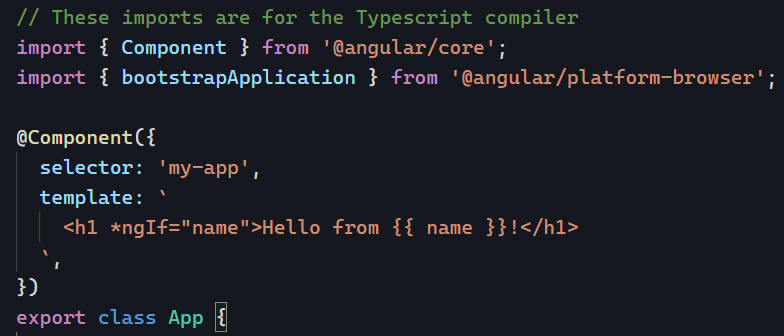
Now we have Angular Material installed, let’s try out an Angular Material component in our application. In the app.component.ts file add the following.

import { Component } from '@angular/core';
import { MatSliderModule } from '@angular/material/slider';

@Component({
  selector: 'app-root',
  templateUrl: 'app.component.html',
  styleUrls: ['app.component.scss'],
  standalone: true,
  imports: [MatSliderModule],
})
export class AppComponent {}
Code language: JavaScript (javascript)

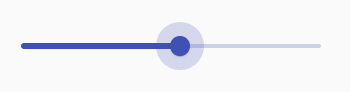
And in the app.component.html file add the following line.

<mat-slider>
  <input matSliderThumb />
</mat-slider>
Code language: HTML, XML (xml)

Here we’ll just add a simple mat-slider to the page to test everything is working.

If we now run the application in the browser, we should now see a mat-slider on the page.

Coming up in part two of this series we’ll dig deeper into the mat-slider and the recent changes from Angular Material 15 as Angular Material 16 was mainly minor changes and bug fixes.

What you need to know about ngModules

Angular modules (ngModules) are a source of confusion for Angular developers. This short guide will clarify what they are and how to think about ngModules in general.

Why ngModules?

Angular uses a Typescript compiler and a template compiler that turns our HTML templates into Javascript instructions to render the DOM in a browser.

The Typescript compiler knows how to compile our Typescript code (all our classes) because all dependencies have to be imported in these Typescript files:

Compiling the HTML template for the above component is a different task because *ngIf is not imported anywhere in our Typescript code. Yet, the Angular compiler must know about all directive/component/pipe dependencies of a component’s template to turn all that HTML into DOM instructions.

The solution to that problem was the introduction of ngModules. ngModules expose features meant to be used by the template compiler and does so in a “global” way, in the sense that importing an ngModule once is enough to enable all its code for all components within that module.

That’s why we rarely think twice about using ngFor or ngIf or any pipe: They are all part of CommonModule, which is automatically imported into the AppModule by default:

Do I need to create ngModules in my app?

Most likely, no. The Angular team introduced standalone components as an alternative to ngModules. A standalone component does not need such modules because all its dependencies are listed in the Typescript code itself:

There were only two reasons why you’d need to create your own ngModules in the past:

That’s it. Both of these problems are solved by standalone components, which can be lazily loaded and already bring all their dependencies along, so no ngModule is needed.

What about core, shared, and feature modules?

Those were parts of guidelines created for the sake of consistency within Angular applications. But you don’t need these modules for your application to work. You can still organize your code neatly in folders and sub-folders and not use ngModules. You can even have tidy, short import statements without having ngModules.

Usually, the more ngModules you create, the more work and problems you’re likely to encounter (circular dependencies, anyone?), which is why the Angular team introduced standalone components and already migrated all its internal directives and pipes to standalone. In the long run, ngModules will likely disappear.

All ng-conf 2023 videos available for free

I talked about ng-conf 2023 quite a bit back in June and just wanted to let you know that all videos from the conference are now available online for FREE. All you have to do is enter your email address here.

Here are my top 5 recommendations from the conference:

Enjoy! The first 4 talks are about 20 minutes long, and the last one is 35 minutes long.

Using setters with @Input()

Following our theme of lifecycle methods with ngOnChanges and ngOnInit, I want to give you another interesting trick to be notified when an @Input value changes.

We’re already familiar with that syntax:

But what if instead of applying @Input on a class property, we used it on a setter:

The input works the same as before, with the advantage of running several instructions when a new value is set. All of that without using ngOnChanges. This approach is practical if you have several side-effects to trigger depending on which input changes, which would be tedious to handle with multiple conditionals:

The setter approach brings more clarity and leaves less room for mistakes:

ngOnInit lifecycle hook

A few days ago, we talked about the ngOnChanges lifecycle hook. We saw that every time an @Input() changes, Angular will trigger ngOnChanges. ngOnInit is similar but runs only once; after all @Input() receive their initial value. The official documentation puts it like this:

The above definition might surprise you because there is a widespread belief that the purpose of ngOnInit is to run all initialization tasks, even though the class constructor runs before ngOnInit, as explained a few months ago in this entry: ngOnInit vs. constructor in Angular.

As a result, using ngOnInit is only 100% justified when you want to run some code that needs the value(s) of @Input() properties of your component/directive. In other scenarios, you can use a constructor to run your initialization code sooner.

Typescript Cheatsheet: Classes

A few weeks back, I shared a cheat sheet for Typescript interfaces. Today, I want to share a cheat sheet on classes, which can be complemented with my past entry on Typescript visibility modifiers, as their behavior in Angular has specificities related to HTML templates.

Note the common syntax section with the different options for field declarations:

Click this link to see a larger version in a browser.

How to create custom pipes?

Earlier this month, we covered how to create custom directives. Today, let’s tackle how to create custom pipes. Pipes help format data such as strings, dates, numbers, etc. The first thing to do is to use the Angular CLI:

ng generate pipe [name]

or ng g p [name]

It’s also possible to generate standalone pipes with the --standalone option:

ng generate pipe [name] --standalone

This creates a class with a single method transform to implement:

By default, the types are all set to unknown, as Angular CLI cannot guess what kind of data we want to format. As we know what we want to format and how, as well as how many arguments our pipe can accept, we can change that signature to make it more meaningful as follows:

Most pipes have optional parameters, so it’s always a good idea to have a default value for each, as I did in this example with displayPrefix = true.

Such a pipe can safely be used as follows:

Or, if we want to turn off the prefixes, we can use our optional parameter and set its value to false:

Displaying an overlay with Angular

We covered how to display a dialog in two lines of code earlier. Today, I want to illustrate how we can show an overlay on any portion of the screen using the Angular CDK.

First, it’s important to mention that Angular CDK is NOT part of Angular Material, and you can use the CDK independently from any component library.

To install the CDK: npm install @angular/cdk

Then, you would import the OverlayModule wherever you need it (here in a standalone component):

This module allows you to inject an Overlay service that can be used to create an overlay and display a component in it:

By default, overlays have a transparent background, so I added a panelClass for my overlay and then gave it a background color – Note that you also need to import the CSS styles from the CDK in your global CSS file:

There are plenty of configuration options, and if you want to see a different approach, look at this tutorial for a dropdown built with an overlay. The source code for my basic example is here on Stackblitz.

ngOnChanges lifecycle hook

ngOnChanges is an Angular lifecycle hook that is called whenever one or more of the bound input properties of a component changes. This hook helps update the component’s state or view in response to changes to the input properties.

To use it, implement the OnChanges interface as follows:

The above ngOnChanges method will run every time the parent component updates the value of name. We can get more information about what changed using the parameter of that method, an object that maps each changed property name to an SimpleChange object. The SimpleChange object contains the following properties:

  • previousValue: The value of the property before it changed.
  • currentValue: The value of the property after it changed.
  • firstChange: boolean value, true if it’s the first change made to that input, false otherwise.

As an example, the above code would output that object to the console as follows:

You can find that example in action on Stackblitz. The most common real-life example of using ngOnChanges is to be notified when an object ID changes so the component can request data for that ID using a service that makes an HTTP request, for instance.