viewChild() and contentChild() for signal-based queries

After introducing model() for signal-based 2-way bindings, let’s dive into viewChild() and contentChild() for signal-based queries.

In case you’re not familiar with Angular queries, they existed before Angular 17.2 as the @ViewChild and @ContentChild decorators.

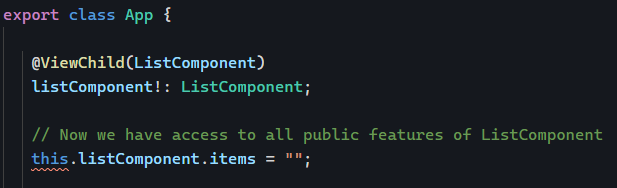
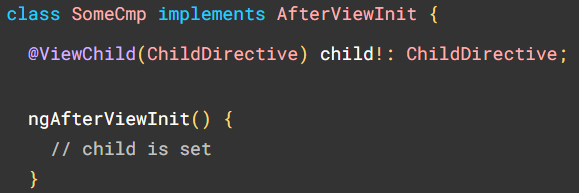
ViewChild is a way to get a reference on an HTML within the current component’s template. For instance, if we need our Typescript to access the instance of a given child component, I can use @ViewChild like so:

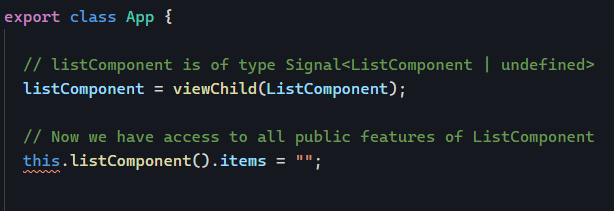
The new syntax gives us the same feature as a Signal:

The same goes with ContentChild. The difference between ViewChild and ContentChild is that ViewChild looks for an element inside the component’s template, whereas ContentChild looks for an element projected by the parent component into the ng-content element of the current component using content projection. You can learn more about content projection with this tutorial:

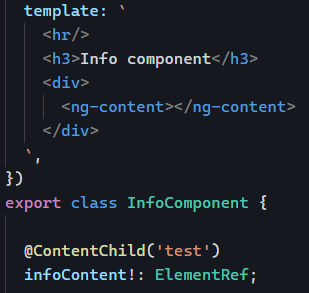
The above code will look for an element with a template reference variable called test in the projected ng-content.

We can achieve the same feature with the new contentChild() function, which returns a Signal:

Differences between these new functions and the old decorators

These new functions bring a few extra interesting features. For instance, we can get rid of possibly undefined values by making a query required:

Decorator-based queries were satisfied once the component was fully initialized, which means that running side effects required the use of specific lifecycle methods:

With signal-based queries, we receive a signal so we can rely on computed() or effect() to run such side-effects:

This approach is less intrusive and requires knowing just one thing: Signals! No more lifecycle methods are needed. You can find these different examples in action on Stackblitz here.

model() for signal-based 2-way data bindings

Angular 17.2 brought more features to the signal-based components approach, where almost everything in our components will become signals. We’ve already covered that inputs can be signals since Angular 17.1.

As an Angular developer, you’ve probably used ngModel in the past to create two-way data bindings. You might have created your own 2-way bindings using the approach covered in this tutorial, too.

All of that becomes even easier with Angular 17.2, as we can now do the following using the model function:

The above syntax means that we can pass a value to NameEntryComponent‘s age property as follows:

We can even have a 2-way binding (meaning something that acts as both an input and an output) by using the “banana in a box” syntax as follows:

This gets even better as we can specify that a value is required for that model input using model.required:

Since age and firstName are signals, we can update their values using set or update:

Where increaseAge is a method that uses an arrow function (as those aren’t supported in Angular templates):

You can see this example in action on Stackblitz here.

We can pass data to models using regular component properties:

But it gets even better as we can also use signals as-is with these 2-way bindings:

You can see this new example in action on Stackblitz here. Next week, I will cover 4 more functions available since Angular 17.2, all signal-based as well!

All about environment variables with Angular

Angular apps created with the Angular CLI used to have automatic environment creation built-in for new projects. While this automation was removed in recent years to simplify the learning curve of Angular, it is still possible to add support for different environments using the command:

ng generate environments

Before we generate such environments, it’s important to take a look at angular.json in the root folder of any Angular project, more specifically, the section called configurations in the build section:

This tells us that our project has two different configurations: production and development, and the default config for the ng build command is production.

Note that the serve section of angular.json has a similar config that extends the build targets and overrides the default configuration by making it development, which, as a result, is what we use when we run ng serve:

If we want to override the default configurations when running ng serve or ng build, we can do this by adding a configuration flag to the command and making it point to the proper configuration name, for instance:

ng serve --configuration=production

ng build --configuration=development

How do we plug environment variables into this?

When we run ng generate environments, the Angular CLI does two things:

It creates two new files in src/environments: environments.ts (the environment for production, which is also the default) and environment.development.ts for development.

angular.json gets updated with the following highlighted syntax:

As you can see, this instructs the builder to replace the production environment file with the development file when we use the --configuration=development flag.

Such environment files can contain any environment variables we want. For instance, say I want to define a SERVER_URL that is different for production and development. I can do that:

Now, to use such environment variable in my code, all I need to do is import it as follows:

Important: The import has to be from /environments/environment. Angular will pick the correct configuration based on the flag given to the build or serve command.

How do you create environments for QA, pre-prod, and more?

Now that we know that angular.json is the file where all this magic happens, if we want to create a qa environment, we can head to the configurations section of build, add a new configuration block with the name q (or anything you want, of course), and make the file replacement to a new file that I call environment.qa.ts:

Then, I can create that environment file under src/environments and add any variables I need in it:

And that’s it! We covered how to create environment variables for production and development and how to create other custom environments we might need.

5 tips for Strictly Typed Reactive Forms

Forms can be a very complex part of any web application, and today, I will cover some useful tips and tricks for using Reactive Forms with strict types.

  1. Use nonNullable: true to restore default values on reset

Form controls and groups are nullable by default in Angular, which means that the following example of FormControl value isn’t of type string:

Instead, if you try to read email.value, you’ll see that the type is string or null. Why would that be the case since we have a default value? That’s because the form can be reset with a <button type="reset"> on the form or by calling email.reset(), for instance.

The trick then is to make that control non nullable by adding the following option:

Now, when the form gets reset, email.value is equal to "test2@gmail.com", which is perfect in several different form scenarios, such as an edit form, where we don’t want to “lose” the previous values, but just “reset” to those values.

2. Using non-nullable form controls at scale

If we want to apply that same config to several form controls, we can put them in a FormGroup and pass that same nonNullable: true option to the FormGroup constructor instead of specifying it for every single control. But what if we use the FormBuilder service?

Then we can use the following syntax:

3. How to define the type of a FormControl with no default value?

If we do something like this:

We’re in trouble because Typescript will infer the type of password.value is null. Instead, we use generics and a union type to specify the expected type for that value, here string or null:

4. How to read the values of disabled form controls?

In complex forms, it is very common that some controls are enabled/disabled based on some condition. For instance, if the user selects the country “USA, ” we might enable a state dropdown with the US states in it and disable it for other countries.

When a control is disabled, its value doesn’t appear as part of the form group value. Here is an example where age is obviously equal to 21, but since that control is disabled, formGroup.value doesn’t return it:

The workaround here is to use formGroup.getRawValue(), which will return everything, including disabled control values:

You can see that example in action on Stackblitz here.

5. How to handle dynamic forms where we don’t know which controls will be present ahead of time?

In some cases, forms can be completely different depending on the type of user, country, etc. As a result, we don’t know whether a control will be present or not at runtime. We can define that uncertainty in Typescript using the optional operator ? when we define the type of our form:

In the above code, password is defined as optional in our interface, meaning that the compiler will not throw an error if we remove that control later.

If your form is 100% dynamic and handling proper types for each scenario would be a nightmare, you can use the more flexible FormRecord instead of FormGroup: