How to internationalize your Angular application?

Yesterday, we touched on how to change the locale of our Angular applications. The next step is to fully internationalize our apps by translating all text into different languages.

While Angular has its localization implementation to internationalize applications, the most popular library used for such a task is ngx-translate.

Why not use Angular’s internal implementation? The main reason is that Angular builds one version of your application per locale. As a result, if you have to support 20 different locales, your Angular build would output 20 different applications. This means that changing the site would result in a complete reload of the application. This also means that changing a translation requires a complete rebuild and redeploy of the application.

ngx-translate is much more flexible because it relies on pipes, directives, and services to translate our text at runtime instead of build-time. Here are some examples:

With TranslateService:

With TranslatePipe:

With TranslateDirective:

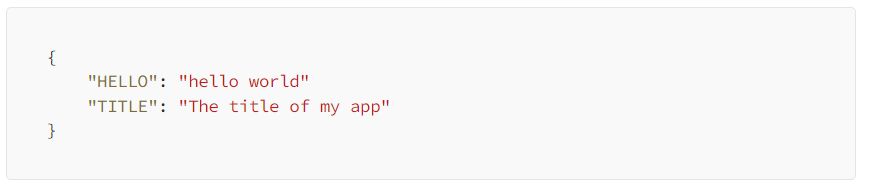
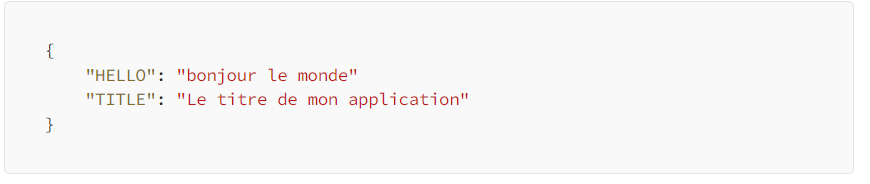
Translations come from specific files where translation keys ("HELLO" in my example) are mapped to actual values in each language. ngx-translate supports different formats out of the box (such as JSON and PO).

Here is an example of English translations stored in en.json:

And the same translations in French in fr.json:

All we have to do is indicate where the translation files are located and ngx-translate will download them as needed based on the locale.

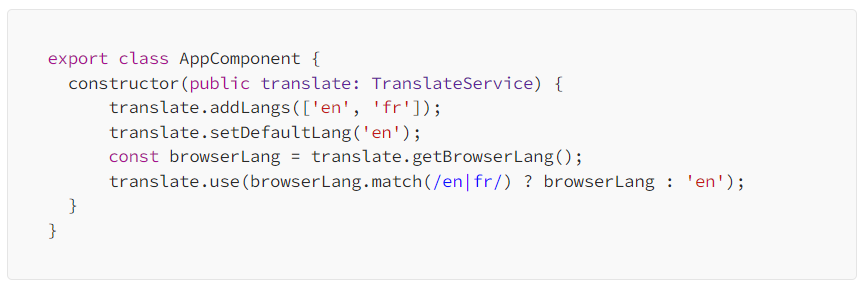
Defining which languages are supported as well as which one to use by default can all be done with the TranslateService from the library:

You can see a live example of ngx-translate in Stackblitz here. If you want to try it, you can use my ngx-translate step-by-step tutorial.

How to change the locale of your Angular application?

A locale is a combination of country and language, such as fr-CA for French spoken in Canada or en-US for English spoken in the US. Locales matter when you want to create an application that works all around the globe.

For instance, let’s take the following sentence in American English for the US:

On 04/01/2023, the price of this item was $2,056.23

The same sentence in French for France would be:

Le 01/04/2023, le prix de cet article était 2 056,23 €

As you can see, everything is different. Currency, number format, date format, and of course, language. Knowing all of these differences between locales would be a complex task. Fortunately for us, Angular knows about most locales, and all pipes and formatting functions use that locale to format dates/numbers/currencies correctly.

To support different locales, we have to import all of them in main.ts:

Then you can configure your providers to set a default LOCALE_ID:

And just like that, the expression {{ 2056.23 | number }} would display 2 056,23 instead of 2,056.23 (code example here). So our pipes will use that default locale from now on.

Partial utility type in Typescript

Typescript is excellent for type safety as it prevents us from making mistakes when declaring new objects. That said, an object is sometimes created by aggregating data from different sources (different API calls, for instance).

For instance, say we have the following interfaces:

We have to create an instance of the Question object, but let’s imagine that creating that object requires several steps. In the first step, I retrieve data for the question itself, and in the second step, I have to retrieve the list of options.

At first, my Question object would look like this:

But this code won’t compile, as myQuestion is missing the options property. We could assign an empty array to options, or we could make it optional in the interface using this syntax: options?: Option[];

All of that seems like cheating, though. Instead, we can use the Partial utility type to indicate that our object is in a temporary state:

The compiler is happy with the above code; we don’t have to change our interfaces.

myQuestion is now an object that implements a subset of the Question interface, with all properties marked as optional.

Typescript has several more utility types like Partial. I’ll cover more of those in the upcoming newsletters.

RxJs startWith operator

startWith is an operator that does something straightforward: It takes an existing Observable and makes it emit a default value immediately.

Its marble diagram looks like this:

What are some everyday use cases for startWith? Here is an example where I want to display a loader while data is being loaded from a service:

The loading property is used to decide when to show/hide a loader. This observable would first emit { data: null, loading: true } then the actual data with loading: false.

You can see the complete example here on Stackblitz ( I had fun with Typescript, the async pipe, and generics in that example, too).

A more complex example in this tutorial is Dynamic filtering with RxJs and Angular forms. I describe how to create a text input used to filter a list of states as follows:

We need startWith in that scenario to start the filtering feature before the user has typed anything in the text input. That’s one of the most common use cases for the startWith operator.

Named router outlets

Using the Angular Router is one of the best ways to emulate multiple pages/screens in an Angular application. However, we might sometimes want even more flexibility by having the equivalent of “sub-pages” where sibling elements on a web page can display dynamic content based on the current URL.

Something like this where three different divs can display different components without a parent/child relationship:

Angular allows us to have named router outlets to support such scenarios. We can define several sibling outlets by giving them distinctive names like so:

Then, in our router config, we can define which component goes in which outlet for which path:

Finally, when routing a component to an outlet, we have to repeat some of that config in the form of a rather lengthy command:

The above code will load two different components in two different named outlets. You can see a live example on Stackblitz here.

Using a resolver function or a title strategy to change the page title

Before we get into today’s topic: The Angular Team’s Request for Comments (RFC) for Angular Signals is now open to the public. Feel free to take a look and give your feedback.

Yesterday, we saw how to change an application’s title using the router config. Today, let’s cover more complex scenarios when we need a dynamic title set depending on other factors.

Using a resolver function

First, we might need some processing using a function to extract information from a service or API. In that case, we can use a resolver function that gets that data and returns it:

Note that the signature of that function allows us to return a string, an Observable, or a Promise. That way, we can make an API request to fetch some extra data if needed. For instance, in the above example, getUsername() returns an Observable (code here). This is another excellent example of using the inject function we covered earlier in this newsletter.

Using a title strategy service

For more complex scenarios, Angular allows us to create a custom TitleStrategy. Such strategy takes the form of a service that has to implement an updateTitle method:

Here is an example where I add a prefix to the title, then use the default title from the title property in the router config. Note that we could easily inject other services and perform async operations before setting the new title if needed:

Such title strategy service has to be provided as the default title strategy in our dependency injection configuration as follows:

You can see that example in action here on Stackblitz.

Changing the page title using Angular Router

This is a quick post to showcase a recent addition to the framework that is useful and very simple to implement. We can now have a title property in every route config:

The provided title is set as the page title (in your browser tab) when the user navigates from one page to the next. Just like that:

You can see a code example here on Stackblitz with a live version here. I used standalone components with the new provideRouter function just for the fun of it:

Note that there is also a Title service that can be used if you need to change that title dynamically later. Here’s a short tutorial of mine on that topic: How to change the page title and meta tags with Angular?