Using validation functions that work with both template-driven and reactive forms

Yesterday, we looked at how to write a validation function that works with reactive forms. Template-driven forms have a somewhat similar approach that also uses a validator function but requires a wrapper directive that implements the Validator interface like this one (example here):

The easiest solution to write a validation function that works with both reactive forms and template-driven forms is to create a directive for the template-driven form validation and then expose the validation function as a static method of that class:

A static method has two advantages in that scenario:

  • It’s public
  • It does not require an instance of the class (we can refer to it as CreditCardValidator.validateCcNumber)

As a result, we’d use our validation feature like this in a template-driven form:

And like that in a reactive form:

You can check the complete code for that example on Stackblitz here. Here is another tutorial for more information on that validation approach.

Custom form validation functions

Let’s continue our dive into Angular form validation capabilities. So far, we have seen how to display custom feedback to the user based on basic HTML validation features. Today, let’s see how to customize the validation itself.

The good news is that all we need is a function. That function takes a FormControl as a parameter and returns null if the value entered by the user is valid. If the value is invalid, we return a ValidationErrors object, any key/value object we want.

Here’s an example:

Pretty straightforward, right? If the zip code is wrong, we return an object with a custom error message. Otherwise, we return null.

Of course, we can validate more precisely by adding several different checks and specific error messages for each case:

Then to have a specific input use that validation function, we can pass it as a parameter to the FormControl constructor like so:

And then such FormControl gets bound to the proper input in our HTML template (this is the approach for reactive forms – we will cover a method that works for template-driven forms tomorrow). We can then add some error handling by using the errors property of our FormControl, which is going to have the ValidationErrors object returned from our validation function:

Now our form provides custom feedback using our custom validation function:

You can access the code for the above example on Stackblitz.

Implementing custom feedback to form validation with Angular

Yesterday, we saw that Angular uses six different CSS classes (actually, eight – I didn’t mention ng-pending, which is the temporary state when async validation is being performed, and ng-submitted, which applies to the form element only).

Today, let’s see how we can customize the feedback displayed to the user beyond CSS classes. The nice thing about Angular validation properties is that they’re not just available as CSS classes. They are also available as public properties on the ngModel and the ngForm directives used in our form.

We can access such properties using template reference variables to access the exported values of these directives as follows:

The above code would result in the following rendering:

Of course, displaying true or false is not very user-friendly. Instead, we can use *ngIf and make the experience a little more polished:

Which looks like this:

We can apply the same idea to the form element and decide to disable the submit button as long as the form is invalid:

Or we could even hide the button as long as the form is invalid:

You get the idea. As simple as those validation properties are, they enable many possible different customizations of how we display validation feedback and hints to the user.

You can play with my code example on Stackblitz.

Basic form validation with Angular

Validating user input in HTML forms can be a tedious task. In this new series, we’ll look at how Angular can help us implement painless form validation.

First, it’s essential to know that Angular relies primarily on native browser validation features that use modern HTML properties. For instance, if a form field has to be filled out, you can mark it as required using the required HTML attribute:

If the user input has to match a specific format, you can specify such format using the pattern attribute, which uses a regular expression syntax – here, a 5-digit number

Other available HTML validation attributes are min, max, minlength, maxlength. You can also set the input type to something more specific than text, such as email or tel for additional validation and capabilities. Here is the list of all possible input types.

Once you have specified your validation rules using such attributes, Angular is going to toggle some CSS classes on the corresponding HTML elements automatically: ng-valid when the entered value is valid, and ng-invalid when the entered value is invalid.

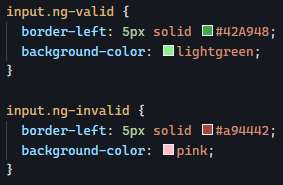
This means that all we have to do to provide visual feedback to the user is implementing such classes in our CSS stylesheets:

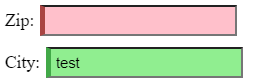
The above CSS classes result in the following styling of form inputs:

If we want to fine-tune the rendering of our form based on whether the user has already typed something or not, there are additional classes added by Angular for such purposes:

  • ng-pristine: true when the user has not changed the element value
  • ng-dirty: opposite of pristine — true when the user has altered the element value
  • ng-touched: true when the user has put focus on the element (say clicked on it) and then removed the focus from the element (clicked away from it)
  • ng-untouched: Opposite of touched — means the user hasn’t put focus on the element or hasn’t removed that focus yet.

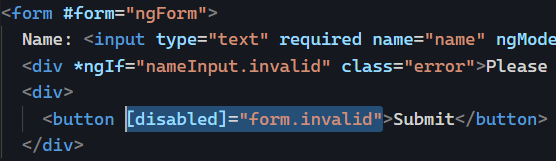
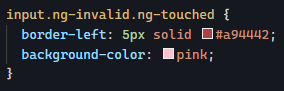
Using combinations of these classes is powerful. For instance, here is how we could add the error styles only once the user has “touched” an input:

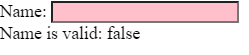
Which results in the following default rendering:

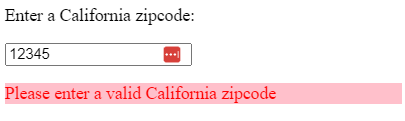
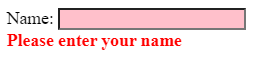
And then once the user has typed something and removed the focus from the element:

You can try a few live examples using the code from this Stackblitz repo. Tomorrow, we’ll see how to do more than just CSS styling using those validation properties.