The power of Angular selectors

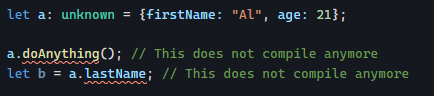
Yesterday, we saw how using directives instead of components can increase code reusability by not tying our code logic to a specific HTML template.

Now, if we want to write some code once and for all and make it work for all HTML elements in our app that match some specific conditions, we have another underused tool at our disposal: CSS selectors.

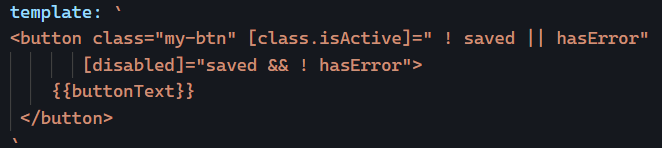
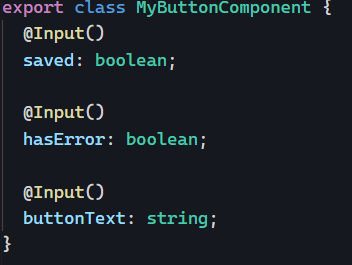
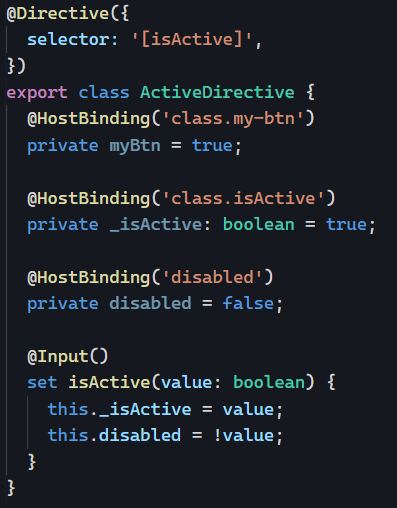
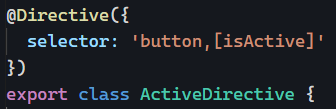
For instance, let’s say we want the isActive directive from our previous example to be applied to all buttons in our application. Of course, we could manually look for all buttons and add the isActive attribute to them, but that would be tedious and error-prone.

Or we could be more imaginative and change the selector of that directive so that it applies to all buttons and any other elements that have an isActive attribute:

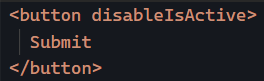
With that implementation, all current (and future) buttons will have that directive applied to them. But what if we want to make any exceptions and disable the directive on some buttons? That’s how we could do it:

Then all we would need is to add the disableIsActive attribute to those buttons that don’t want the isActive directive:

My point here is that there are some creative use cases for CSS selectors, and those selectors are the same as those used for CSS styling, meaning that we can rely on classes, attributes, element names, or any combination of the above!

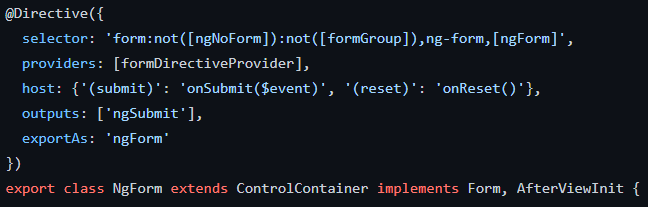
The Angular framework does precisely that in quite a few places. If you’ve ever wondered how forms get auto-magically handled by Angular, now you know the answer. The ngForm directive has a complex selector that would apply to all form elements by default:

When to create a directive vs. a component?

Most Angular applications are composed of a majority of components and just a few directives if any. Today, I’d like to show you an example where a directive makes much more sense than a component.

Consider the following component template:

We have created a component tied to one single HTML element (button), and all the logic in that template is about changing attribute values (for the isActive class and the disabled attribute).

To achieve this, we needed three specialized inputs that resulted in a loss of reusability:

The above isn’t ideal because:

  • Our button can only display text, not any HTML (so no icons, for instance)
  • Our button assumes that its state always depends on saved and hasError, but what if we want to add a third variable to the mix for other use cases?

Let’s create a directive instead:

Which would be used like so:

This implementation is a lot better because:

  • It would work with any HTML element, not just buttons (assuming the element supports disabled properly)
  • The button can display anything, not just text
  • The criteria for isActive to be true depends on the use case and isn’t tied to just saved and hasError.

The point here is that using a directive in that scenario made our code more flexible, and as a result, more reusable. That’s why popular component libraries rely heavily on directives rather than components. Here’s an example from the Angular Material documentation:

You can see that mat-button is a directive, not a component. That way, it can be used with a button or an a tag. You can find the example code of this post on Stackblitz.

Think about this the next time you’re tempted to create a component with one or two lines of HTML in its template. Most likely, what you need instead is a directive.

Check out this tutorial for another example of a directive that makes perfect sense instead of using a component.

RxJs forkJoin operator

Our weekly RxJs operator is forkJoin. This operator can be applied to any number of Observables. When all these Observables complete, forkJoin emits the last value from each one of them.

A common use case for forkJoin is when we need to trigger several HTTP requests in parallel with the HttpClient then receive all of the responses at once in an array of responses:

The critical feature here is that those requests happen simultaneously, not one after the other (better performance), yet we receive the data when both have completed, which is convenient.

Another interesting syntax for forkJoin is to pass an object instead of an array as follows:

Here is a complete example of forkJoin in action.

As a reminder, my 2-hour RxJS workshop from ng-conf 2022 is also available on Youtube for free!

How to generate DTOs for data objects?

Yesterday, we saw how to use json2ts to generate type definitions for our Angular applications. In addition, we saw that interfaces are optimal for performance reasons. Yet, the caveat with interfaces is that they can’t act as a Data Transfer Object (DTO) on their own to change the data you’re dealing with, nor do they perform any runtime checks.

As a result, some people might prefer to use Quicktype over json2ts as it has more configuration options when generating code from a JSON string:

As you can see, those options enable additional capabilities, such as using union types instead of enums (as recommended earlier), throwing errors if an object you’re parsing doesn’t have the right shape, and even some DTO operations such as using camel case instead of underscore in property names.

Of course, you can tweak that generated code and add additional DTO rules as needed.

Quicktype also supports languages other than TypeScript, so you could use that same tool to generate the server-side types for your data in Java, C#, or Python, for instance.

How to generate type definitions for TypeScript?

This week, we have been looking at union types and the downsides of using any or unknown when we don’t have any accurate type information.

Today, let’s look at how to generate type information out of any JSON data. The first tool I want to mention is json2ts.com, a website where you can copy-paste any chunk of JSON syntax and get a fully-typed output of interfaces with inferred types and everything.

For instance, if I copy-paste the following JSON into json2ts:

We get the following set of interfaces ready to be used in our code:

The more data you give to json2ts, the more precise it is. For instance, if you give it an array of similar objects, json2ts can identify if some properties are optional or support multiple different types.

Also, it’s worth mentioning that interfaces are better than classes to describe type information because they do not get compiled into anything at all (like union types), thus bringing type safety to your code without making your production code bigger.

Union types in TypeScript

Yesterday, we talked about any, unknown, and the pros and cons of using such types.

Today, let’s focus on union types, an alternative to enums that are more performant and flexible to describe custom types. Let’s assume we need to support different currencies in our application. Since currencies are mostly a code/symbol, we could take the easy route and do the following:

But this doesn’t help us much. For example, is any string a valid currency? Definitely not. So a better option would be to create an enum for it and describe all possible values in it:

Now we have a proper type to describe what a Currency is. But enums aren’t that convenient because they can’t be used as-is in an Angular component template, requiring some workarounds. Also, they get compiled into a monster structure of JavaScript that increases the size of your code bundle for no valid reason since we don’t have type-checking at runtime in the browser.

Enter union types

Union types solve all these problems. They’re lightweight and do not get compiled into anything at all, which means they’re always more performant than enums (less code to download + less code to interpret = faster app in the browser). They guarantee type safety and can be made out of anything, including strings:

A lot more can be done with union types, such as having more options than just one single type for a given variable:

Angular uses union types a lot. For instance, if you’ve ever used the canActivate router guard, its signature supports up to 6 different return types, all defined with union types:

And we can have unions of union types when more granularity is needed with specific sub-types:

TypeScript: any vs. unknown

TypeScript has some abstract types that can be helpful in Angular applications. Most people have encountered the type any at some point, and it has become a typical anti-pattern in several projects where developers decided: “I don’t want to bother using proper types for this object, so I’ll use any.

Here is why any is dangerous and not recommended:

Now, if we replace any with unknown, things look different:

As you can see, unknown preserves type safety. If we receive an object from a third-party library and need to pass it around to another function, unknown is perfect for that.

One way to think about unknown is: We have this object that we don’t know what’s inside, so we won’t allow touching it; we’ll store it or pass it around.

I can’t think of good reasons why we would need to use any in Angular code at this point. Using any is refusing to use TypeScript properly and falling back to untyped JavaScript.

In the next few days, we’ll cover different techniques and tools we can use to create accurate type information so we don’t need any or unknown anymore.

Change detection for Angular components

Angular comes with two component change detection strategies: default and onPush.

Default is used by default: Angular will check if your component needs to be refreshed every time something happens in the browser. Zone.js triggers such change detection by notifying Angular when a DOM event happens (someone clicked on a button) or a setTimeout completes, or an HTTP request completes.

In other words, any time a callback function runs in the browser, Angular will check if our components need to be re-rendered with new data.

With onPush, the change detection behavior changes. onPush indicates that our component only relies on inputs to display data (in other words – it’s a presentation component) and that DOM events or HTTP requests do not impact the HTML rendering of that component.

As a result, you can use onPush to improve the performance of your presentation components, which is another good reason to follow the presentation vs. container components approach covered yesterday. The official documentation here shows an in-depth dive into change detection strategies.

Container vs. Presentation Components

One of the fundamental concepts of component architecture in Angular applications is to find the right balance between container and presentation components.

Let’s define what those are:

  • Presentation components are reusable, simple pieces of UI. Think buttons, dialogs, cards, nav bars, etc.
  • Container components are the exact opposite: They’re not reusable. They’re tied to a specific use case. Those are usually entire screens or sub-screens, the app component, etc.

From a code standpoint, container components use services to interact with the back end. Such components know where to get the data using those services and then feed that data to their children using inputs, which are presentation components:

A simple way to identify those components is that presentation components only have inputs and outputs, no dependency injection. Container components have dependencies injected and most likely no inputs or outputs.

When to use container vs. presentation components?

Suppose you have components that are good candidates to become presentation components but are using services. In that case, you can most likely inject that service in its parent container and then pass the data to said component using an input. That way, your presentation component will be reusable in other places without being tied to a specific use case.

Of course, just like with any best practice, there are exceptions to consider. There are times when reusability makes sense and others when it does not. Do not force your components into one of these categories if it doesn’t make sense, but give it a try if it’s a quick win. Your application architecture (and possibly performance – stay tuned for more on that soon) will thank you later.