Conditional Dependency Injection

Yesterday, we saw how to use our component (and module) hierarchy to configure dependency injection with Angular.

Today, let’s look at how we can make dependency injection conditional. For instance, say we have a LoginService for production that requires features unavailable at dev time or that we do not want to use during the development phase.

What we can do then is configure our providers to make a decision based on the current environment:

Using the ternary operator [if true] ? [then this] : [else that], we can decide when to use a service over an alternative version.

If you need to make that dependency injection decision depending on other factors, such as data from other services, or if you have several different possible services to inject, you can use a factory function that relies on other services (deps) that are injected in the factory function as follows:

The order of the dependencies in deps has to match the order of the parameters in the factory function passed to useFactory.

Dependency Injection Priority and Hierarchy

Yesterday, we covered the different options to configure our providers with the providedIn syntax. Today, let’s look at how Angular resolves dependency injection using hierarchical injectors.

Let’s assume we have a ButtonComponent that needs a LoginService. Angular is going to check the injector of ButtonComponent to see if a LoginService is available there (since all components have their own injector, configurable with the array of providers or the providedIn syntax).

Suppose the component injector doesn’t know about that service. In that case, it’s going to ask its parent component, then grandparent, making its way up the component hierarchy till it gets to the root injector of the application:

These are called hierarchical injectors: They rely on our component hierarchy. This explains why changing the providers’ config at the component level impacts a component and all its children.

What about modules?

If a service cannot be found in the component tree, then Angular is going to use a similar resolution path using the module hierarchy, from the child modules all the way up to the AppModule.

If no service is found, then Angular throws an error stating no provider is available for that service.

Dependency Injection and Provider Config

As Angular developers, we use and create services fairly often. So, in today’s post, let’s demystify the following syntax and see what the different options for it are:

When a service is provided in the root injector (providedIn: 'root'), it means that such a service can be injected into any component of your application, and that service will be a singleton shared by all consumers in your application.

If we want to restrict the scope of a service, we can provide it in a module or a component instead of the root injector. The syntax looks like this – we use the class name of the targeted module or component:

When a service is provided in a module, only the components/directives/pipes/services of that module can inject that service. However, when provided in a component, that component and its children can inject that service.

From a syntax standpoint, it’s also important to mention that using providedIn is equivalent to doing the following in a component or a module:

The above code is equivalent to the following:

So you only need one or the other; both would be redundant.

Finally, there is another option available: platform.

The service would be injectable into any Angular app in the current browser tab. It’s a rare use case, but if you’re running multiple Angular applications on the same page and want to share a service between these applications, platform is what you need.

For more information, you can read that post of mine that covers all these options (note: providedIn: 'any' used to be an option but is now deprecated, which is why I didn’t mention it)

How to decide which RxJs operator to use?

There are more than 120 operators in RxJs, and with so many options, it can be challenging to decide which one we should use. We covered a few of them in this newsletter so far and mentioned websites such as Rxmarbles to learn more about these operators.

Luckily, Rxjs.dev has an interesting feature called the operator decision tree. This tool asks a few questions about what we’re trying to do and ends up suggesting one operator that answers that need.

It uses a wizard-style approach:

The tool is excellent and does save a lot of time researching operators in the documentation. I found some scenarios where it suggests deprecated options. Still, each deprecated feature has a link to its replacement, so it’s easy to find the actual operator to use from there.

Angular Signals are in the works!

This is probably the most significant change coming to the framework since the release of Angular v2 many years ago.

A new feature called Signals is being prototyped in Angular, and we can follow the entire discussion on GitHub.

Where do signals come from?

They are the answer from the Angular team to several different requests from the developer community over the years, more specifically:

  • Being able to use Observables with @Input
  • Being able to use Angular without Zone.js to have more control over change detection.
  • Having state management built-in with the framework so we don’t need libraries like NgRx or NgXs anymore.
  • Being able to use Angular in a reactive way without relying on RxJs.

In other words, Signals will be a clear and unified model for how data flows through an application and will work without any dependency (no RxJs, Zone, or other third-party library needed).

Will we have to change everything in our apps?

No, because the Angular team has communicated that:

  • Signals will be optional, and the current way of working with Angular will remain in place.
  • Signals will provide ways to play nicely with RxJs (a Signal can be turned into an Observable and vice-versa)

What will signals look like?

It’s still early to have a definite API. We’re not 100% sure what signals will look like, but the early prototype API looks like this:

Creating a signal with a default value (of 0 in this example)

The above line of code would be very much like doing const counter = new BehaviorSubject(0);

Setting a new value to a signal

Updating a value derived from the current value

Updating a value within a signal (mutation of the internal state)

Displaying the value of a signal in an HTML template or Typescript code

The above would be the equivalent of counter | async when using RxJs. The nice thing is that with Signals, there will be no more .subscribe() and .unsubscribe().

If you want to dive into more details, here is the documentation of the current prototype. Again, this is still early and I would not expect Signals to become fully available before Angular 17 or 18, but this is very exciting nevertheless!

Image optimization directive – NgOptimizedImage

The Angular team has always focused on improving the framework by making everything faster, from the compiler to our runtime code that gets optimized, minified, and tree-shaked.

The Image optimization directive was added to Angular 15 in that same spirit.

What it does:

  • Intelligent lazy loading: Images invisible to the user on page load are loaded later when the user scrolls down to that page section.
  • Prioritization of critical images: Load the essential images first (header banner, for instance)
  • Optimized configuration for popular image tooling: If you’re using a CDN, the directive will automatically pick the proper image size from that CDN, optimizing download sizes based on how many pixels of that image will be displayed on the screen.
  • Built-in errors and warnings: Besides the above built-in optimizations, the directive also has built-in checks to ensure developers have followed the recommended best practices in the image markup.

All you have to do to get all these benefits is to use the ngSrc attribute instead of just src:

For CDN optimization, you can use one the 4 existing providers (or create your own) so that the proper image size is always requested. In my example, I use the Imgix CDN, so my config looks like this:

From that information alone, we can tell that Angular was able to generate the proper image URLs to fetch the smallest image possible to fit our div – no more downloading of a 2000 x 1000 pixels image if all you need is 200 x 100:

The NgOptimizedImage directive is part of the @angular/common module, just like ngFor and ngIf, so it’s already part of your toolkit if you use those directives.

It can also be used as a standalone directive without importing CommonModule. My example is on Stackblitz here. The official documentation and more information about that directive can be found here.

Standalone Application and Router config

With this daily post, let’s get back to the new Angular standalone features. So far, we have seen how to create standalone components, add dependencies, and lazy-loading of standalone components.

Since the primary goal of standalone components is to have less NgModules, what about creating an Angular application with no NgModule at all?

Enter the bootstrapApplication function (from @angular/platform-browser). All it needs is the root standalone AppComponent as a parameter:

And that’s it. No AppModule needed. Now you’re probably wondering: How to add some router config?

There’s a provideRouter function for that, along with several router utility functions to configure preloading, guards, error handling, and more:

Last but not least, if you need to use services from a third-party module and don’t want to import the other features of that module (components/pipes/directives), you can also do the following:

As you can see, standalone components have paved the way for many new function-based features (instead of classes/services), and we’ll see even more of those in the coming posts.

What’s new in Angular 15.2?

Angular 15.2 was released a few days ago. The main addition to this release is a new Angular CLI schematic to migrate your existing code to standalone components:

ng generate @angular/core:standalone

This schematic isn’t documented on the Angular website yet, as it’s still in its early stages. It looks like it has three options so far:

  • convert-to-standalone: Default option. Converts all components to standalone ones except those declared in your main AppModule.
  • prune-ng-modules: Deletes all modules that aren’t necessary anymore because their features have been migrated to standalone components.
  • standalone-bootstrap: Bootstraps your application with the bootstrapApplication function and migrates the components referenced in your AppModule.

I’ll post more information in the newsletter as this new schematic evolves.

Another update is that class-based guards are being deprecated, which means the Angular team is pushing for its new function-based router features.

Lastly, a new RouterTestingHarness utility has been added to help with unit-testing components loaded by the router. The Angular team released a short guide to explain how to use it.

RxJs Subjects: When and why?

Our RxJs topic for this week is going to be Subjects. Angular has multiple services and classes (such as FormControl) that give us access to Observables that we can subscribe to. But what if we want to create our own Observable to emit data?

While there is an Observable constructor and Observable creation functions such as of and from, none of these solutions are as powerful and feature-complete as using a Subject.

Why is that? Because Subjects check a lot of boxes for us:

  • They are multicast, which means they support multiple subscribers out of the box (an Observable does not by default)
  • They can replay values to new subscribers (BehaviorSubject and ReplaySubject do that)

Those two features are critical when building Angular apps because our data is usually handled by services, then consumed by components. For example, suppose a service fetches some data (say, the user session info upon login). In that case, it is essential for components that will be displayed later on the screen to subscribe to that information and get the current session info right away (that’s why replayability/caching the latest value is critical).

As a plus, the Subject API is incredibly straightforward:

So we have complete control over what we emit, when, and how. All with a single method: .next()

And since a Subject is a specific type of Observable, you can subscribe to it the same way: subject.subscribe(). That said, it is a best practice to expose the subject as an Observable by using the asObservable() method as illustrated here:

For more details on how to use Subjects and what are the different types of Subjects, feel free to head to my RxJs subjects tutorial.

Lazy-loading standalone components

Now that we’ve covered both standalone components and lazy-loading Angular modules, we can introduce the concept of lazy-loading a standalone component, which wasn’t possible before Angular 14.

From a syntax standpoint, the only difference is that we use loadComponent instead of loadChildren. Everything else remains the same in terms of route configuration:

Now, one of the benefits of lazy-loading a module is that it can have its own routing config, thus lazy-loading multiple components for different routes at once.

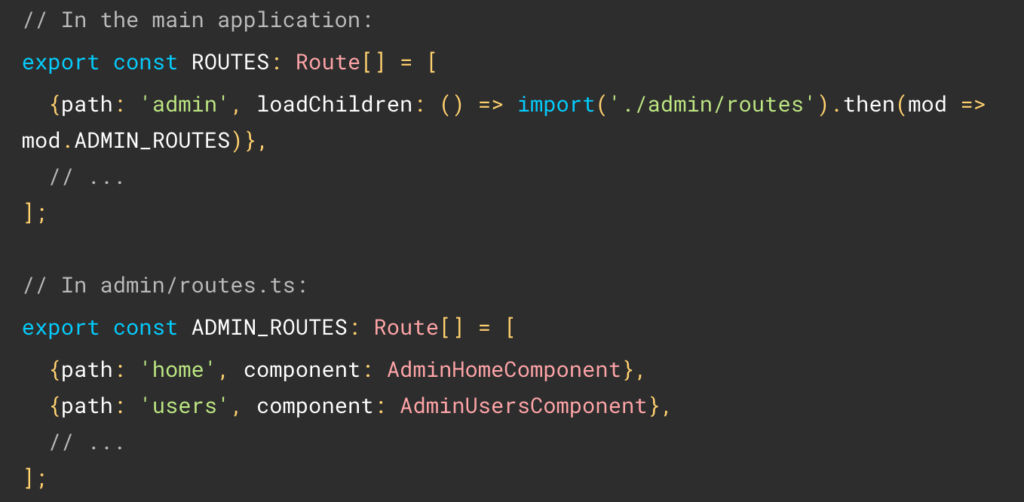
The good news is that we can also lazy-load multiple standalone components. All it takes is creating a specific routing file that we point loadChildren to, like so:

One last cool thing to share today: Along with the above syntax, Angular now supports default exports in Typescript with both loadChildren and loadComponent.

This means that the previous verbose syntax:

loadComponent: () => import('./admin/panel.component').then(mod => mod.AdminPanelComponent)},

Can now become:

loadComponent: () => import('./admin/panel.component')

This works if that component is the default export in its file, meaning that the class declaration looks like this:

export default class PanelComponent

The same applies to loadChildren if the array of routes (or NgModule) is the default export in its file. You can see an example in Stackblitz here.