Angular 17: New esbuild builder with Vite

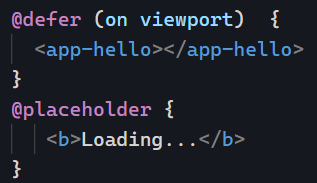
Who doesn’t like faster builds? Since Angular 2, the Angular team has consistently worked on making our builds quicker and faster. Angular 16 included a developer preview of a new build system based on esbuild and Vite.

With Angular 17, this feature is now enabled by default for new apps, with reported speed improvements of over 67% in most applications.

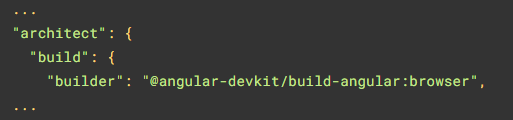
To enable this new build system in existing apps (that use v16+), open your angular.json file and look for all the places where @angular-devkit/build-angular:browser is used:

Then, replace those instances with @angular-devkit/build-angular:browser-esbuild

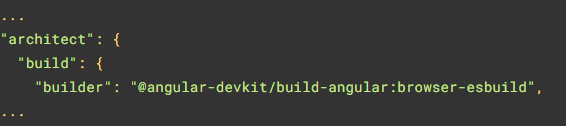
And your next run of ng serve or ng build will automatically use this new build system. Nice and easy! If you use server-side rendering or have tweaked the builders in the past, you’ll want to look at the extra instructions listed on this page.

Angular 17: Trigger options for @defer

Yesterday, we introduced the new @defer bloc to lazy-load components on the screen. We saw that @defer includes several config options to display errors, placeholder, and loading templates.

Today, let’s focus on the possible triggers for such lazy loading.

idle

This is the default option. Will load the contents of that block once the browser is in an idle state:

viewport

Triggers the deferred block when its content enters the viewport. For instance, that would be when the user scrolls down, and the block becomes “visible.” Note that this option requires a placeholder (used to detect when the element comes into the viewport):

Another interesting option is to load the deferred block when another specified element makes it into the viewport using a template reference variable. That option does not require a placeholder:

interaction

Waits for the user to interact with the placeholder to load the deferred block. Even better, this trigger can be combined with another element so you can lazy-load a component on a button click, for instance:

The above code can be tested on Stackblitz here.

hover

Similar to the two previous examples. Waits for the user to hover over the placeholder or a specified element:

immediate and timer

immediate triggers the deferred block immediately as soon as Angular has finished rendering. Timer waits for a specified delay:

You can see most of these different examples on Stackblitz here. There are a few more options for @defer that I’ll cover later to keep this newsletter short and readable. It’s incredible what such a small API can do!

Angular 17: Lazy-loading with @defer

Angular 17 is available, and we already covered its new optional control-flow syntax. Today, let’s cover the new option to fully customize lazy-loading with Angular using @defer.

What’s great about @defer is that it does not rely on the Angular router anymore. You can lazy-load any standalone component anywhere, anytime, and on your terms, as you can decide the trigger to load that component.

Let’s start with a basic example:

The above code will load the HelloComponent as soon as the browser is idle, which means it’s done loading everything else. While that is happening, we can decide to display a placeholder, and in my case, I decided that such a placeholder would be displayed for a minimum of 2 seconds no matter what. You can use seconds (s) or milliseconds (ms) as a time unit:

You can see the above code in action here on Stackblitz. Note that the Angular Language service was updated accordingly, so VS Code (Stackblitz is a web-based VS code), Webstorm, and other IDEs already know about the new @defer syntax and do proper highlighting of it!

We can also specify a loading template and an error template, all customizable with a minimum amount of time during which we would display those templates (example on Stackblitz here):

I used “big” numbers to see the different states in my examples. Note that @loading supports an “after ” option only to show the loading template if loading takes more than a certain amount of time, so you don’t have to display anything if the component loads quickly. Both parameters are optional:

These are the different new blocks available with @defer. Tomorrow, we’ll look at the various possible triggers.

The Angular renaissance is on!

With a new logo and a new website released just before a new version (v17 will be released on Wednesday, November 8th), Angular is more than ever in the middle of a remarkable transformation:

There is a lot to unpack from yesterday’s live event (you can watch a recording here), and I will cover all these updates over the next few days, starting today with the new home for Angular: angular.dev

The website is a complete rewrite of all contents and tutorials from the Angular team and will replace angular.io soon. I have played around with it a little bit, and I find the site to be incredibly fast, especially the new search feature accessible from the left menu and the ctrl + K command:

The content is also straightforward and easier to navigate than angular.io. It’s an absolute pleasure looking for information and finding it almost instantly with lots of examples and great info:

There’s also a new playground with different examples to play with. You can edit the code on the website and see the result live, just like with Stackblitz:

Tomorrow, I’ll start getting into the main updates of v17, and there’s a lot to unpack there as well! In the meantime, I already got the new logo on my laptop:

What do you think about it? Note that the colors are not set in stone, and the actual logo on the website is a gradient that’s constantly changing colors from a primary palette outlined here:

More info about the new Angular branding can be found here with downloadable logo samples.

Copy and paste in JavaScript

Sometimes, it’s helpful to copy and paste some text programmatically. There are different options in Javascript, and the only one that works consistently is the following:

You can see an example of the above code in action on Stackblitz here. The only caveat is that such code can be triggered from an event listener, such as onClick.

A newer API is emerging but isn’t fully supported anywhere, and Firefox support is significantly lacking, so I wouldn’t recommend it. The main problem with that new approach is that it requires the user’s permission, and there’s currently no way to ask for it. The Permissions API seems to be a bit inconsistent and lacking at this point:

It’s a shame because that new API would allow copying custom content into the clipboard, not just the current user’s selection.

By the way, a quick reminder to tune in for the Angular live event today on Youtube.

Dependency Injection: ElementRef

We use dependency injection daily to inject services in our Angular “objects,” such as components, directives, pipes, and other services.

Angular does offer other kinds of injectables, though, and one of those is the ElementRef. Its primary purpose is to give us direct access to the native DOM element of a component or a directive.

Here’s a code example (you can test it in Stackblitz here):

The above code changes the background color of the HTML element to red. It’s important to note that the above implementation is not ideal. We should use Angular data bindings for such a use case, which are a lot more readable (code example in Stackblitz here):

The Angular team doesn’t recommend using this API either:

So when should we use ElementRef? Just like markForCheck, it’s a last resort option, and we should use it when everything else fails. The only use case I would consider for ElementRef is when I have to interact with a non-Angular 3rd-party library, such as a chart or a map library, after carefully checking that Angular wrappers are not available on npm (or such wrappers do not pass my tests for good, reliable dependencies)

RxJs eslint plugin for Angular

Last month, I discussed eslint and how to use that tool to parse your code and receive feedback on best practices and possible improvements.

Today, I want to mention an eslint plugin explicitly written for RxJs with Angular: eslint-plugin-rxjs-angular.

This plugin adds three possible validation rules:

All rules are optional, and it doesn’t make sense to use all of them at once because these best practices are contradictory in the sense that the goal is for you to choose one of these three approaches and be 100% consistent with it:

  1. The first rule will enforce that you always use the async pipe in your components.
  2. The second rule doesn’t care about the async pipe but wants to ensure you unsubscribe on destroy.
  3. The third rule is the most specific, as it enforces that you always use a Subject with takeUntil to unsubscribe in your components.

I’d suggest using the first rule only because we covered before that the async pipe is the safest and most performant option. And remember that you can always use the async pipe. There are no excuses!

Special Angular Event Next Week

If you follow the Angular team on social media (Youtube channel or Twitter/X), you probably saw that the team scheduled a special live event for next week. The team went as far as changing their logo on these channels to tease us:

In the past few months, we have all noticed what has become known as the renaissance of the framework, with new features such as standalone components, Signals or the new control flow API that is happening next week with the release of Angular 17.

All these changes embody the spirit of making Angular easier to learn by removing the need to know about some of the most difficult concepts (ngModules, RxJs, change detection, etc.) when getting started. All I can say is that it’s going to be a great week to be an Angular developer!

Click here to get notified when the live event starts on Youtube.