Browser dev tools for LocalStorage

Last week, I introduced localStorage and sessionStorage. I also suggested a few options to get notifications when such storage gets updated.

Today, I will cover how we can visualize and debug storage data. In Google Chrome, open the dev tools (right-click on the webpage, then “inspect” or press Ctrl + Shift + I).

Once the dev tools panel shows up, click on the “Application” tab:

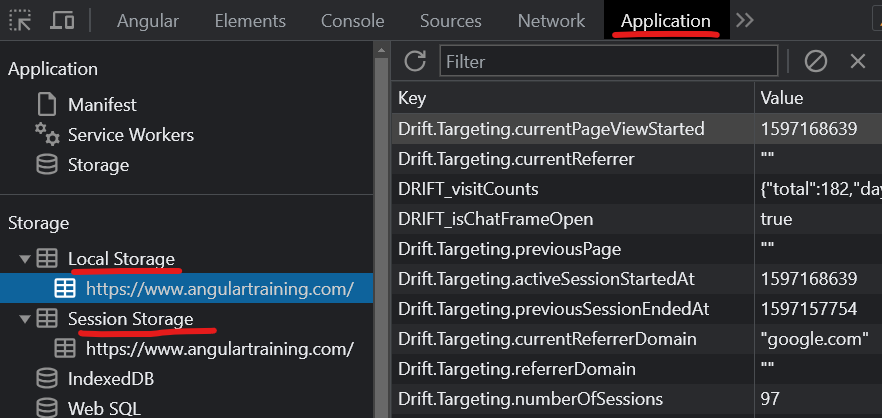
You can select Local Storage or Session Storage on the left-hand side. This shows you the contents of those storages on the right-hand side in key-value pairs. Storage is by domain, so using those tools on a different website would show you different data.

If an object is stored as a JSON string, you can click on the key-value row, and Chrome shows a collapsible version of that Javascript object at the bottom of the screen, making it easy to explore complex objects:

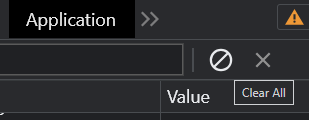
There are two buttons in the top right corner of that same panel. One allows you to clear the entire storage for the current domain, while the second one (the X) clears the currently selected key-value pair:

You can edit a key or value by double-clicking on the corresponding cell in the right panel’s table. This makes testing different values, resetting a cache, or debugging specific scenarios easy.

ng-class for dynamic styling

This is a guest post by Tomas Kotlar. Thanks for your contribution, Tomas! Remember than anyone can reach out to me to contribute or suggest post ideas.

ngClass, as defined by the Angular documentation, is a built-in attribute directive that dynamically modifies the behavior of other HTML elements.

Common use cases

Conditional Styling

Let’s consider a button element that changes color based on whether it’s disabled or active. We can use ngClass to toggle between the ‘active-btn’ and ‘disabled-btn’ classes, giving the button a responsive touch:

Whenever the button is clicked, the toggleDisabled() function will be executed, toggling the value of isDisabled.

As a result, the button will become enabled or disabled based on the updated value of isDisabled, and the corresponding style (active or disabled) will be applied.

Using an Object

ngClass goes beyond just toggling classes. It also lets you iterate over object properties to apply your styles conditionally. This can be handy when working with data-driven apps or displaying dynamic content.

For example, using the following data:

In our HTML, we can apply dynamic styles using an array:

Based on the type (‘hero’ or ‘villain’), the directive applies the appropriate highlight class to the hero card.

Combining classes using conditions

With ngClass, you can mix multiple CSS classes, toggling them individually or creating compound styles:

The hero cards will be highlighted for heroes who can fly and have a different style for heroes who cannot, based on the canFly property.

Best practice: Using types with the HttpClient

Here is an example of code I see way too often when people submit their code to our Angular certification exam:

While I could almost live with the above code, the following example makes me angry (especially because I tell people NOT to do that in bold uppercase characters in my instructions):

What’s the problem with that code? It uses any, and any is dangerous. It isn’t good because it turns off type safety. It makes your code less safe; it removes type information, it makes it less maintainable. It’s excruciating when we know that the HttpClient is nice enough to let us specify the type of the data we’re going to get as a response:

Of course, this type of information does not guarantee that the server is going to return data of that shape, so we have to make sure the server is indeed returning that exact type of data.

But the thing is, once you add that type to your HTTP request, you can (should I say, you must) do the following:

And this is important because when you subscribe to that Observable, Typescript knows what kind of data you receive:

And that is why we use Typescript. Using the above syntax enables autocomplete in your IDE; it brings type safety so you can’t make typos. There are only benefits to using it.

One more async pipe syntax trick

We’ve covered a few different async pipe syntax tricks earlier in this newsletter, as well as why it’s important to use the async pipe to automate your subscriptions/unsubcriptions from Observables.

Today, let’s see another interesting syntax that can be very helpful when a template has multiple subscriptions, such as:

Even if using ng-container, as we saw earlier this week, is helpful, it would be even better to have just one place where both subscriptions happen.

We can simplify the above by creating a new object that has one property for each Observable value as follows:

That way, all our async subscriptions are in one place, and the rest of our HTML template is much more readable.

What is ng-container?

Yesterday, we covered ng-template and touched on different scenarios when it makes sense to use ng-template. Let’s now introduce a close relative of ng-template called ng-container.

There are a lot of similarities between those two elements, which can both be used to use structural directives such as ngIf or ngFor, with the bonus that ng-container can be used with the shorthand syntax of those directives:

One thing you probably noticed as an Angular developer is that we can’t use two structural directives on the same element:

In this scenario, using ng-container is the perfect way to use both directives without adding any HTML to the DOM, as ng-container, just like ng-template, doesn’t create new DOM elements:

Another use for ng-container is to become the host of a ng-template, similar to the way that a router-outlet is the host of routed components:

Such templates can be passed from a parent component using @Input and let the child component decide when to display which template, which is very powerful:

You can find a complete code example of such a feature in this Stackblitz and a more in-depth tutorial here if you want to try it.

Using services to cache data

Yesterday, we saw that services are singletons that are created once for all and stay in memory as long as the application is open.

This makes our services the best place to store data that can be shared between multiple different components. Such services can use BehaviorSubjects or Signals to cache that data and replay the last value automatically to any new subscriber (component, directive, pipe, service, etc.).

Here is an example using a signal to store a value and expose it in a read-only fashion:

This article compares BehaviorSubjects and Signals to cache a shareable value.

Lifecycle of Angular applications

The lifecycle of an Angular application is something that many aspiring Angular developers struggle with. People often ask me questions such as:

  • How long does this component/service/directive stay in memory?
  • How do I save the data before I navigate to the next page/view/component?
  • What happens if I open that same app in another browser tab?

Here is how to think about it:

  • When we open an app in a browser tab, we’re booting an Angular application in a self-contained memory space, similar to a virtual machine.
  • Closing that tab is equivalent to killing the application, freeing any memory associated with it, just like when you close a desktop app in your machine’s operating system.

In Google Chrome, there’s even a task manager where you can see the memory footprint and CPU usage of your tabs and browser extensions – they’re just like independent desktop apps:

From an Angular perspective, a component gets loaded in memory whenever displayed on the screen. That’s when its class is instantiated.

Suppose the component gets removed from the screen (by navigating to a different component or removing it with a ngIf directive, for instance). In that case, the component is destroyed, and all of its memory state is gone. The same goes for directives and pipes: They get created when used by a component template and destroyed when that component gets destroyed.

Services are different, though. A service is created by Angular when a component needs it for the first time. Then, that instance remains unique and shared between all components that inject such service. A service doesn’t get destroyed: It remains in memory as long as your app is open and you don’t close your browser or tab.

This answers our three initial questions:

  • How long does this component/service/directive stay in memory?
    Components stay as long as they’re in the DOM. Services stay as long as the app is open.
  • How do I save the data before I navigate to the next page/view/component?
    Not if you save it in a service
  • What happens if I open that same app in another browser tab?
    You create another separate instance of everything: Components, services, etc. Both instances are independent and do not share any data or memory space.

Using setters for better @Input

When using @Input in our components, we can implement ngOnChanges to be notified whenever an input value has changed:

The above code works and would run whenever id or name are updated by the parent component. The problem is that this syntax can quickly become heavy when there are several @Inputs in your component.

Instead, we can do this:

Instead of using @Input() on a class property, we can use it on an ES6 setter function. The benefit of the setter syntax is that it makes it obvious what kind of code we’re running when the @Input value is set. No more ngOnChanges needed.

Build size budgets

As mentioned earlier in this newsletter, the size of your Javascript matters a lot, as our code has to be downloaded first, then parsed and interpreted by a browser, which will get slower and slower as the size of your app increases. This is why we want optimized production builds. And this is also why it’s always a good idea to keep track of the size of your production code after each build.

Fortunately, the Angular team has our back and integrated build budgets in the Angular CLI. You can use those budget settings to decide when to get a warning or even fail a build it your code becomes too big. This configuration happens in angular.json:

The above (default) budgets would warn you if your Javascript exceeds 500Kb in size and fail once the build exceeds 1Mb. Those are already part of your projects, so you don’t have to do anything to use them.

If you do continuous integration, your build will fail right after the commit that degraded your bundle size, making it easy to troubleshoot and fix the issue.

Most of the time, dependencies are the culprits. I remember coaching a client who needed some Excel-like features in the browser, and their build exploded to over 25MB because of a massive monolithic Javascript Excel library. Thanks to the build error, we knew that this library wouldn’t work, so we chose a lighter one instead.

In the past, I’ve also inherited projects where I would track our build size version after version. My client was amazed to see that despite adding features, the build was getting smaller and smaller after each release, thanks to Angular always being better at tree-shaking and having the incentive to clean up old code and make it smaller. When you start tracking a metric, you want to improve it!

Angular style guide

People often ask me the best way to organize their files/folders. While it’s mostly a matter of personal preference or a team decision, the recommendations of the Angular style guide are always good to follow.

For instance, when it comes down to folders, here’s what the official style guide says (the highlight is mine, as I find this to be true for myself):

What’s great about the Angular style guide is that it always provides why such approaches are recommended. As you can see, the above justifications make perfect sense.

Also, while some recommendations are purely naming conventions, others touch on architecture decisions, such as talking to the server through a service or using directives to enhance an element (somewhat similar to my earlier call to think more about directives instead of components).