This is one of the most common mistakes I see with my training/consulting clients. When deploying code to production, they would use the command: ng build.
Instead, you want to use: ng build --configuration=production
Why is that? Because a production build is optimized in several ways:
- The code gets minified and obfuscated, which means it looks like this when running in a browser:
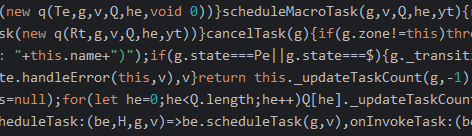
This code is as lightweight as possible (no tabs, whitespace, new line characters, variables have super short names, etc.) and a lot more challenging to understand (a hacker would have a harder time understanding your code).
2. The code gets tree-shaked. Angular removes unused dependencies and dead code and makes your build output as tiny as possible. Size matters on the web: The less code you ship to a browser, the faster it gets downloaded, parsed, and interpreted (which is also why Angular gives us lazy-loading capabilities)
3. Source maps are not generated in that same spirit of hiding what our source code looks like.
4. Angular DevTools are disabled on that code, again for obfuscation and reverse-engineering purposes.
If you’re still not convinced after reading all of this, give it a try on your Angular projects. The size of your dist folder after a production build should be at least 90 to 95% smaller compared to a regular build, which is massive.