Build size budgets

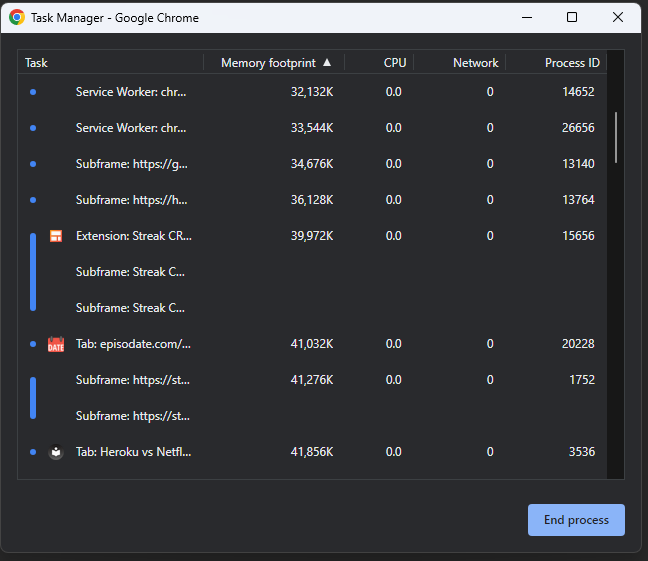
As mentioned earlier in this newsletter, the size of your Javascript matters a lot, as our code has to be downloaded first, then parsed and interpreted by a browser, which will get slower and slower as the size of your app increases. This is why we want optimized production builds. And this is also why it’s always a good idea to keep track of the size of your production code after each build.

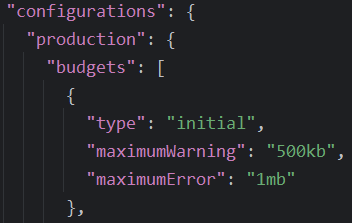
Fortunately, the Angular team has our back and integrated build budgets in the Angular CLI. You can use those budget settings to decide when to get a warning or even fail a build it your code becomes too big. This configuration happens in angular.json:

The above (default) budgets would warn you if your Javascript exceeds 500Kb in size and fail once the build exceeds 1Mb. Those are already part of your projects, so you don’t have to do anything to use them.

If you do continuous integration, your build would fail right after the commit that degraded your bundle size, making it easy to troubleshoot and fix the issue.

Most of the time, dependencies are the culprit. I remember coaching a client that needed some Excel-like features in the browser, and their build exploded to over 25MB because of a massive monolithic Javascript Excel library… Thanks to the build error, we knew that this library wouldn’t work so we chose a lighter one instead.

In the past, I’ve also inherited projects where I would track our build size version after version. My client was amazed to see that despite adding features, the build was getting smaller and smaller after each release, thanks to Angular always being better at tree-shaking and having the incentive to clean up old code and make it smaller. When you start tracking a metric, you want to improve it!

ngFor trackBy for improved performance

We all use the ngFor directive on a daily basis. The directive is used to repeat a template as many times as needed based on an array of data we want to render. We covered how the directive exposes useful local variables in the past.

To help Angular perform DOM updates when items in the array are reordered, new items are added, or existing items are removed, we can add a trackBy attribute that specifies what unicity criteria Angular will use to track these additions/removals/reorderings:

Of course, this only helps if the array in question is subject to changes in the future. By default, Angular uses Object.is() to compare values in the array, which is somewhat similar to a === comparison.

In our case, we created a function that specifies how to track by _id:

That way, Angular will know how to compare objects efficiently and won’t perform DOM updates that aren’t needed, which can be a huge performance boost if you’re displaying a massive data table with thousands of records. You can see this example in action on Stackblitz here.

Lazy-loading with defer (new RFC)

We’ve talked about lazy loading and performance a few times in this newsletter. The Angular team is working on a new feature that will expand the scope and flexibility of lazy-loading in Angular using a new primitive with a syntax similar to the one introduced in the control flow RFC:

The above code would lazy-load the calendar component whenever that block is rendered in a template. And it gets better: We can also add conditions on when to render, how much time to wait before doing so, or even a combination of several predefined conditions/triggers:

The above code means that the calendar component would be loaded if the user interacts with the page or after 5 seconds.

We will be able to provide a placeholder and a loading template, too – those would be displayed before and during lazy-loading, respectively:

This new defer block is in the request for comments (RFC) phase, which means the Angular team is gathering feedback from all of us on this idea. There is no timeline yet as to when the feature will be available. Feel free to add your thoughts and contribute here. The more excitement is shown on Github, the higher the Angular team will prioritize the feature.

How to improve performance with pure pipes

Earlier in this newsletter, we saw that calling a method in a component template is an anti-pattern. The antidote to that anti-pattern is to use a pure pipe.

By default, all pipes we use in Angular are pure. Custom pipes are also pure by default. The only way to make a pipe impure is to add the config option pure: false to its decorator:

What is a pure pipe?

A pure pipe is one that Angular will execute only when there is a pure change to its input value. It is automatically optimized for performance since it is executed only when needed.

A pure change is either a change to a primitive input value (such as string, number, or boolean), or a changed object reference (such as Date, Array, or Object).

In other words, if we consider the following use case:

Here are some examples of pure and impure changes in variables:

With all that information, we are now equipped to call a formatting function in a template by using a pipe (said function would be called in the transform method of the pipe). We know that the function would run only when the input value changes (purely), which allows us to decide when we want that pipe to be executed again by making either a pure or an impure change to the input value.

Finally, we can double-check that our pipe is working as expected using the Angular profiler to make sure that the pipe doesn’t run more often than expected.

How to create a copy of anything in Javascript?

Modern Javascript developers are used to the following syntax to create a copy of an object:

let copy = {...object};Code language: JavaScript (javascript)

While this approach works fine, it creates a shallow copy of the object, not a fully-fledged clone that also duplicates nested objects and arrays.

As a result, Javascript developers have learned another trick to perform a deep copy:

let copy = JSON.parse(JSON.stringify(object));Code language: JavaScript (javascript)

The idea of this approach is to turn an object into a JSON string before parsing that string back into a brand-new object. It works, but it’s not elegant and looks like a hack.

As a result, a better approach has been added to the Javascript language: the structuredClone function. It’s a syntax improvement that creates deep clones efficiently:

let copy = structuredClone(object);Code language: JavaScript (javascript)

The function is supported across all recent major browsers as shown on Can I use:

If you need to support another browser, there is a polyfill implementation in core.js.

Anti-pattern: Not using production builds to deploy production code

This is one of the most common mistakes I see with my training/consulting clients. When deploying code to production, they would use the command: ng build.

Instead, you want to use: ng build --configuration=production

Why is that? Because a production build is optimized in several ways:

  1. The code gets minified and obfuscated, which means it looks like this when running in a browser:

This code is as lightweight as possible (no tabs, whitespace, new line characters, variables have super short names, etc.) and a lot more challenging to understand (a hacker would have a harder time understanding your code).

2. The code gets tree-shaked. Angular removes unused dependencies and dead code and makes your build output as tiny as possible. Size matters on the web: The less code you ship to a browser, the faster it gets downloaded, parsed, and interpreted (which is also why Angular gives us lazy-loading capabilities)

3. Source maps are not generated in that same spirit of hiding what our source code looks like.

4. Angular DevTools are disabled on that code, again for obfuscation and reverse-engineering purposes.

If you’re still not convinced after reading all of this, give it a try on your Angular projects. The size of your dist folder after a production build should be at least 90 to 95% smaller compared to a regular build, which is massive.

Angular profiler for performance tuning

The Angular dev tools introduced in our previous newsletter include a second tab called Profiler:

The Profiler has a single record button. We can hit it, play with our application, then stop the recording. This turns the UI into a profiler view of what happened during the recording. In the example below, we can see how a click generated a change detection event that impacted several components:

As you can see in the above screenshot, every change detection event is tracked as a bar chart entry. The taller a bar is, the more time it takes to complete that cycle. We can explore which components and directives are impacted for each event and how long it took to re-render that component (in the above example, 0.1 ms).

When facing a performance issue, the Profiler is perfect for identifying the problem’s root cause. For instance, it could highlight that one component is much slower than the others and gets refreshed for no good reason, indicating that a different change detection strategy is needed.

The official documentation showcases all individual features of the Profiler one by one.

Image optimization directive – NgOptimizedImage

The Angular team has always focused on improving the framework by making everything faster, from the compiler to our runtime code that gets optimized, minified, and tree-shaked.

The Image optimization directive was added to Angular 15 in that same spirit.

What it does:

  • Intelligent lazy loading: Images invisible to the user on page load are loaded later when the user scrolls down to that page section.
  • Prioritization of critical images: Load the essential images first (header banner, for instance)
  • Optimized configuration for popular image tooling: If you’re using a CDN, the directive will automatically pick the proper image size from that CDN, optimizing download sizes based on how many pixels of that image will be displayed on the screen.
  • Built-in errors and warnings: Besides the above built-in optimizations, the directive also has built-in checks to ensure developers have followed the recommended best practices in the image markup.

All you have to do to get all these benefits is to use the ngSrc attribute instead of just src:

For CDN optimization, you can use one the 4 existing providers (or create your own) so that the proper image size is always requested. In my example, I use the Imgix CDN, so my config looks like this:

From that information alone, we can tell that Angular was able to generate the proper image URLs to fetch the smallest image possible to fit our div – no more downloading of a 2000 x 1000 pixels image if all you need is 200 x 100:

The NgOptimizedImage directive is part of the @angular/common module, just like ngFor and ngIf, so it’s already part of your toolkit if you use those directives.

It can also be used as a standalone directive without importing CommonModule. My example is on Stackblitz here. The official documentation and more information about that directive can be found here.

Lazy-loading standalone components

Now that we’ve covered both standalone components and lazy-loading Angular modules, we can introduce the concept of lazy-loading a standalone component, which wasn’t possible before Angular 14.

From a syntax standpoint, the only difference is that we use loadComponent instead of loadChildren. Everything else remains the same in terms of route configuration:

Now, one of the benefits of lazy-loading a module is that it can have its own routing config, thus lazy-loading multiple components for different routes at once.

The good news is that we can also lazy-load multiple standalone components. All it takes is creating a specific routing file that we point loadChildren to, like so:

One last cool thing to share today: Along with the above syntax, Angular now supports default exports in Typescript with both loadChildren and loadComponent.

This means that the previous verbose syntax:

loadComponent: () => import('./admin/panel.component').then(mod => mod.AdminPanelComponent)},

Can now become:

loadComponent: () => import('./admin/panel.component')

This works if that component is the default export in its file, meaning that the class declaration looks like this:

export default class PanelComponent

The same applies to loadChildren if the array of routes (or NgModule) is the default export in its file. You can see an example in Stackblitz here.

Lazy-loading for better Angular performance

Before we continue our series on standalone components, it is important to talk about the most important tool at our disposal to create more performant Angular applications: Lazy-loading.

When we use lazy-loading, instead of building our application as one single bundle of code that gets downloaded as soon as our user accesses the app in a browser, we divide our code into several different pieces that get downloaded on-demand when they are needed.

For instance, without lazy-loading, if our application is 25 MB big in terms of Javascript code, a browser has to download, then parse, and run those 25 MB of code, which can slow things down a lot on mobile devices or slower internet connections.

Instead, we can divide our application into different modules containing components, pipes, directives, and services. In our example, let’s assume we create an AdminModule that includes all of the features needed for the Admin section of the application. If this module ends up containing 10 MB of code and we use lazy-loading with it, then the initial bundle of the application is down from 25 MB to 15 MB, which is a big difference.

Only Admin users would ever have to download the 10 MB of code for the admin section, which is great for both performance and safety (hackers can’t reverse-engineer code that has never been downloaded in their browser).

The best part of lazy-loading is that a single line of code initiates it in our router config:

The above line will get the Angular compiler to automatically create a bundle of code for AdminModule and enable lazy-loading of that code when /items is accessed. That’s it!