Image optimization directive – NgOptimizedImage

The Angular team has always focused on improving the framework by making everything faster, from the compiler to our runtime code that gets optimized, minified, and tree-shaked.

The Image optimization directive was added to Angular 15 in that same spirit.

What it does:

  • Intelligent lazy loading: Images invisible to the user on page load are loaded later when the user scrolls down to that page section.
  • Prioritization of critical images: Load the essential images first (header banner, for instance)
  • Optimized configuration for popular image tooling: If you’re using a CDN, the directive will automatically pick the proper image size from that CDN, optimizing download sizes based on how many pixels of that image will be displayed on the screen.
  • Built-in errors and warnings: Besides the above built-in optimizations, the directive also has built-in checks to ensure developers have followed the recommended best practices in the image markup.

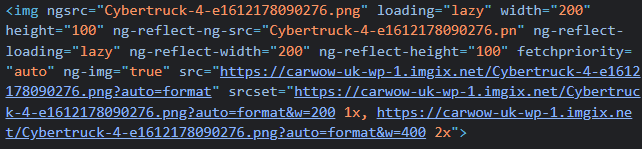
All you have to do to get all these benefits is to use the ngSrc attribute instead of just src:

For CDN optimization, you can use one the 4 existing providers (or create your own) so that the proper image size is always requested. In my example, I use the Imgix CDN, so my config looks like this:

From that information alone, we can tell that Angular was able to generate the proper image URLs to fetch the smallest image possible to fit our div – no more downloading of a 2000 x 1000 pixels image if all you need is 200 x 100:

The NgOptimizedImage directive is part of the @angular/common module, just like ngFor and ngIf, so it’s already part of your toolkit if you use those directives.

It can also be used as a standalone directive without importing CommonModule. My example is on Stackblitz here. The official documentation and more information about that directive can be found here.

Lazy-loading standalone components

Now that we’ve covered both standalone components and lazy-loading Angular modules, we can introduce the concept of lazy-loading a standalone component, which wasn’t possible before Angular 14.

From a syntax standpoint, the only difference is that we use loadComponent instead of loadChildren. Everything else remains the same in terms of route configuration:

Now, one of the benefits of lazy-loading a module is that it can have its own routing config, thus lazy-loading multiple components for different routes at once.

The good news is that we can also lazy-load multiple standalone components. All it takes is creating a specific routing file that we point loadChildren to, like so:

One last cool thing to share today: Along with the above syntax, Angular now supports default exports in Typescript with both loadChildren and loadComponent.

This means that the previous verbose syntax:

loadComponent: () => import('./admin/panel.component').then(mod => mod.AdminPanelComponent)},

Can now become:

loadComponent: () => import('./admin/panel.component')

This works if that component is the default export in its file, meaning that the class declaration looks like this:

export default class PanelComponent

The same applies to loadChildren if the array of routes (or NgModule) is the default export in its file. You can see an example in Stackblitz here.

Lazy-loading for better Angular performance

Before we continue our series on standalone components, it is important to talk about the most important tool at our disposal to create more performant Angular applications: Lazy-loading.

When we use lazy-loading, instead of building our application as one single bundle of code that gets downloaded as soon as our user accesses the app in a browser, we divide our code into several different pieces that get downloaded on-demand when they are needed.

For instance, without lazy-loading, if our application is 25 MB big in terms of Javascript code, a browser has to download, then parse, and run those 25 MB of code, which can slow things down a lot on mobile devices or slower internet connections.

Instead, we can divide our application into different modules containing components, pipes, directives, and services. In our example, let’s assume we create an AdminModule that includes all of the features needed for the Admin section of the application. If this module ends up containing 10 MB of code and we use lazy-loading with it, then the initial bundle of the application is down from 25 MB to 15 MB, which is a big difference.

Only Admin users would ever have to download the 10 MB of code for the admin section, which is great for both performance and safety (hackers can’t reverse-engineer code that has never been downloaded in their browser).

The best part of lazy-loading is that a single line of code initiates it in our router config:

The above line will get the Angular compiler to automatically create a bundle of code for AdminModule and enable lazy-loading of that code when /items is accessed. That’s it!

Union types in TypeScript

Yesterday, we talked about any, unknown, and the pros and cons of using such types.

Today, let’s focus on union types, an alternative to enums that are more performant and flexible to describe custom types. Let’s assume we need to support different currencies in our application. Since currencies are mostly a code/symbol, we could take the easy route and do the following:

But this doesn’t help us much. For example, is any string a valid currency? Definitely not. So a better option would be to create an enum for it and describe all possible values in it:

Now we have a proper type to describe what a Currency is. But enums aren’t that convenient because they can’t be used as-is in an Angular component template, requiring some workarounds. Also, they get compiled into a monster structure of JavaScript that increases the size of your code bundle for no valid reason since we don’t have type-checking at runtime in the browser.

Enter union types

Union types solve all these problems. They’re lightweight and do not get compiled into anything at all, which means they’re always more performant than enums (less code to download + less code to interpret = faster app in the browser). They guarantee type safety and can be made out of anything, including strings:

A lot more can be done with union types, such as having more options than just one single type for a given variable:

Angular uses union types a lot. For instance, if you’ve ever used the canActivate router guard, its signature supports up to 6 different return types, all defined with union types:

And we can have unions of union types when more granularity is needed with specific sub-types: